Hello friends! This is Design Team member Crystal Komara here with you today. If there is one thing I love when it comes to cardmaking, it’s the alcohol. Ink, that is! ; ) Initially I never thought I would have enjoyed working with alcohol inks as much as I have because, well. . . they’re messy. They stain. They are a tad unpredictable in outcome and all that just terrifies me. Yet, somehow I learned to love them and now can’t feature them enough on my cards.
Card details:
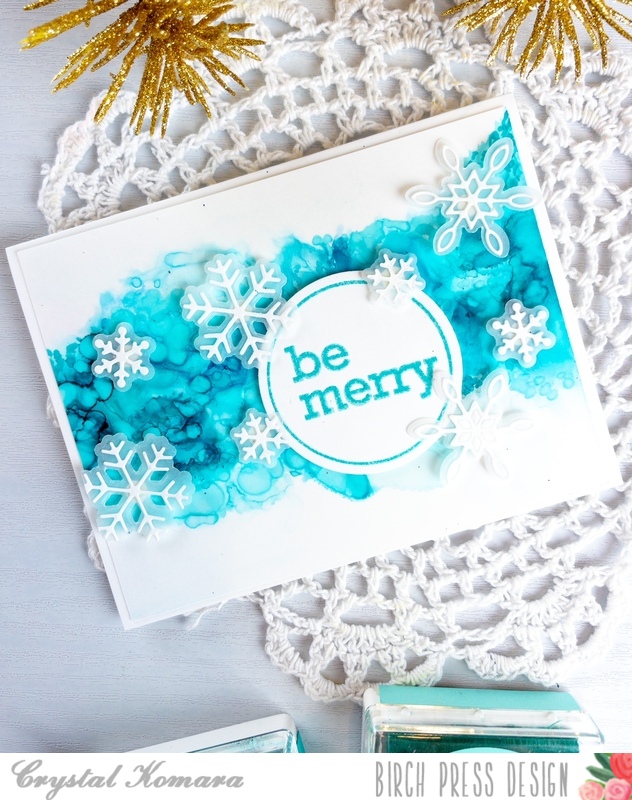
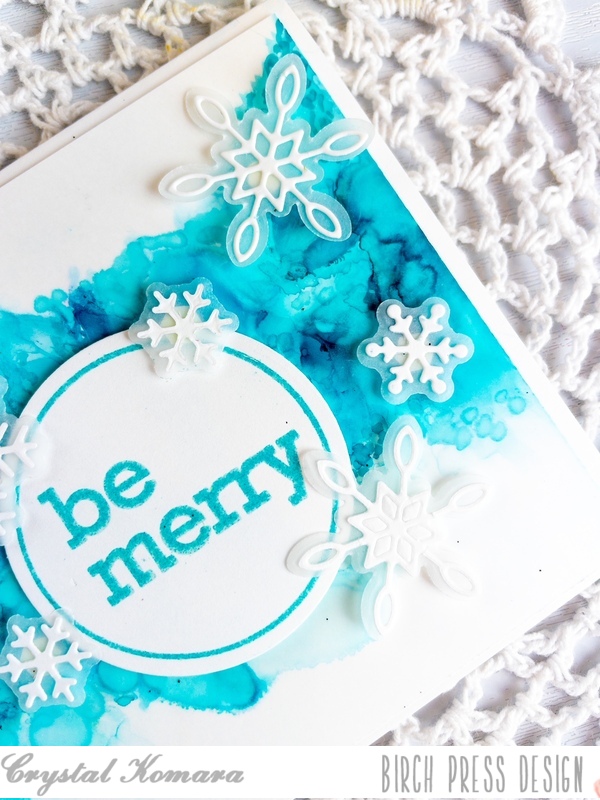
The base of this A2 sized card is made from 80 lb. Neenah Solar White Smooth cardstock. I cut a 5 1/4″ x 4″ piece of Yupo (polysynthetic paper) and “ink blew” Ranger Adirondack alcohol ink in the color Stream over the Yupo paper. That’s it, just one ink color was all I used! As it moves around and dries, you get puddles of ink that look like other darker and lighter colors, but I assure you, I used just one color. Nice and easy!
Using the Felicity Snowflakes dies, I cut the outer layer from vellum cardstock and the top thinner layer from white cardstock. I adhered the two layers together with liquid adhesive and then I adhered the snowflakes to the card with a small pop dot (which you can actually see through the vellum, it’s too hard to hide).
Using the Contempo Christmas Greetings stamp set and coordinating die, I stamped the sentiment in Versamark ink on white cardstock and heat embossed it with turquoise embossing powder. I used the coordinating circle die to cut out the sentiment. I adhered the sentiment to the card with Scotch 3M foam adhesive for added dimension.
Now that I think about it, you could make this same card in ANY color! Red or green alcohol ink would be very traditional, but I’m also thinking pinks and purples for a pop of pizazz too!
Thanks for visiting and have a wonderfully creative day!
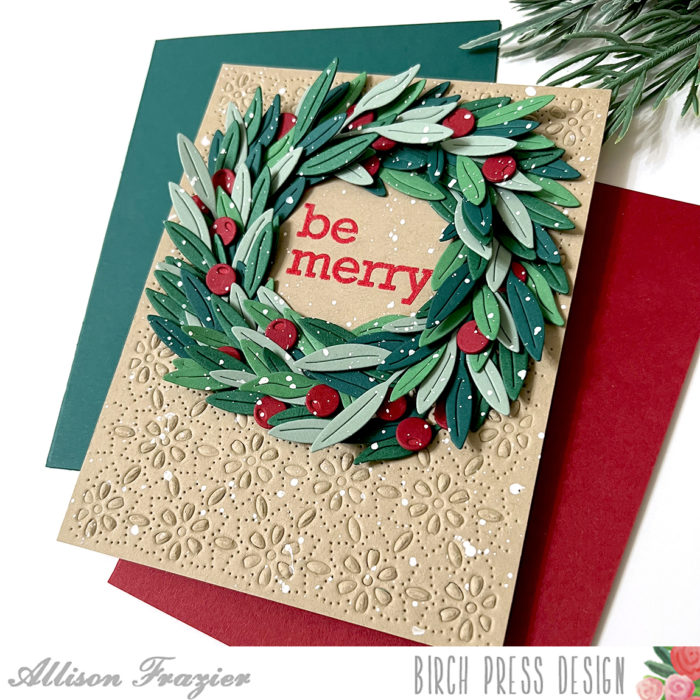
Hello, Birch Press friends. Happy November! The holidays are getting closer and closer, and there is no better time to start making those holiday cards. Of course, I love making them all year round. The most recent release is full of holiday fun. But I wanted to show you how to use some non-holiday products and turn them into a festive card.
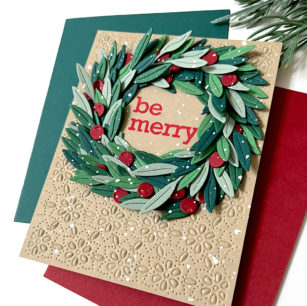
I started my card by dry embossing Layer C of the Flora Plate die set onto the front of a Kraft A2 card base. This is one of my favorite ways to create unexpected texture for a background. I then looked through my collection of Contour Layers die sets for the perfect leaf to create a wreath with. There are many floral sets with great options, but I chose the leaf from the Tiny Tuft Flowers set.
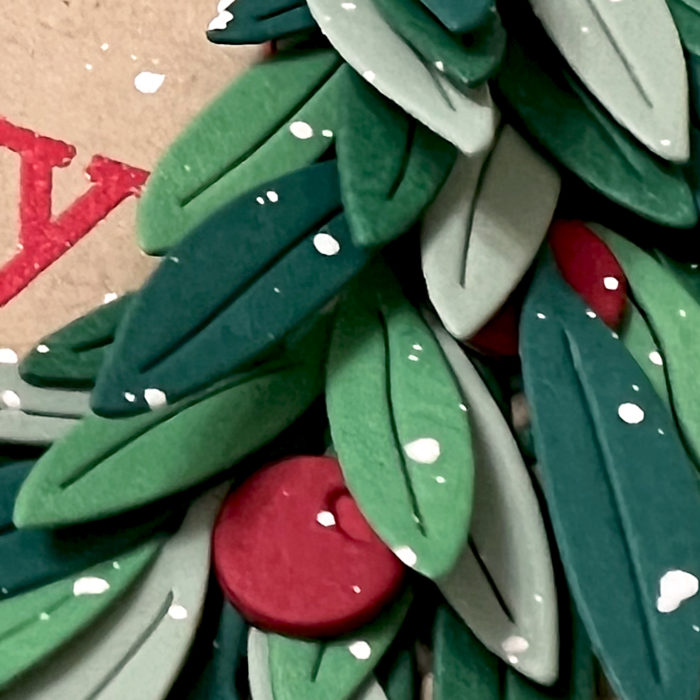
I chose four different colors of green card stock and die cut a bunch of leaves. I then began arranging them in a circle to get an idea of placement and size. I originally was going to use a word die for a sentiment, but I decided to use the round “be merry” stamp for the center of the wreath. I heat embossed it onto Kraft card stock with red embossing powder and cut it out with the matching circle die. I adhered it to the card panel, and this gave me the center point to build my wreath around.
There are three sets of leaves that are attached to branches, and I started by glueing the full elements down to form the wreath shape. As my wreath got more full, I would snip individual leaves off to fill in as needed.
For the berries, I used the Eucalyptus Stem and Berries die set, which is now retired. Again, these berries come attached to a branch (I believe there are seven berries on the branch), but I cut them into smaller bunches or even single berries as needed. When I was finished, I splattered the entire card with some white acrylic paint, making sure to cover the stamped sentiment with some washi tape first.
Thank you so much for joining us today. I hope this card inspires you and brings a smile to your face!
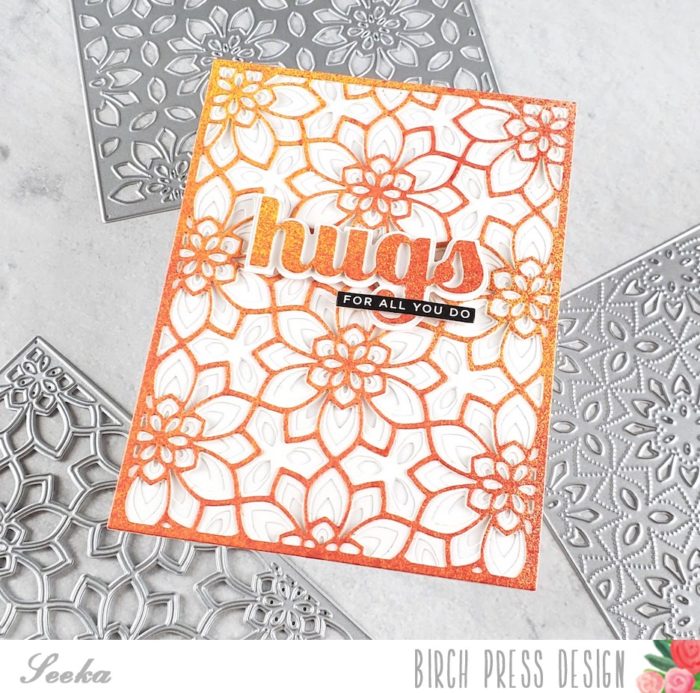
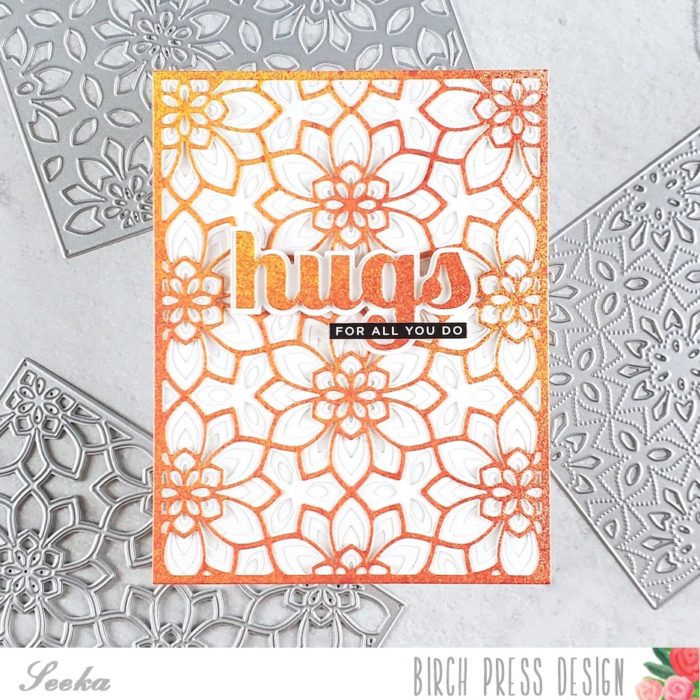
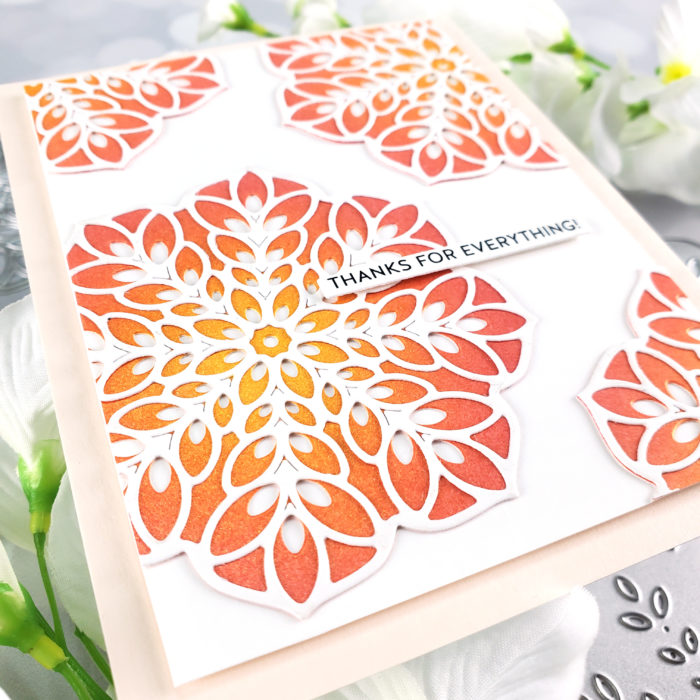
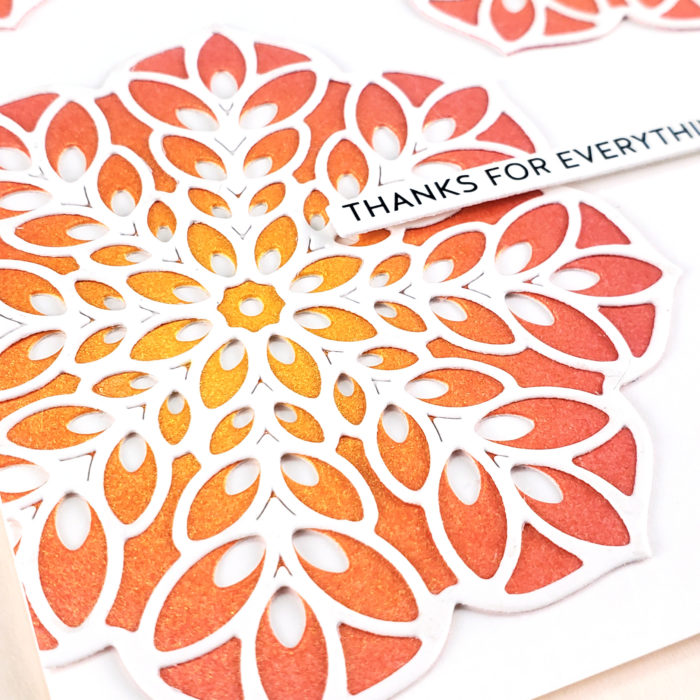
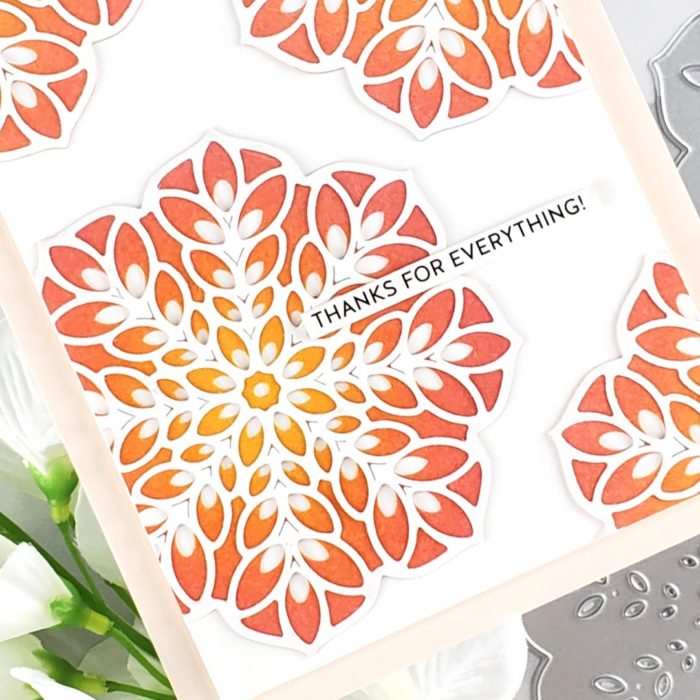
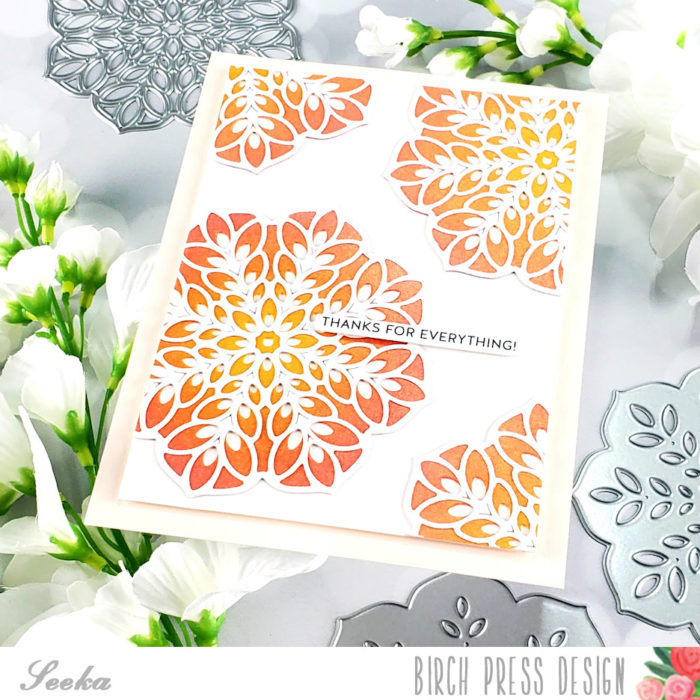
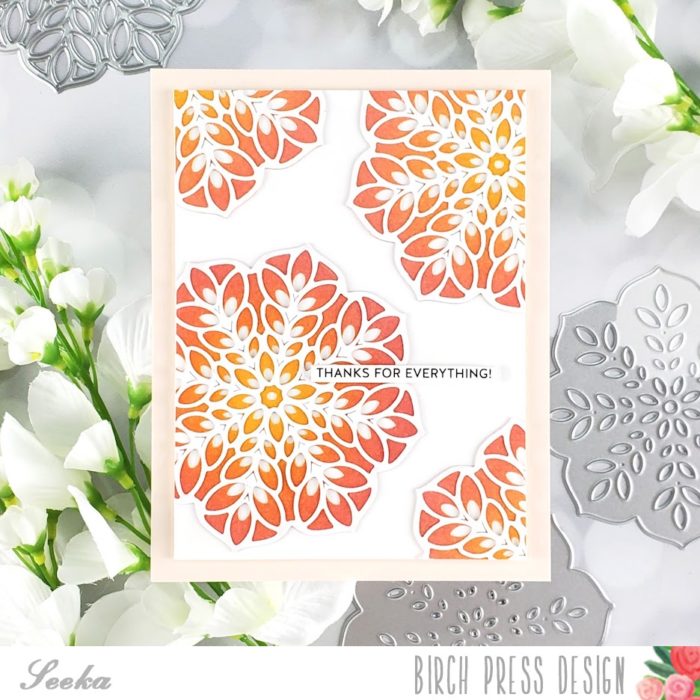
Hello and welcome! Seeka here and today I have a card featuring fall colors and the Viola Plate die set.
I started by spraying a piece of heavy white cardstock with red, orange, and yellow Dylusions ink sprays. When the cardstock was dry, I cut it with the Viola Plate layer A die. Then I used the layer B and C dies to cut regular weight white cardstock. I glued the layers together and then glued the combined piece to a card base.
Next, I cut the sentiment layer of the Big Hugs Sugar Script die set from a leftover piece of sprayed cardstock. I glued the sentiment to the shadow layer, cut from white cardstock, and then used foam tape to adhere the sentiment to the card front. To finish, I added a small sentiment from my stash.
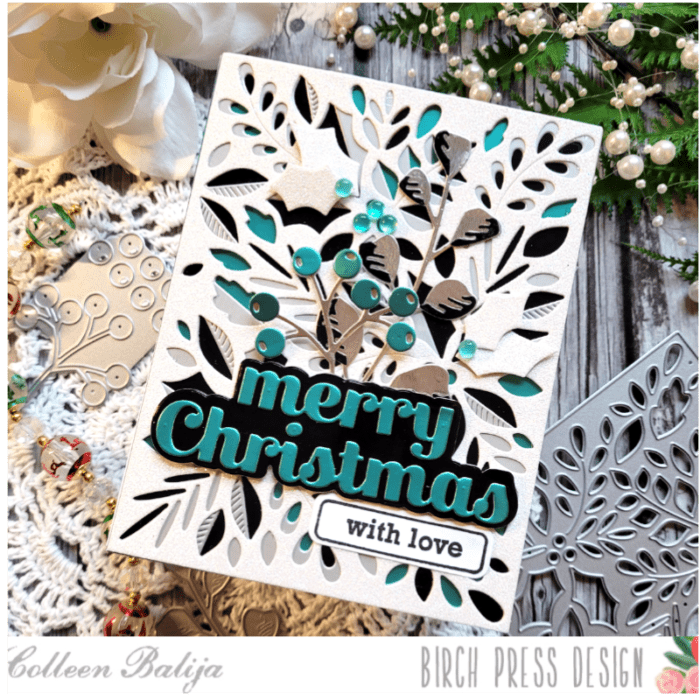
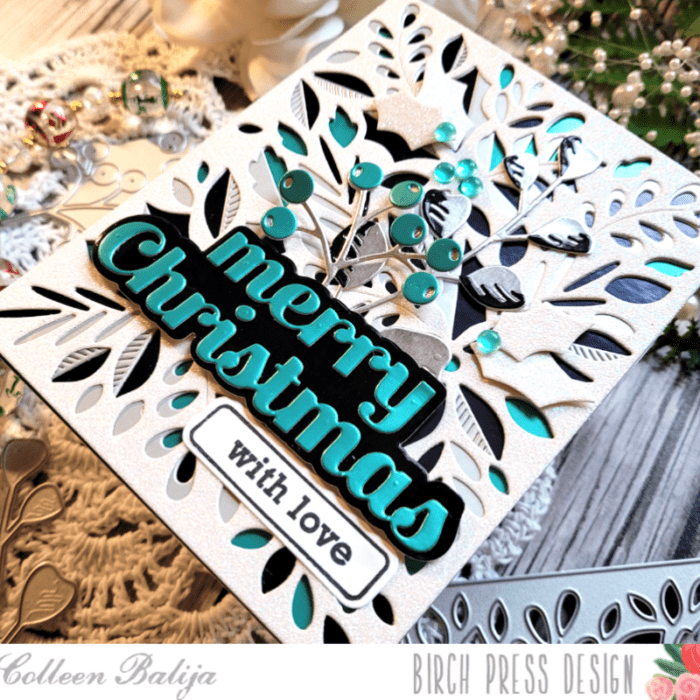
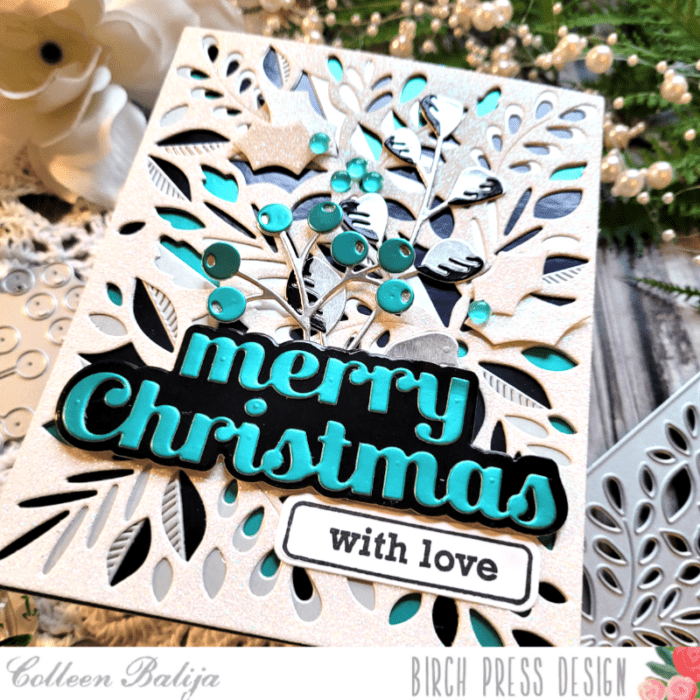
Today I want to share a non-traditional holiday card! I am a big fan of testing the waters on unique color schemes for my holiday cards. I think they keep things fresh and interesting! Let’s get started with today’s card, called Merry Christmas with Love!
First step was to choose the colors for this holiday card. I wanted to use a lot of black and white with just a touch of bold color, so I chose a shade of teal green. Now, green is a holiday color, but teal green is a bit different than the traditional Forest or Mistletoe green! NOTE: You could also go with shades of pink or yellow or purple! Choose a color that you love, and your card will be amazing!
Once my colors were selected, I chose my Birch Press Design elements, which were Herbarium Layering Plates, Contempo Christmas Greetings stamp and coordinating die, Merry Christmas Sugar Script die, and Memory Box Vintage Pastel paper. I wanted foliage on this card, so I also chose Eucalyptus Stem and Berries Contour dies! These foliage dies will be perfect on holiday cards!
With my colors and design elements chosen, I started on the background piece. the background here is also a focal point, so I wanted it to pop! I chose black, teal green, and a shimmery white for the layers of the Herbarium Layering Plates. I die cut each layer and adhered them together using liquid glue, going from darkest color to lightest on top. I just love how that black and teal green shine through all the layers! Once my background was finished, I set it aside and started on my sentiment and foliage.
I wanted the sentiment and foliage to be in the same colors as the background. This way everything is cohesive and is easy on the eyes! I die cut the Merry Christmas Sugar Script in black and teal green and adhered the 2 layers together. I also stamped a sentiment “with love” and adhered both to the lower third of the background card panel.
Next, I die cut the foliage from Eucalyptus Stem & Berries Contour set in silver, teal green, and black. I adhered the layers together and tucked them behind the Merry Christmas sentiment. I finished with embellishments in teal green.
I love how the colors blend beautifully together to create a lovely and unique Christmas card! This card has the holiday shine and shimmer, but the colors are unique and will stand out to your recipients! Thanks for stopping by!
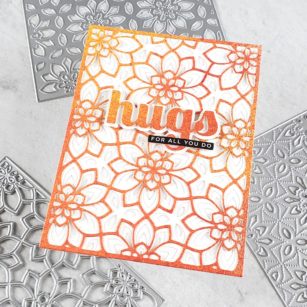
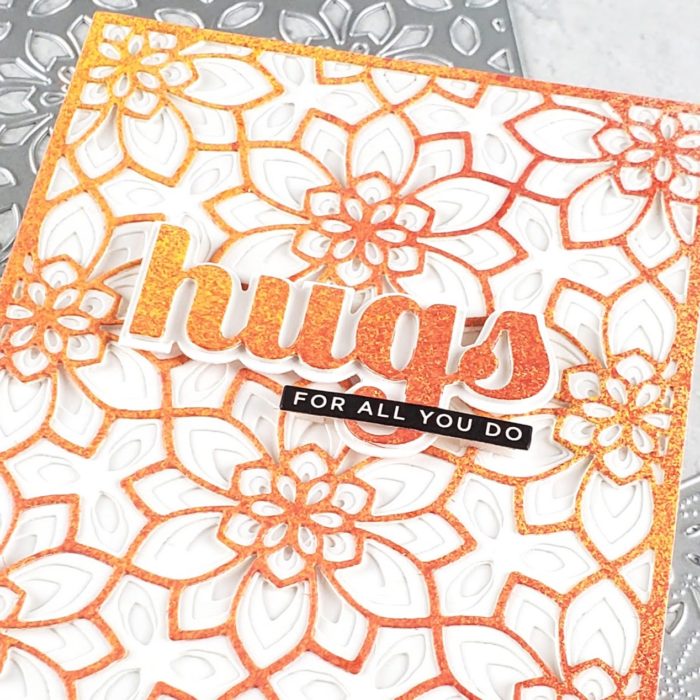
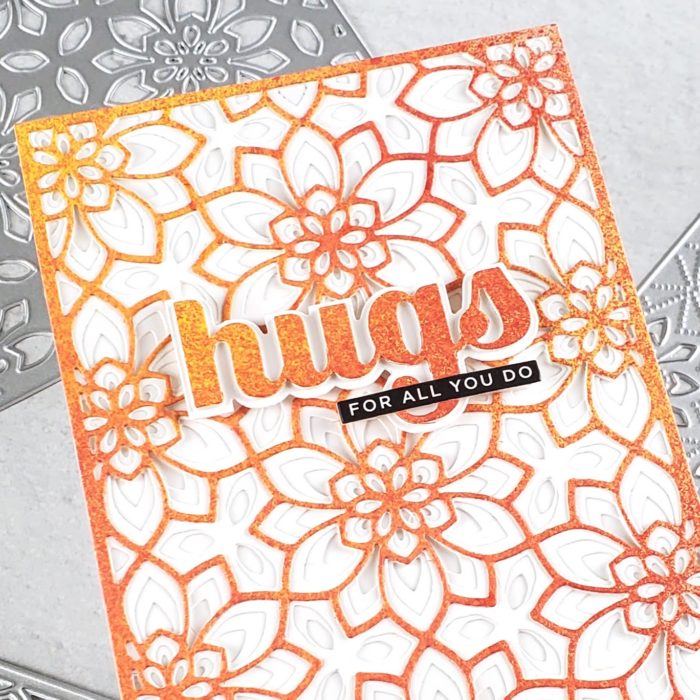
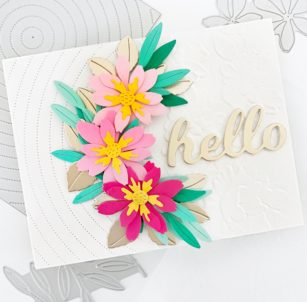
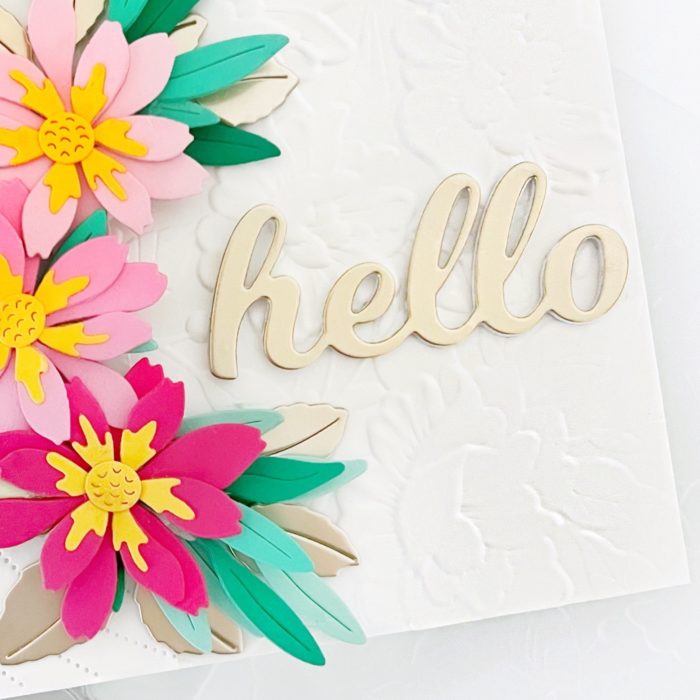
Happy Friday, crafty friends! Dee here today sharing this fresh floral card featuring the Star Flowers Contour Layers dies combined with a few other favorites!
First, I created the background by die cutting the Pinpoint Radial Plate die and cutting it in half. Next, I embossed an A2-sized card base with the Memory Box Blooming 3D Embossing Folder, then adhered the partial Pinpoint background on top.
Next, I cut the Star Flower Contour Layer dies twice in three shades of pink cardstock and die cut the centers in yellow cardstock, then adhered them together. I die cut leaves from the Dainty Rose and Leaves and Tiny Tuft Flowers and Leaves die sets in different shades of teal, and metallic cardstock, then adhered them, tucked in, behind the flowers.
To finish, I cut the hello from the Hello Topper in the same metallic cardstock and adhered it over the top. Thanks so much for joining me today!
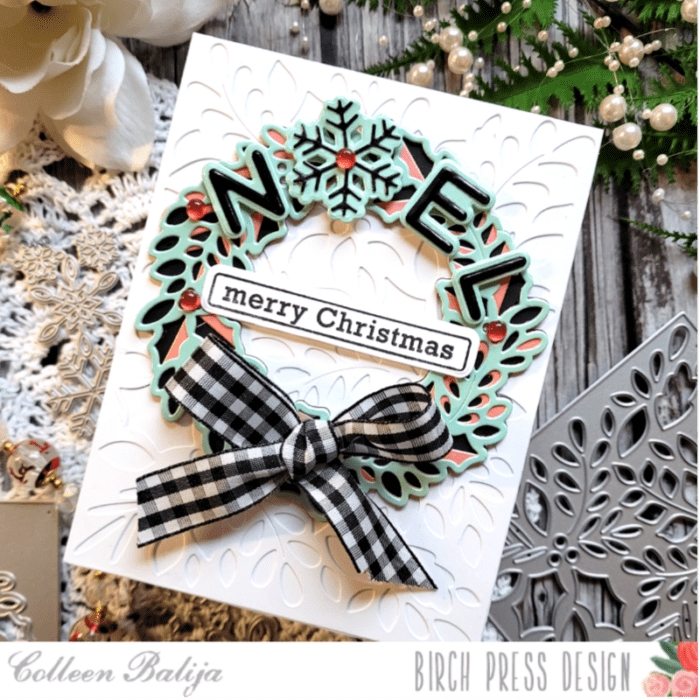
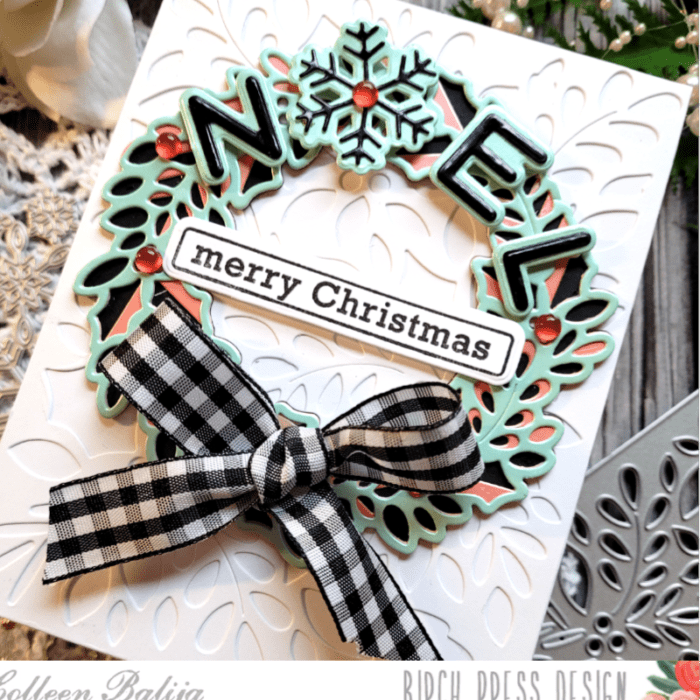
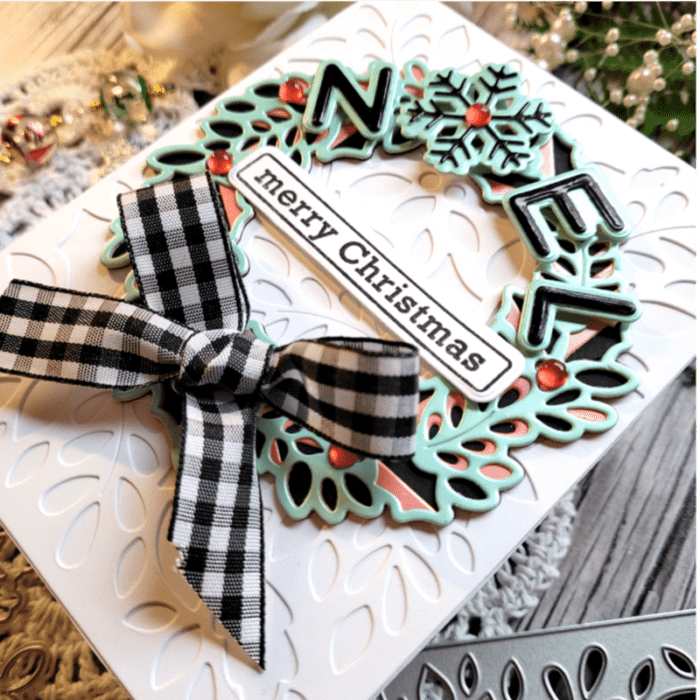
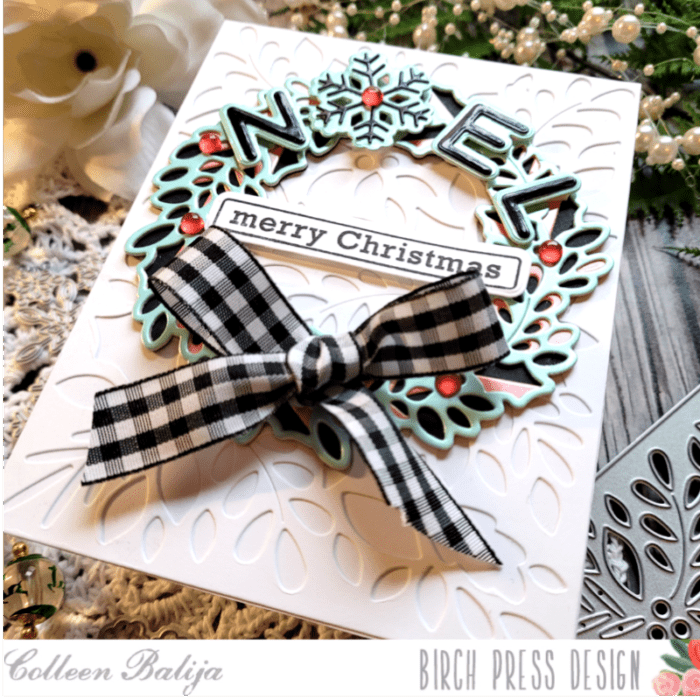
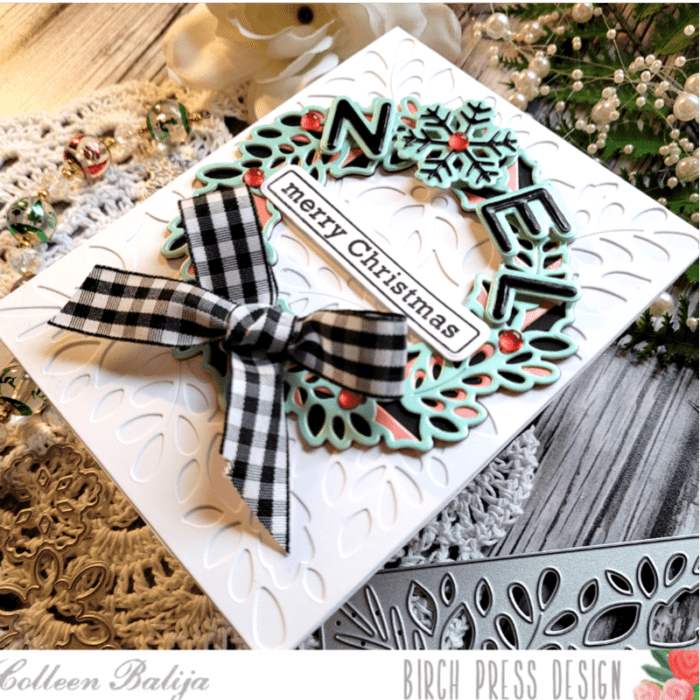
Hi everyone, this is my first blog post with Birch Press Designs, and I just couldn’t be any more excited! I hope that you will enjoy my cards and find inspiration to create your own version! This card reminds me of A Country Christmas with the ever-so popular black and white gingham and pastel colors. Let’s get started on how I was inspired to create this holiday delight!
The first step was to choose my colors. I always choose colors first because it inspires the rest of the card when I take this first step. Recently I was shopping at a craft store and saw beautiful holiday table wear in black and white. I took a picture of it so that I would remember to use those colors on my next card, which turns out to be this one!
Once my colors were selected, I chose my Birch Press Design elements to use, which were the Herbarium Layering Plates (A only) and the Holly Wreath Layering Plates. Since most of the card was going to be in black and white, I wanted the wreath to pop with a bit of color, so I used pastel shades of green, coral, and black from the Memory Box Vintage Pastel patterned paper pack. I also grabbed a black and white gingham ribbon that I had on hand and a few embellishments. Now that I had inspiration and all my design elements ready, it was time to put everything together!
Step one was to create the background. Starting with a 5.5×4.25 white card panel, I die cut Layer A from Herbarium Layering Plates, punched out the positive pieces, and adhered it using liquid glue to a 5.5×4.25 white card base. NOTE: I use liquid glue because it gives me a little wiggle room to place my design element where I want it before it adheres permanently! When my background was finished, I set it aside to work on the wreath.
Next step was to die the 3 layers from Holly Wreath Layering Plates using the pastel paper I had set aside earlier. The darkest color (black) was the bottom layer. I find that going from dark to light helps to add dimension because the darkest colors look furthest away from your eyes. When I was finished die cutting all 3 layers, I placed the die cuts over the images on the packaging to guide me in aligning all the layers properly. And once again, I used liquid glue to help me adhere each layer perfectly! Then I glued my finished holly wreath over the background panel I created earlier.
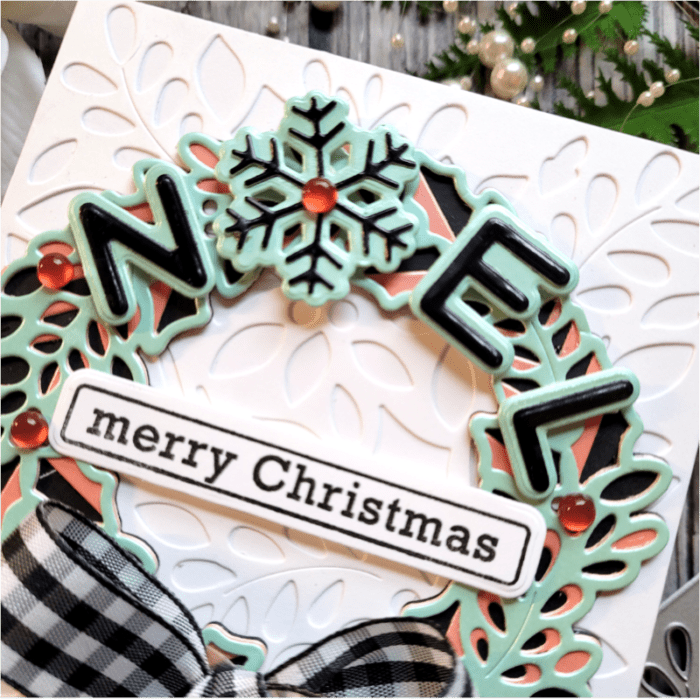
Next, it was time to work on my sentiment. As you can see in the photo below, the word “Noel” is placed over the wreath! There’s a secret to helping these little guys stand out from the wreath – read on to find out!
Using Mod Alphabet die set and Felicity Snowflake, I die cut the word Noel, minus the ‘o’, in black and pastel green. I did the same for one of the larger and rounder snowflakes. I adhered foam tape onto the back of each letter and snowflake to help it stand out from the wreath, and then I adhered it to the top of the wreath. And by the way, that’s my secret to helping the sentiment pop off the page! Foam tape is a miracle worker because it lifts the image off the page. Going back to the sentiment, the snowflake replaced the letter ‘o’ because it looks like an ‘o’. These are the details that take your card from average to WOW!
Next, I added the Merry Christmas sentiment to the middle of the wreath using Contempo Christmas Greetings stamp and coordinating die set. I created a bow using the gingham black and white ribbon and adhered that to the bottom of the wreath, trimming the ends at an angle. I finished with embellishments that look like red berries!
This card was so much fun to create, and I just adore the black and white touches to it! Black and white is a color combo that can never go wrong. Start with that and then add your pop of color to your own card! Thanks so much for joining me today!
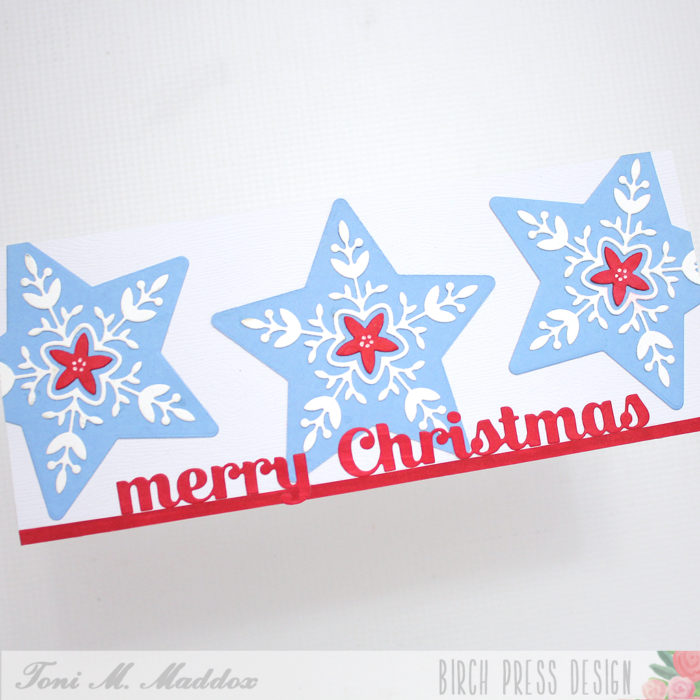
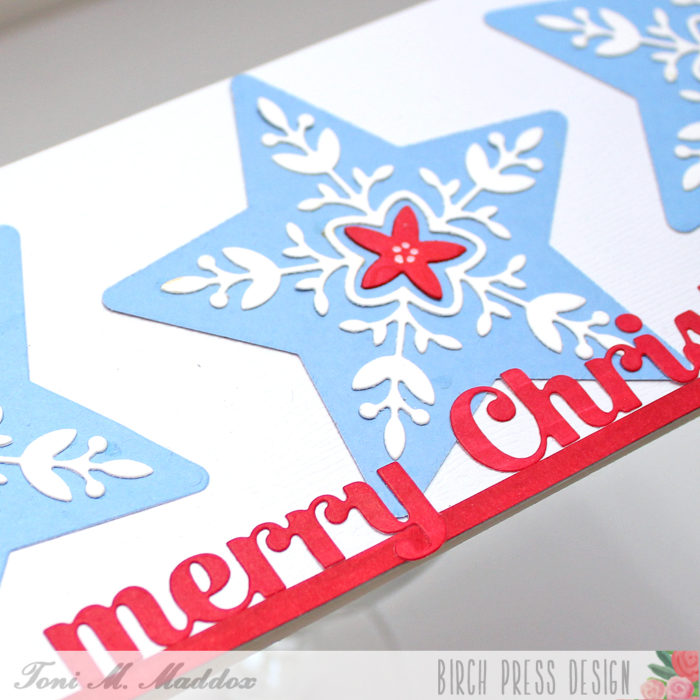
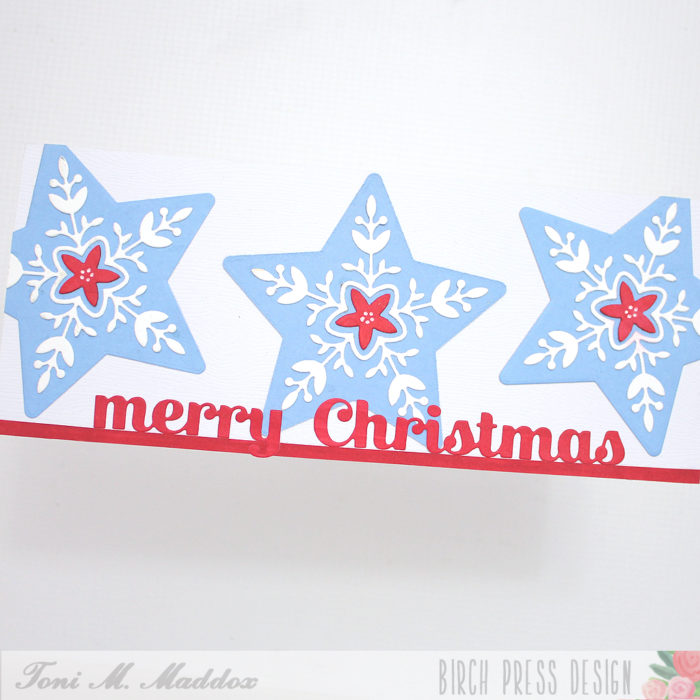
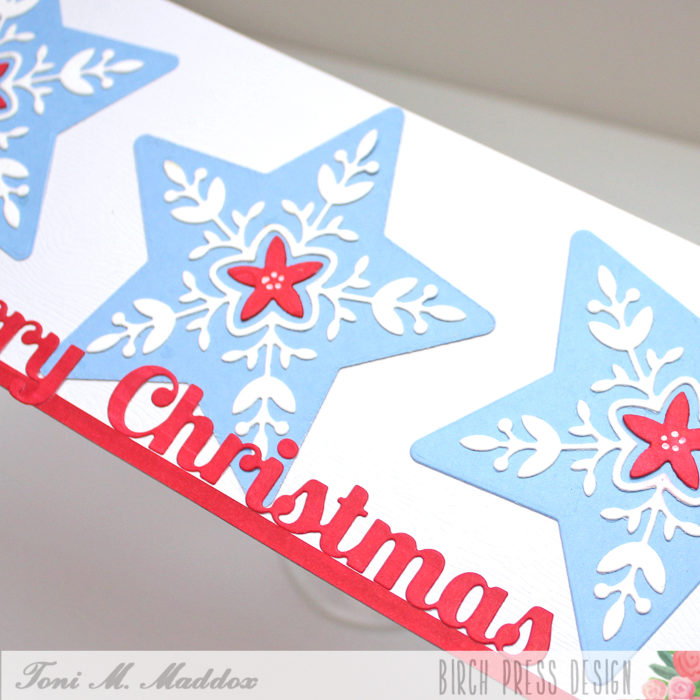
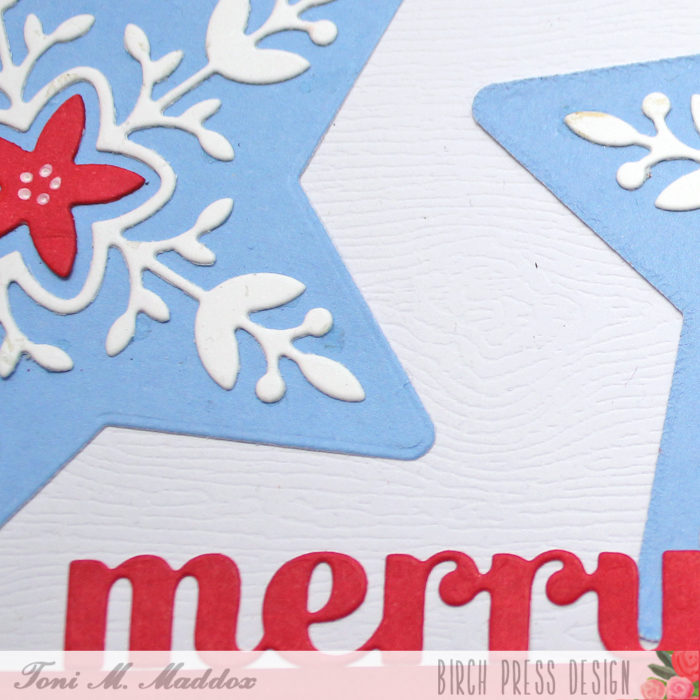
Hello, everyone! Toni here with you today sharing a holiday card inspired by Scandinavian designs I’ve seen here and there.
I cut out the BPD Piped Icing Star from white and Memory Box Ocean Blue 6×6 cardstock. I cut the floral centers from scrap red cardstock and added white pigment pen dots.
I cut out a slimline card base from Memory Box Woodgrain Cardstock and mounted the stars on top.
I colored scrap cardstock using Copic R29 to match the star centers and cut the BPD Sugar Script Merry Christmas from it. I added a narrow strip to the bottom as well.
I hope you enjoyed today’s card and have a great rest of your week!
Hello and welcome! Seeka here and today I’m sharing a subtly shimmery card featuring the Delight Layer die set.
I started off by using a foam blending tool to blend Picked Raspberry, Saltwater Taffy, and Wild Honey Distress inks onto a panel of Bristol Smooth cardstock. I blended in a circle, concentrating Wild Honey in the center. Next, I sprinkled some Perfect Gold Perfect Pearl powder onto the panel and used a small paint brush to spread it around. To get even coverage, I then took a clean paper towel and buffed the powder across the panel. Then I repeated to create a second panel. The subtle Perfect Pearl shimmer is so pretty!
Next, I used the Delight Layer C die to cut the ink-blended panels, centering the die over the blended circle. Then I used the Delight Layer A die to cut white cardstock twice and glued the white layers to the ink-blended layers, resulting in two assembled pieces.
To create the card front, I glued the two pieces to a 3.75″ x 5″ panel of white cardstock. I trimmed off the areas hanging off of the panel and then glued them to the two open corners of the panel. I trimmed again and then used foam tape to adhere the finished card front to a pale blush card base. Last, I used foam tape to adhere a sentiment strip from my stash to the card.
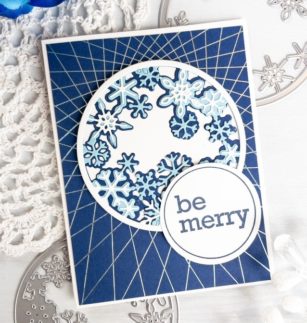
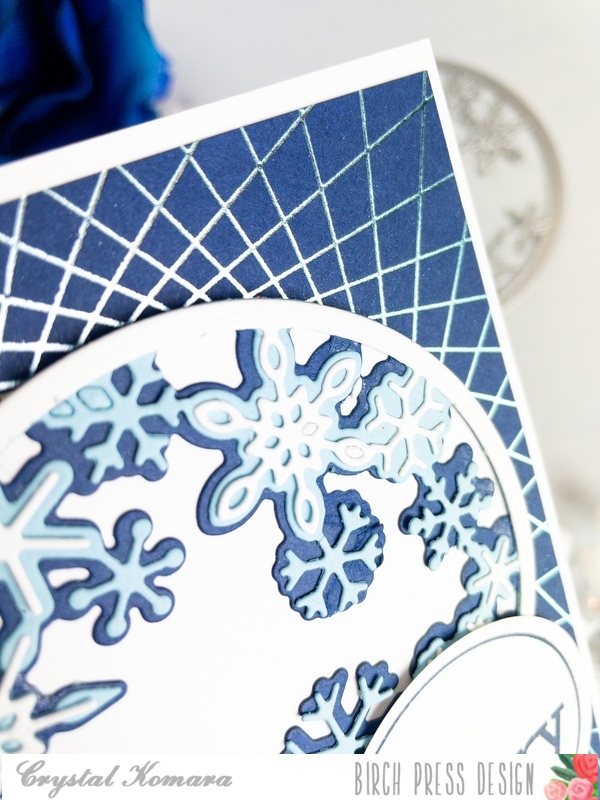
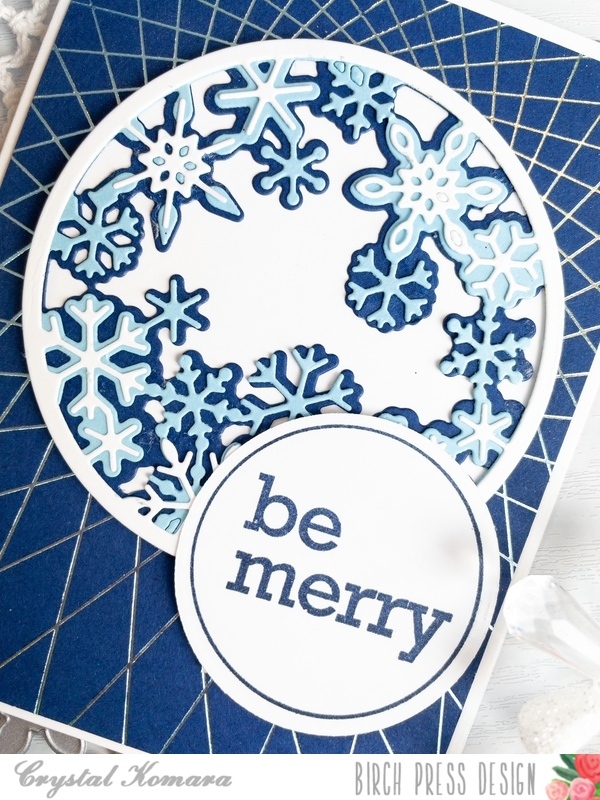
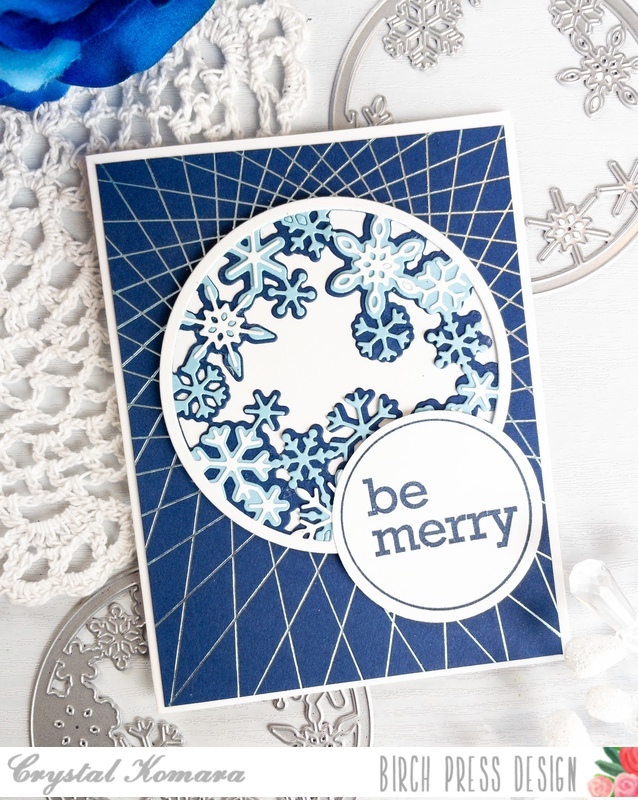
Hello friends! This is Design Team member Crystal Komara here with you today sharing more holiday themed inspiration using products from the latest Birch Press Design Release. Birch Press Design never ceases to amaze me with its elegant layering dies, contour dies and foil plates. Some of my most loved cards have been as a result of these gorgeous and elevated products.
Card details:
The base of this A2 sized card is made from 80 lb. Neenah Solar White Smooth cardstock. I cut a 5 1/4″ x 4″ piece of navy cardstock from the 6″ x 6″ Ocean Blue paper pack. Using my Gemini Foilpress machine and the String Art Hot Foil Frame, I heat foiled a cerulean blue foil onto the navy cardstock. I know that it kind of looks like silver foil in these photos, but it is ever-so-slightly more blue tinted in person.
Using the Snowy Circle Layer Set, I created the center focal piece. I die cut Layer C (bottom layer) from navy cardstock. I die cut Layer B (middle layer) from a sky blue cardstock. I die cut Layer A (top layer) from white cardstock. Again, I used cardstock from the 6″ x 6″ Ocean Blues paper pack. I used a fine-tip liquid adhesive to adhere all three layers together and then I lined the back of the three layers with a solid sheet of white cardstock. I adhered the entire Snowy Circle image to the center of the card using 3M foam adhesive.
Lastly, I stamped the sentiment “be merry’ in navy ink on white cardstock. This sentiment is from the Contempo Christmas Greetings stamp set. I used the coordinating circle die to die cut the sentiment out. I adhered the sentiment to the lower right side of the snowflakes with 3M foam adhesive.
I hope you have enjoyed today’s card. Thank you for visiting and have a wonderfully creative day!
Hello Birch Press friends! I am excited to be back on the blog today sharing a Rustic Holiday card using the Crochet Snowflake Layering die set! I love the layers in this set and had a lot of fun creating a rustic holiday design! So let’s get started!
For today’s card I started with the Crochet Snowflake Layering die set. I started by die cutting Layer C out of a gel print from my stash. Then I die cut Layer B using the Earth Neutral Paper Pad by Memory Box. I chose a brown piece of card stock from the collection and die cut layer B. Next I die cut Layer A using the Festive Glitter Pad by Memory Box. Once all 3 layers were due cut, I adhered the layers together using liquid glue.
Next I started to work on the background for my card. I started with a gelli print from my stash. I adhered the gelli print onto a piece of kraft card stock. Next I distressed the edges using a distress tool. I then added distress ink around the edges, as well as a green shade of embossing glaze. I added embossing ink to various section of the card panel, then added the glaze and heat set with my heat gun. I added a bit more distress ink to darken sections of the edges and card panel.
I then added a few paper strips using gelli prints. I wanted to keep that distress look and ripped the paper strips for added texture. I added a small piece of text pattern paper to the center as well. I adhered the strips together using liquid glue. I then added splatters to the card panel background using white acrylic paint, as well as metallic splatters. Once dry, I adhered the strips to the card panel, and adhered the Crochet Snowflake using foam tape.
To complete my card I chose the Find Joy and Outline sentiment die set. I die cut the shadow layer using vellum. I die cut the Find Joy script using paper from the Lush Green paper pad from Memory Box. I die cut the sentiment Find Joy 4 times and adhered them together with liquid glue. I added a bit of distress ink to various sections of the sentiment with my blending tool. I then adhered this to the vellum shadow layer and then onto the card panel using liquid glue.
I completed the card with a few Fairy Drops. Thanks so much for stopping by today! I had a lot of fun and I hope you enjoy making a Rustic Holiday card!