Good morning, Tracey here for some Birch Press inspiration. Birch Press Design is sponsoring The 25 days of Christmas Tags event on my personal blog once again this year.

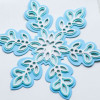
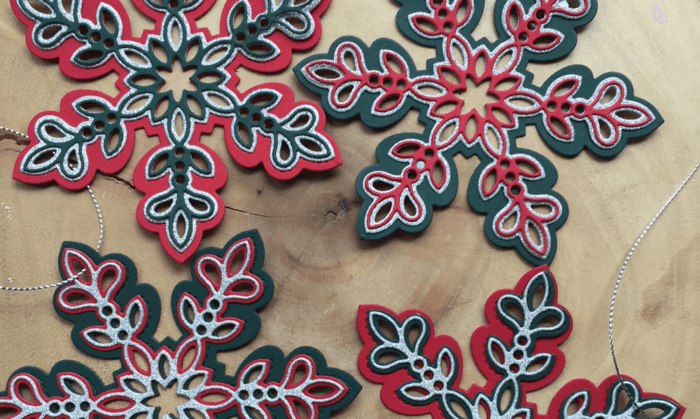
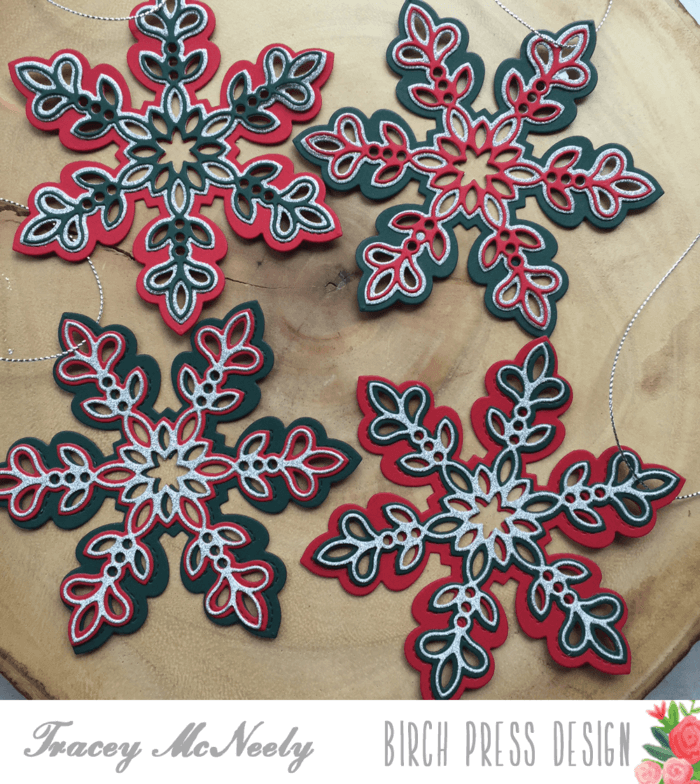
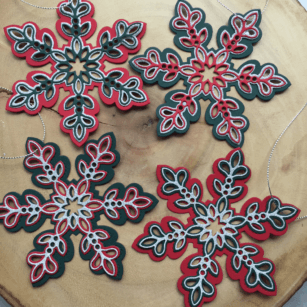
The Glitz Snowflake die set it’s a gorgeous set that requires minimal effort to create gorgeous tags, embellishments and even Christmas ornaments.You can create gorgeous unique snowflakes with only a couple different colours of card stock. When you change the order of how you adhere Layers A, B and C together you get a completely different result. For my examples today I have chosen two colours of card stock and piece one glitter paper. For the first two snowflakes I have cut Layer B from the glitter paper.
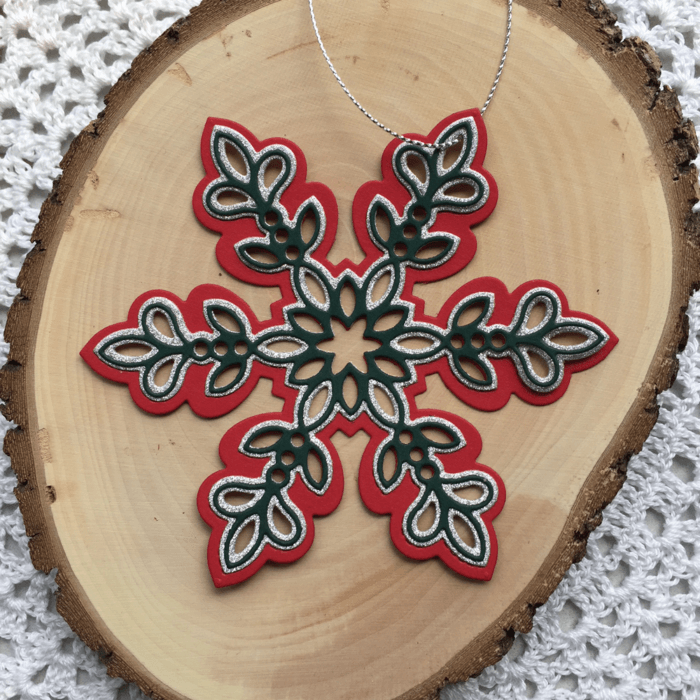
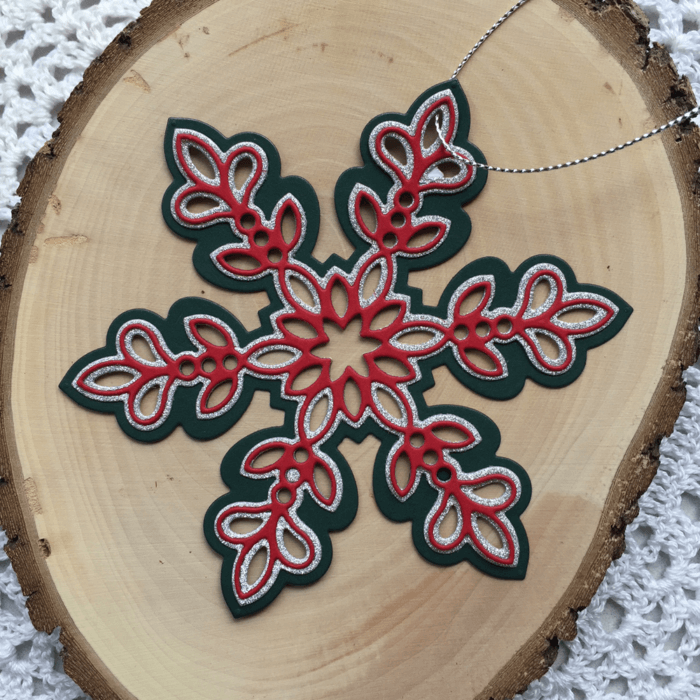
For the next two snowflakes I cut Layer C from the glitter paper. See how the snowflakes are completely different once again.

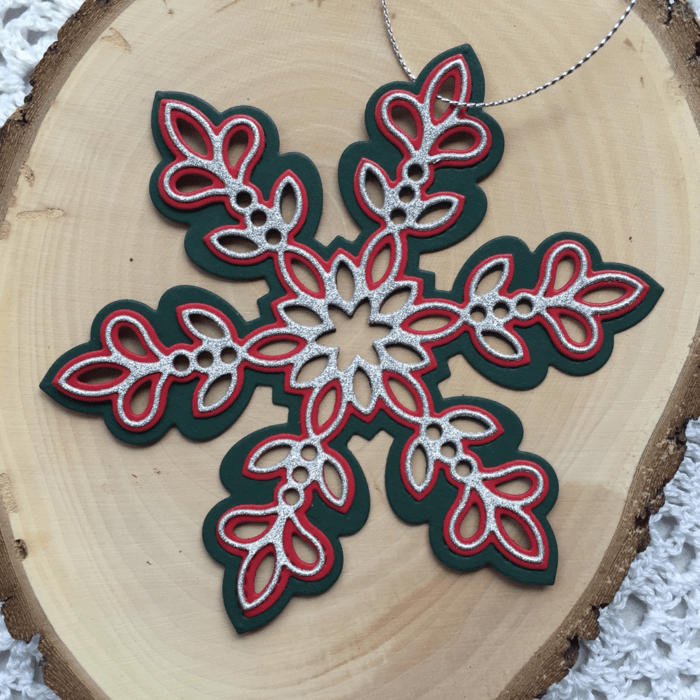
To finish the tags off I tied a piece of silver cord to the top of the Snowflake so that it could become a gift tag, a package embellishment or an ornament to put on the Christmas tree. Packaged together they would make a lovely hostess gift for the holidays. Head over to the In My Creative Opinion blog to see the post for day 7 of the 25 days of Christmas Tags event and your chance to win a prize from Birch Press.
Thanks for joining me today and come back again next Tuesday for more creative inspiration.

Category: Craft Dies
-
Snowflake Glitz | by Tracey McNeely
-
Alcohol Ink Bird | By Jeanne Jachna

Maybe Jennifer McGuire made you do it too? She’s inspired lots of people to get out their alcohol inks and start blending! You can see her original tutorial here. I too hadn’t given much thought to my alcohol inks lately. It’s really addictive once you start playing. All you need is some glossy or YUPO paper and alcohol inks. You can use any brand of alcohol inks – maybe you have some marker refill’s handy.
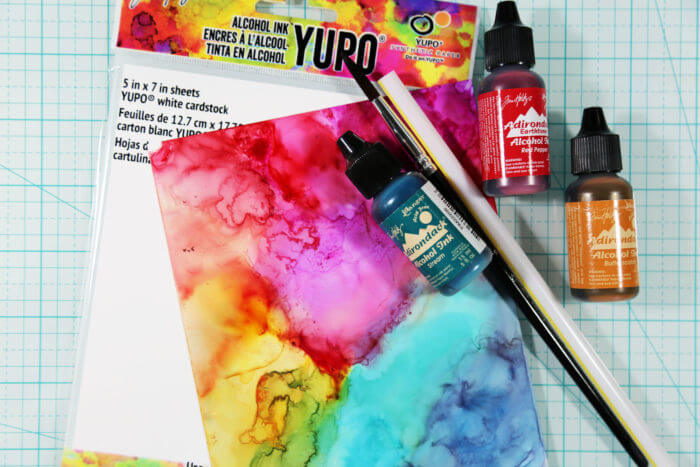
I wet my YUPO paper with alcohol ink before adding the drops of color to give me more play time and to soften the colors. Alcohol ink dries very quickly! The backgrounds are bold and beautiful, but a few things you might want to keep in mind… work in a well ventilated area. The smell from the rubbing alcohol is quite strong. You’ll also want to be careful to not get the ink on your clothing – it will stain. I worked on a glass craft mat. This made clean up really easy. The ink left on the mat is easy to remove with a cotton ball and rubbing alcohol.
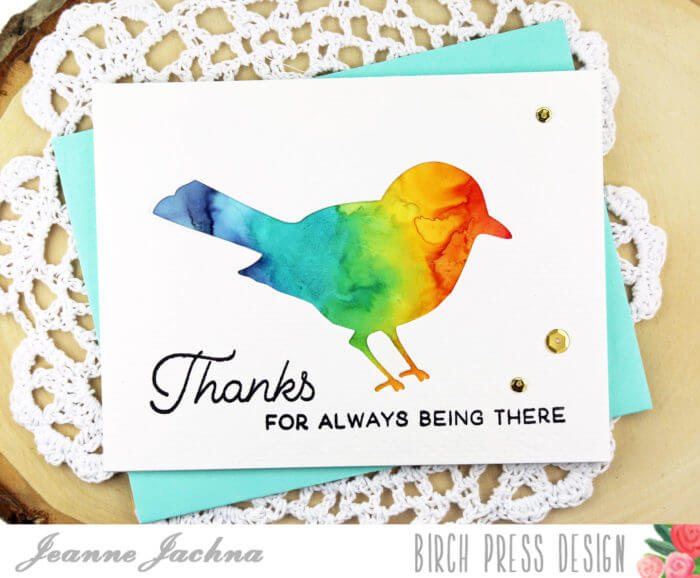
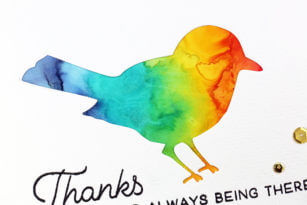
For this clean graphic design I die cut the morning bird from watercolor paper and used the negative cut. I saved the actual bird die cut for a second project. The added thickness of the watercolor paper adds rich texture and an expensive heavy weight feel to the card. You can die cut the cover of your card panel and adhere the blended backdrop to the inside cover of your card so it shows through the open die cut window.
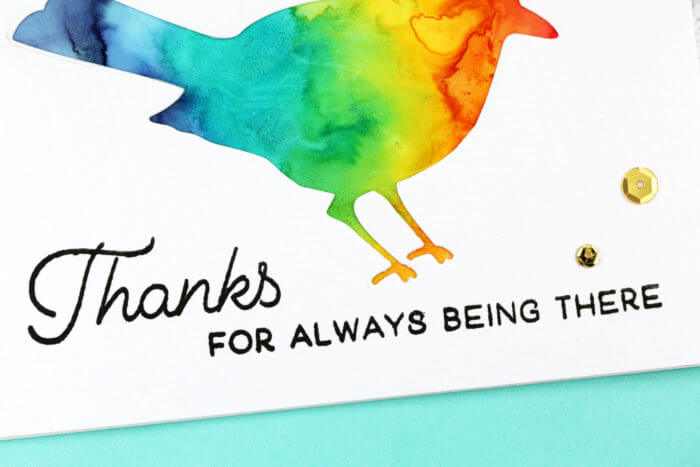
The sentiment from the Just Because Clear Stamp Set was stamped with Versafine Onyx Black Ink. I used a stamping tool to double stamp the sentiment. The watercolor paper is uneven and I wanted to be sure it was stamped clearly. I added a few gold sequins from the Not So Heavy Metal mix for some sparkle and shine. There’s lots of new sequins in the store! You can find them here!
You”ll love the beautiful backgrounds you can make with alcohol inks!
Supplies
-
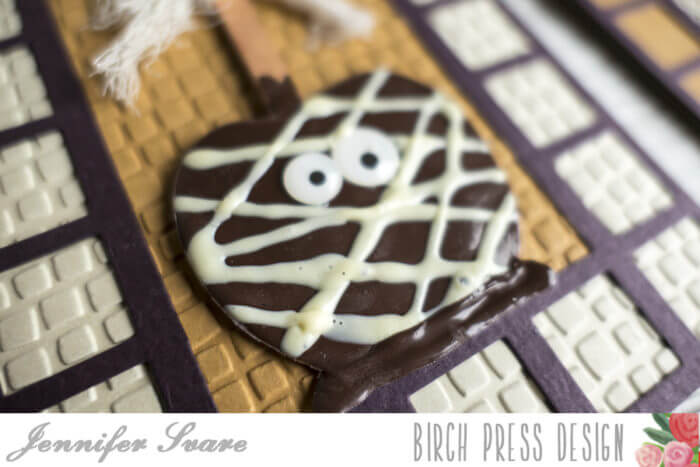
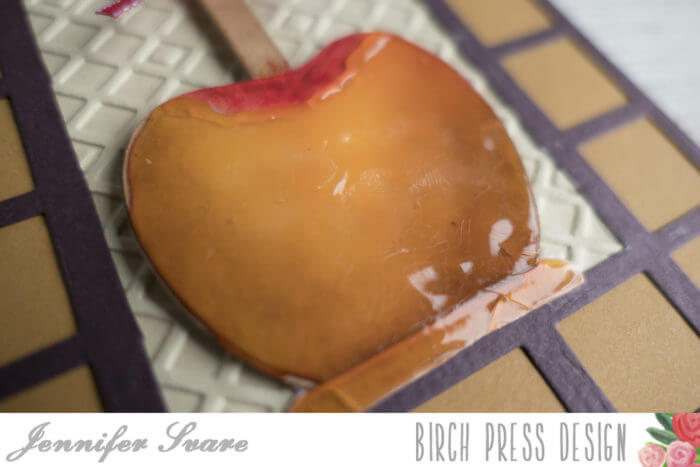
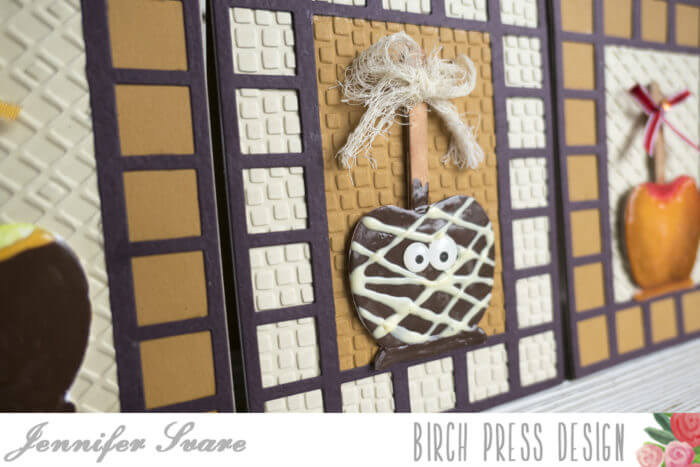
Caramel Apple a Day | by Jennifer Svare
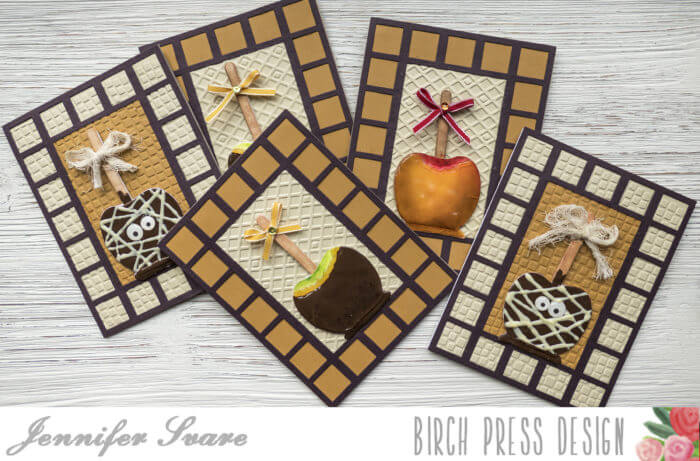
Happy Harvest! These caramel apples were inspired by my visit to a nearby home boutique. I was reminded that it is “caramel apple season,” and I could not resist making these using the Apple a Day die set!
The Maxwell Layer A die is so versatile, and was used to create the base of the card.
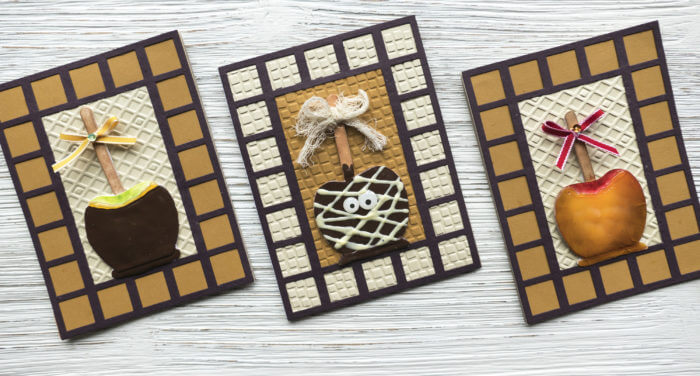
There are three varieties here: Green apple with chocolate over caramel, classic red caramel apple, and a fun zombie caramel apple.
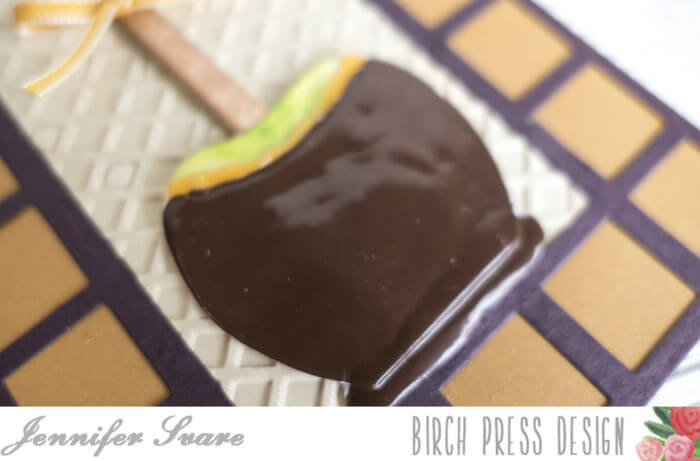
Because there are three sizes of dies in the set, there are a lot of different variations that could be made. I used the mid-sized apple which fit perfectly inside the frame. Embossing added some texture to the frame, as well.
The video below shows how I made each design ~ they are simple to make in a large batch, so everyone on the list can receive one! (The cards themselves are so fast; it’s the drying time that takes the most time.)
I hope you enjoy the video, and also caramel apple season! Have a great day!


-
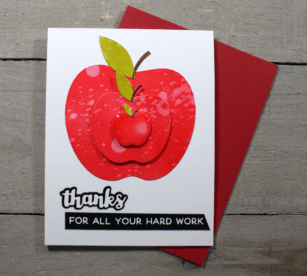
Apple for the Teacher | by Tracey McNeely

Have you had a chance to check out the brand new An Apple A Day craft dies over at Birch Press Design? This fun set of three dies is perfect for creating for school themed projects. Today I am going to share with you a fun project creating a card for the hard working teacher in your life.

I created a video for you to see how I created my apples. I love how there are so many techniques and colouring mediums you can use along with dies and stamps from Birch Press Design!
I used the An Apple A Day dies to cut the apples, leaves and stems from my Distress Inked panels…


Adhered the apples together and attached to the card with adhesive and foam tape.

I added my ‘thanks’ from the Calligraphy Pop Thanks and sentiment from the Just Because clear stamps. Once the card was assembled I added Glossy Accents to the smallest apple. I applied it much slower than the speeded up video and I used a straight pin to pop any bubbles that formed. I let the Glossy Accents dry for about 2 hours before I took the final photos.

A closer look at the texture on the apples…

The completed card…

I hope that I inspired you to make something fun with the new Apple A Day craft dies. Used together or alone they are fabulous. We will see you again next Tuesday for more crafty inspiration!


-
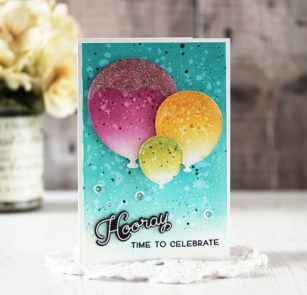
Hooray | By Laurie Schmidlin

Hi there! It’s Tuesday again, and that means we are sharing something creative with you here on the blog!
I’m sharing two of my favorite things with you – stitched die cuts and ink blending! The new Party Balloon Dies is a wonderful set that is full of endless possibilities, and that stitching detail along the edge is the perfect detail!

I started by die cutting three different balloon sizes out of white cardstock.

I then applied ink to each balloon, making sure to blend darker color at the tops. I also sponged ink onto a piece of watercolor paper for the background. I used Distress Inks as they are very reactive to water, but other water based inks will work as well.

To create texture, I sprinkled on clear water to each layer, let it sit for a few seconds, and then gently dried it with a paper towel. After each layer had dried, I splattered on some I coordinating watercolor paint. I wanted just a bit more depth on the background layer so after the turquoise paint was dry I splattered on a bit of white paint.

I was on such a roll with adding texture that I just had to add some more! :-). I applied some clear glaze to the tops of the balloons and then sprinkled with a fine prisma glitter.

For the sentiment, I used a couple of stamps from the Hooray for Everything stamp set. The Hooray is die cut using the coordinating Hooray for Everything Die Set.
Thanks so much for joining me here today!


-
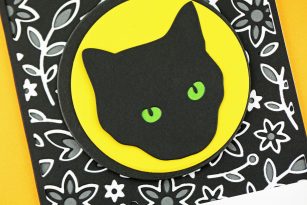
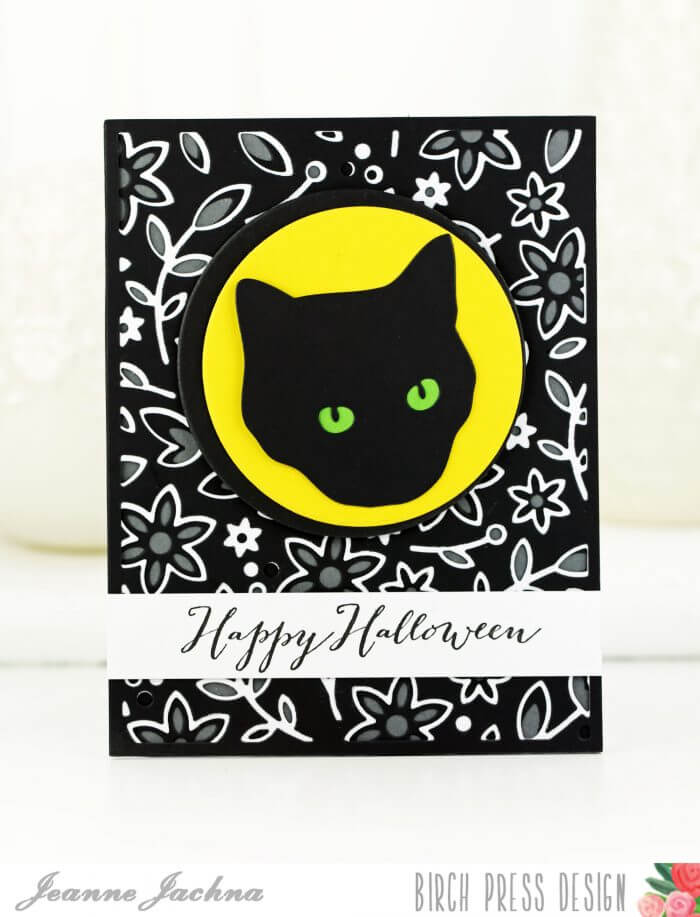
Halloween Cat | By Jeanne Jachna

Halloween is creeping up fast! It’s time to start making some cards to send to your favorite boys and ghouls! This one looks fussy but it’s really easy!
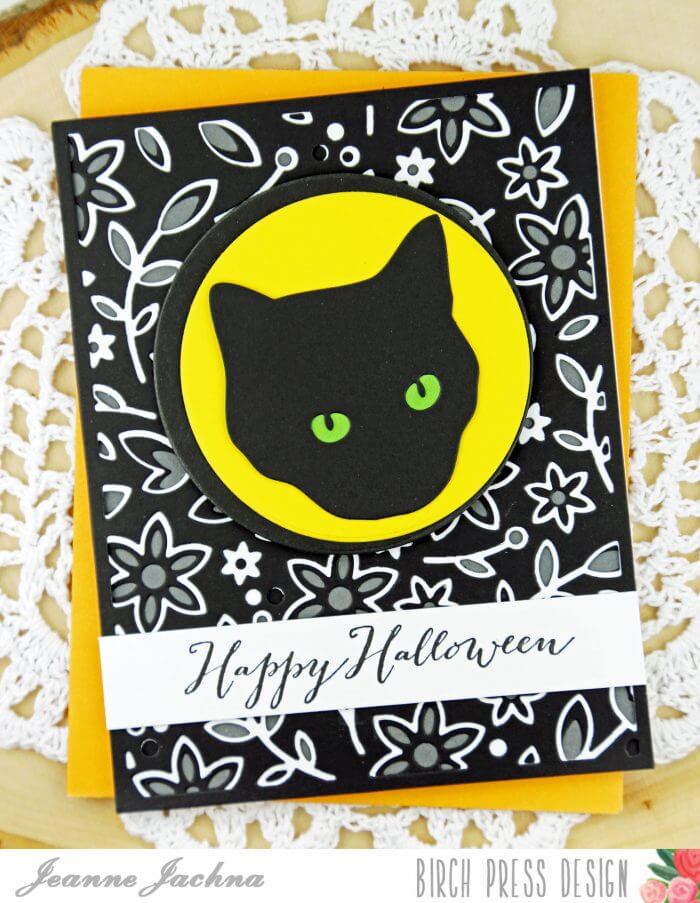
I cut the Avalon Frame from black and white card stock (layer a black, layer b white, layer c black) adhered them together and mounted on grey card stock. This pattern is my favorite at Birch Press Design!
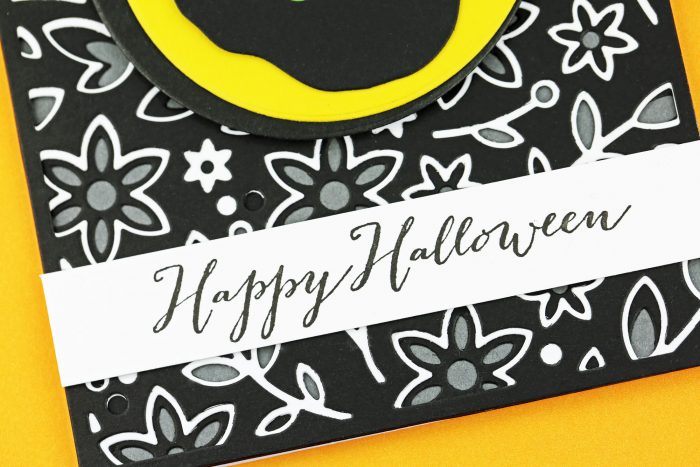
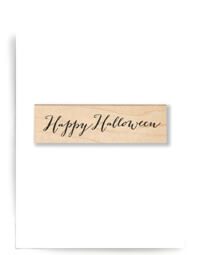
The Happy Halloween sentiment is a wood mount stamp from the store. I love the vintage script that is elegant and eerie at the same time!
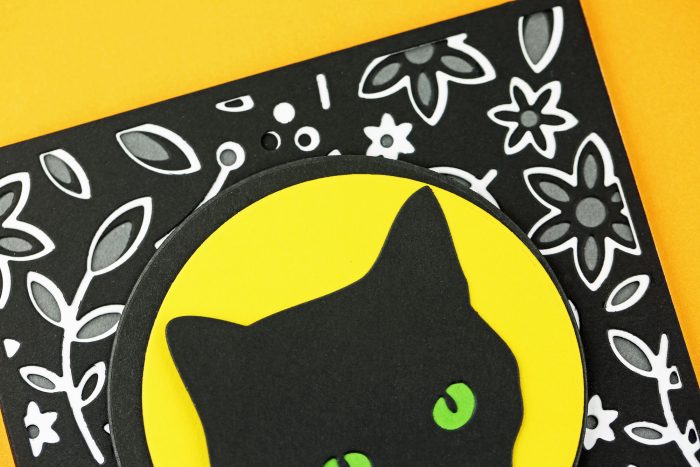
I framed the cat silhouette with a die cut circle of bright yellow card stock (like a moon). I added a second slightly larger circle of black card stock to keep the background from closing in. To color the cat’s eyes I added some green card stock behind the die cut eye openings.
Told you! Lots of drama and so simple to assemble!Thanks so much for all the nice comments we received during the Fall Coffee Lovers Blog Hop! I’m happy to announce the winner from the event…
Arianna Barbara! She receives a $20 gift certificate for the store. Congratulations!Have a great day!
Finished Size 4.25 x 5.5″
Supplies:


-

Fall Coffee Lovers Blog Hop & A Prize
By Jeanne Jachna
If you love to craft and you’re a coffee fan then you are in the right place! Birch Press Design is a Super Sponsor for the Fall Coffee Lover’s Blog Hop! It’s a way to celebrate two of your favorite things.. crafting and coffee!

You can get all the details here on Amy Tsuruta’s blog Coffee Loving Cardmakers where you can get all the details on how to link up your own card! Amy has lots of fabulous prizes to give away including a $20 gift certificate to the Birch Press Design Store! To sweeten the deal we’re giving away a second $20 gift certificate here on our blog! I couldn’t pass up on all the fun so I made a card of my own with some wonderful craft supplies from the shop!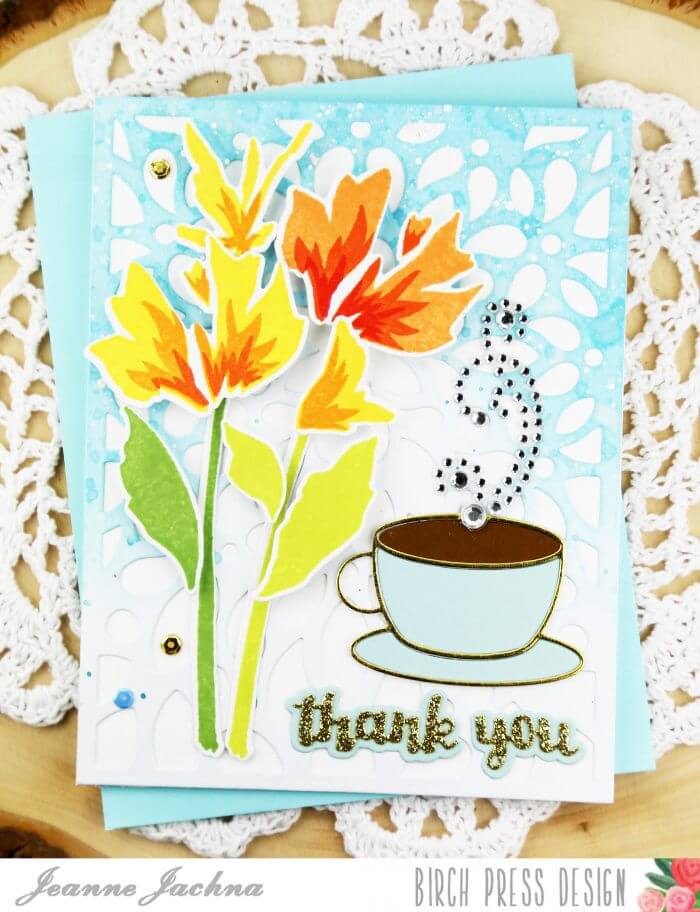
I started with a background of lace using the Fiori Cover Plate Layer A. I wanted to add a bit of color but not have it take over the design. I didn’t want the blue gold rimmed coffee cup to disappear into a blue background.
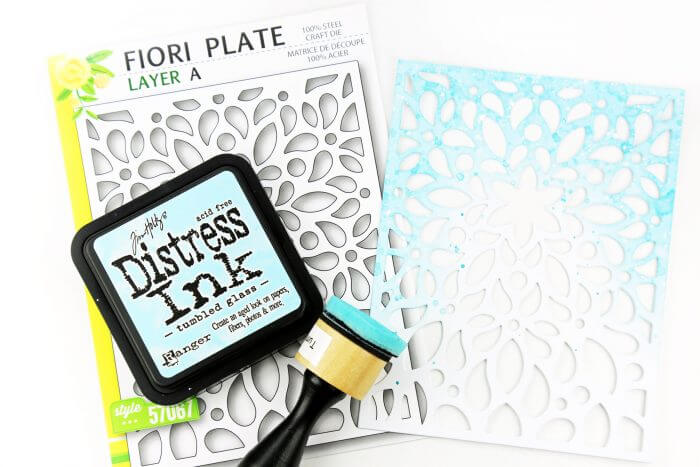
I inked up the top portion of the die cut with Tumbled Glass Distress ink. Next I splattered it with water, and then some Broken China. For the finishing touch I added a splash of white ink.
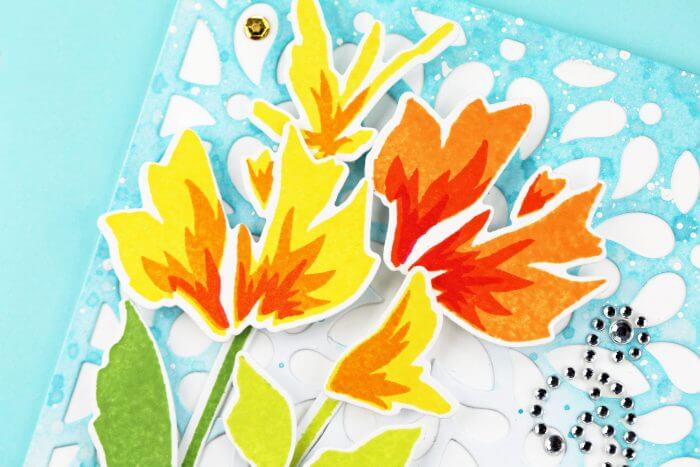
I added some Watercolor Wildflowers to keep the card feminine and to add some fall color at the same time. The triple stamp flowers are stunning and look lovely in any color combination!
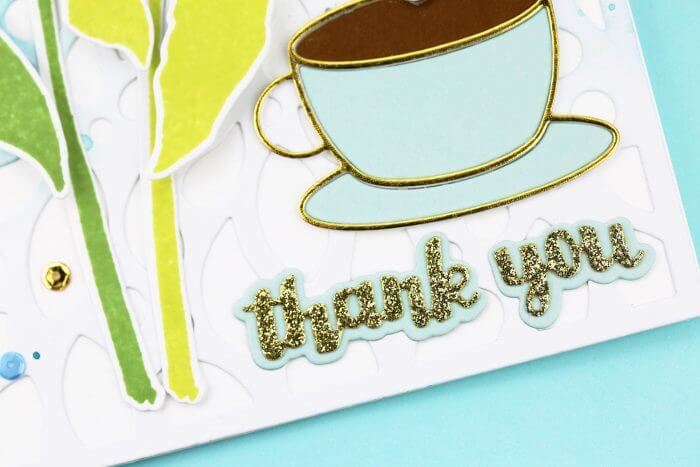
We’ve added lots of die cut words to the store including this Calligraphy Pop Thank You. The “Morning Cup” is from Poppystamps (our sister company). I thought a fun swirl of rhinestones would make for some amazing steam coming off that cup!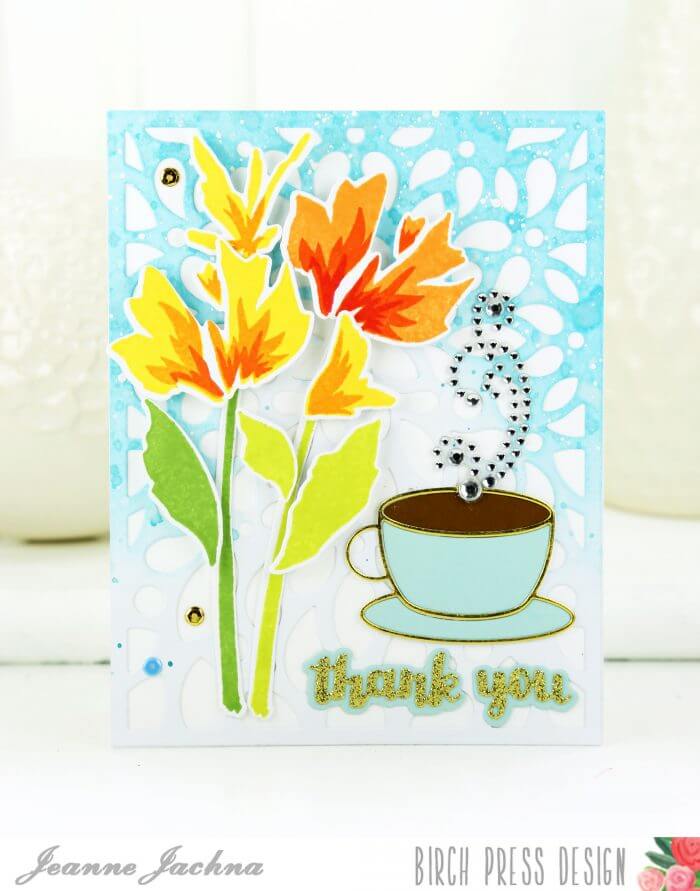
Want a chance to win a $20 gift certificate to the store? Just leave me a comment! Let me know what’s your favorite way to start the day! One random comment selected through Random Number Generator will be selected as the winner. You have until 12 am US EST on September 25 to leave a comment and I’ll post the winner on September 26!Finished Size 4.25 x 5.5″


-
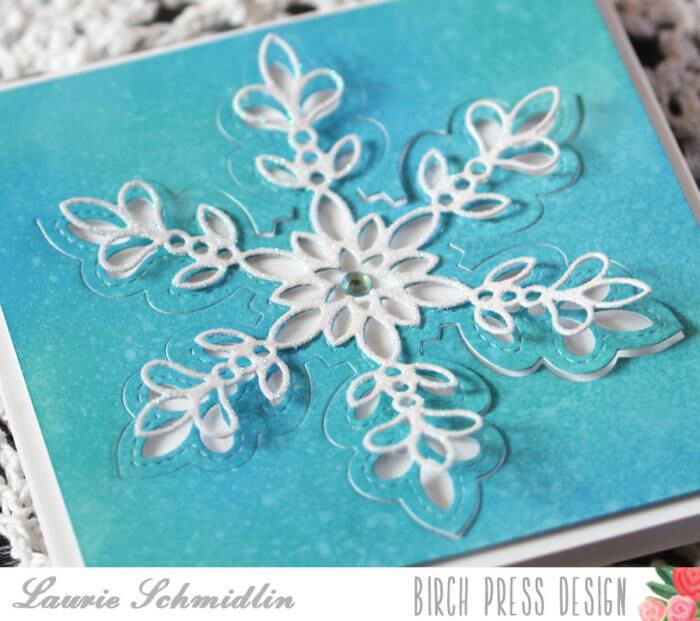
Glitz Snowflake | By Laurie Schmidlin
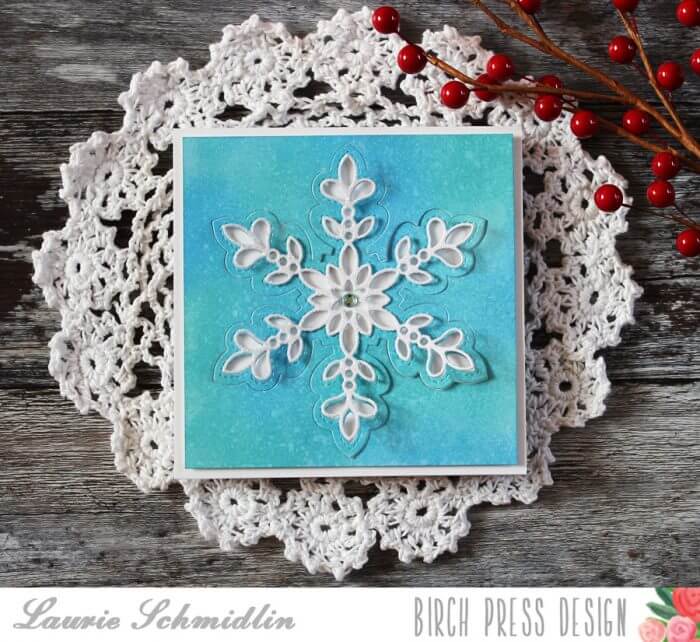
Have you seen all of the new items in the store? So many brand new beautiful stamps and dies! When I first saw the Glitz Snowflake set, my heart actually skipped a beat! I have long been a fan of Birch Press Design snowflakes, but these are the prettiest ones yet! And in true Birch Press Design style, there are three different layers, making them even more versatile and fun to create with.
I like to get a head start on my Christmas card each year, so I really appreciate having new holiday themed items already in the store!
I decided to create a note card without a sentiment so that it could be sued for either a Christmas card or a holiday thank you!
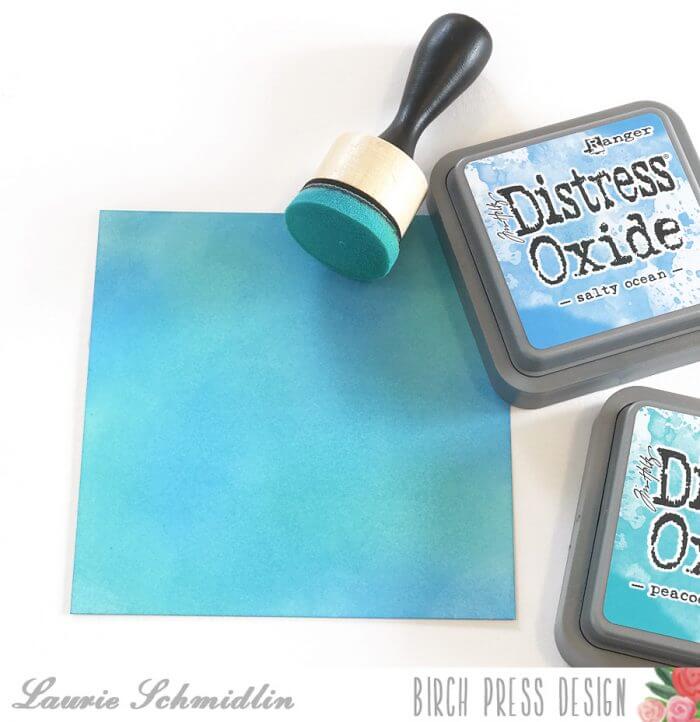
I started by sponging on some Distress Oxide inks to a white square background.
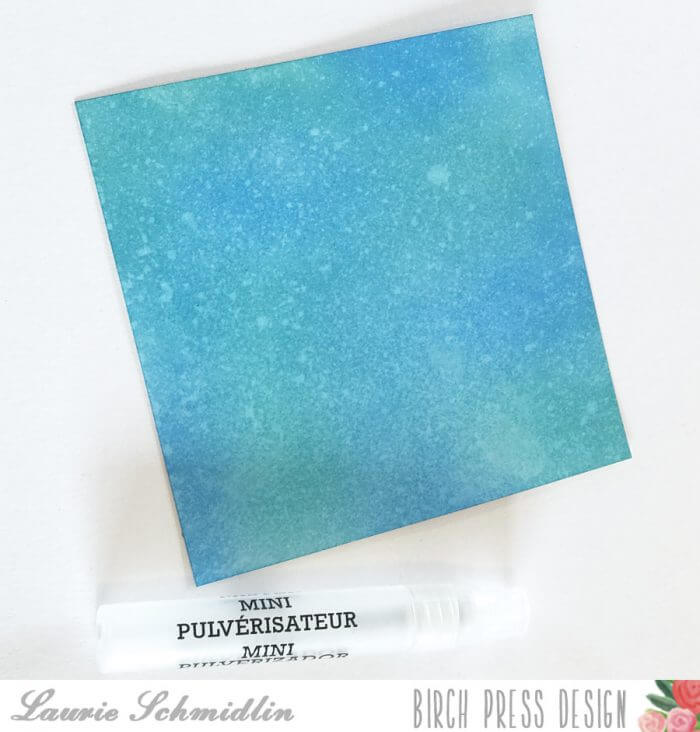
I then lightly spritzed it with water. The ink is very reactive with water so it creates a fun splatter look.
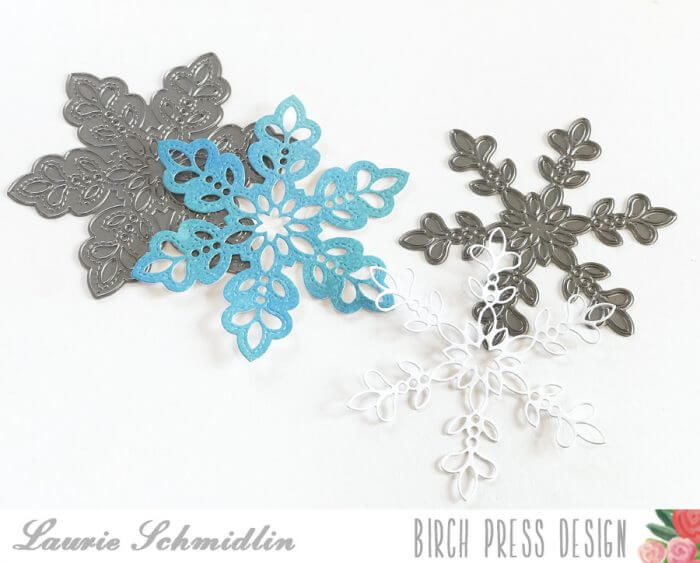
I then die cut the Glitz Snowflake Layer C out of my inked background. I also die cut the Glitz Snowflake Layer A out of white cardstock.
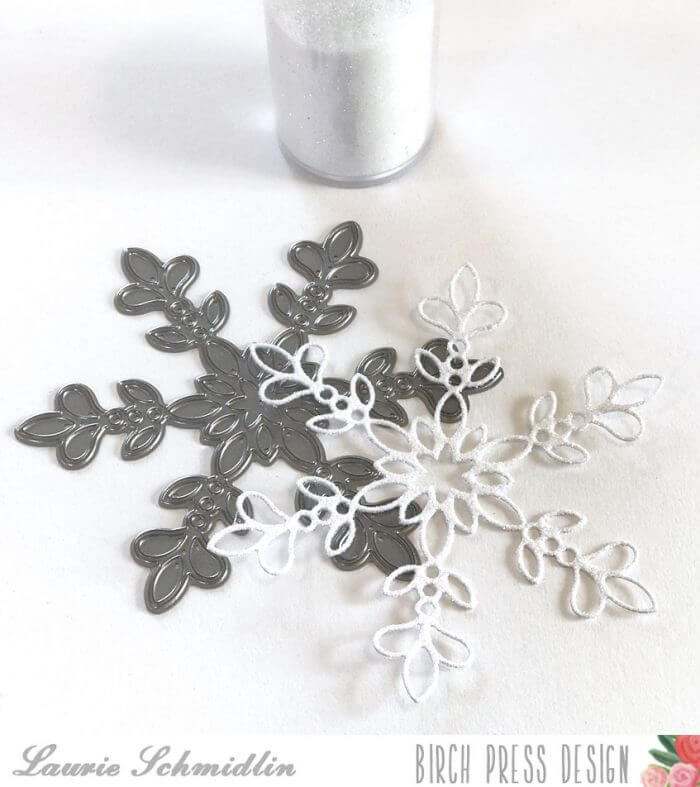
I covered the white snowflake with a fine prisma glitter. I have found the easiest way to do this is to spray the die cut with spray adhesive and then sprinkle on the glitter. This ensures a full glitter coverage.
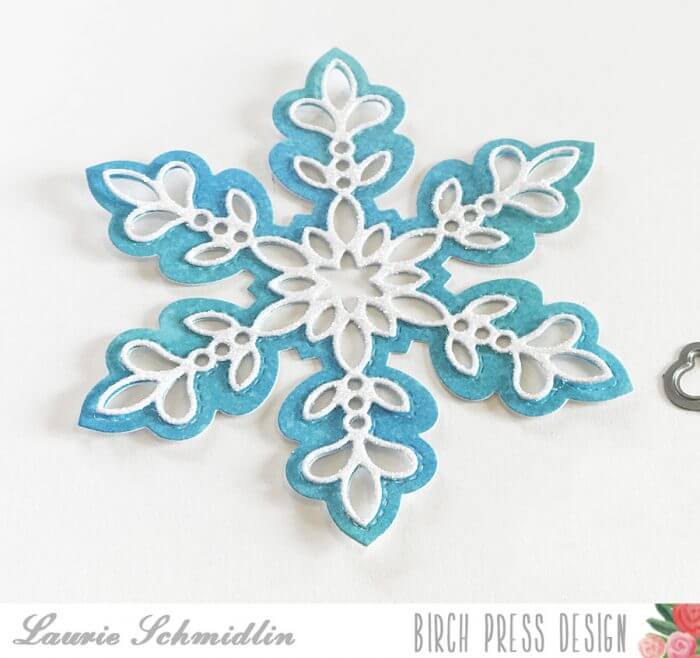
I then layered the snowflakes together by adding liquid glue to just the center parts of the snowflakes.
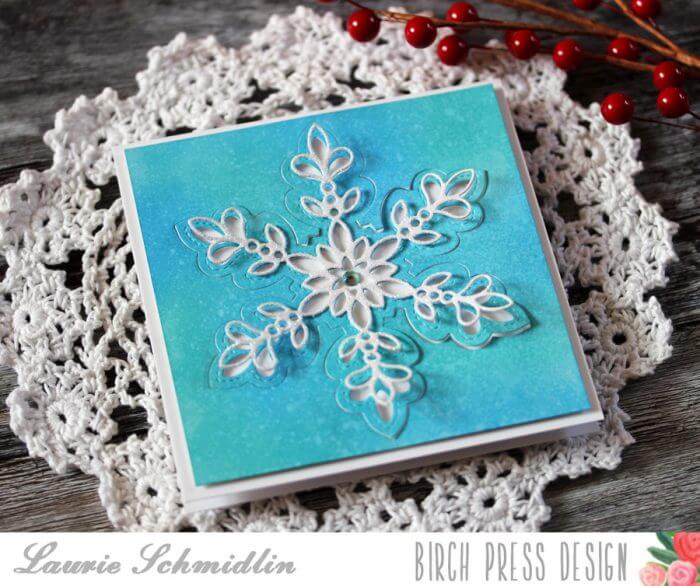
I tucked in the die cut snowflakes back into the sponged background. I added dimensional foam to the back and mounted it to a white card base.
What about you? Do you like to start creating your holiday cards early?
Thanks for joining me here today!


-

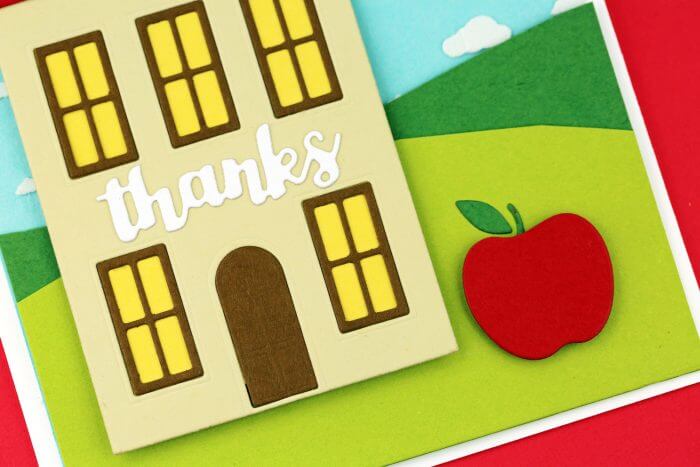
Back to School | by Jeanne Jachna
I hope you’re having a great day! There’s so much going on in the Craft section in the store! If you haven’t stopped by in a while you want to check out the “What’s New” tab! There’s some new layered dies as well as some great stand alone dies! There’s new stamp sets and accessories like washi and clips are being added every day!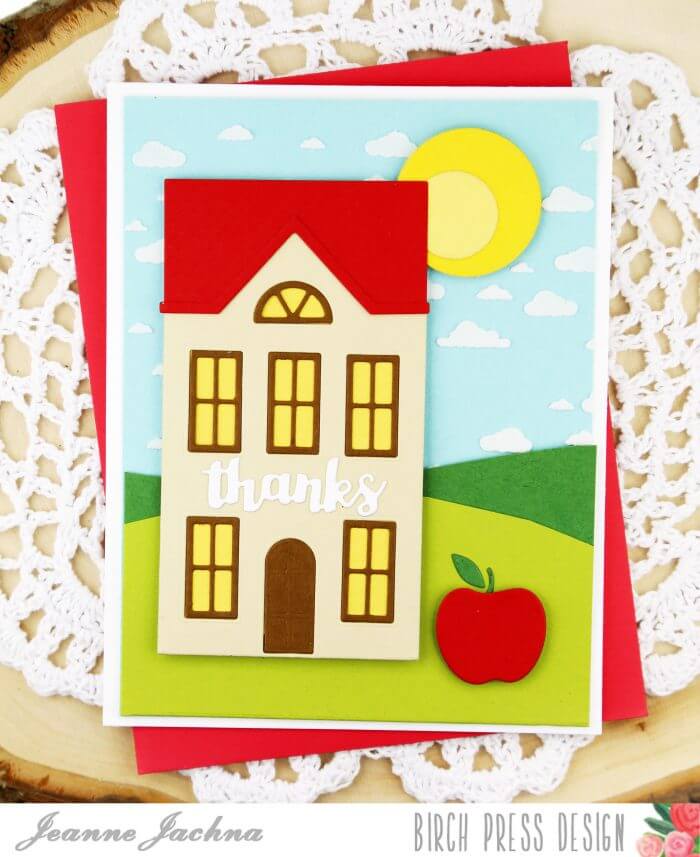
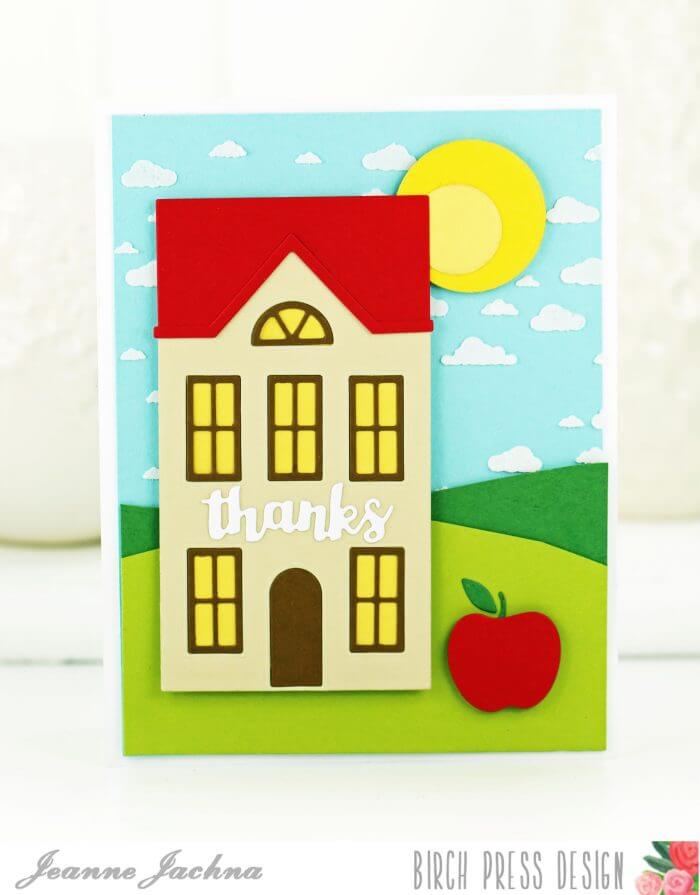
Fall is in the air and I’m seeing the buses picking up kids early in the morning! I thought I’d make a special thank you for teacher with the new Home Sweet Home die. This die is so versatile.. I can imagine lots of uses for it.. congratulations on a new home, a we’ve moved card.. an invite for Thanksgiving or Holiday feast.. how about a haunted house in black and grey?
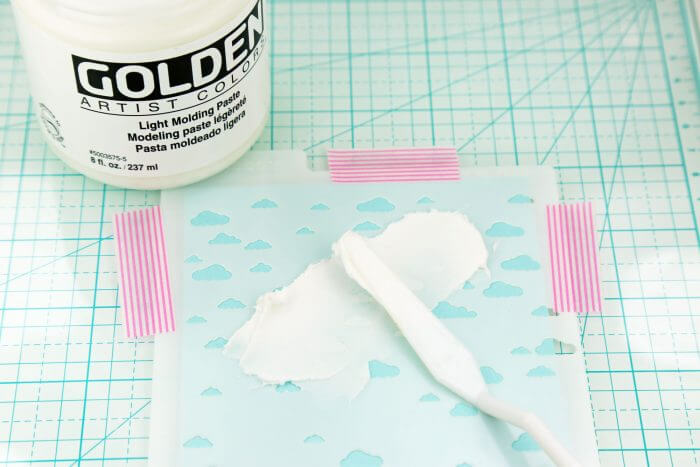
For my sunny day I started with a panel of blue card stock. I added clouds with Light Molding Paste spread through the openings of the Memory Box Mini Clouds Stencil. When it dries the clouds are thick and puffy and add great texture to the card.
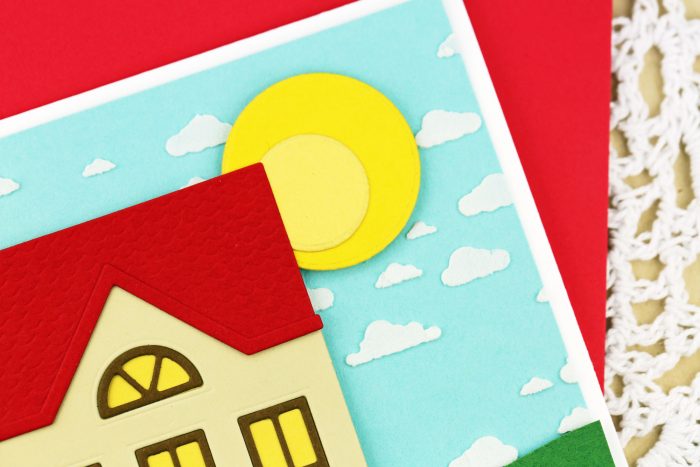
Two die cut circles (Memory Box Open Studio Circle Basics) cut from yellow card stock make an easy sun and hand cut waves of green card stock make a hilly landscape. The house die is amazing.. there’s lots of detail. All the window outlines cut completely from the house frame so you can change colors easily. The roof has a scallop embossed design, the front door has embossed panels, and there is a separate cornice between the roof and the house so they attach seamlessly.
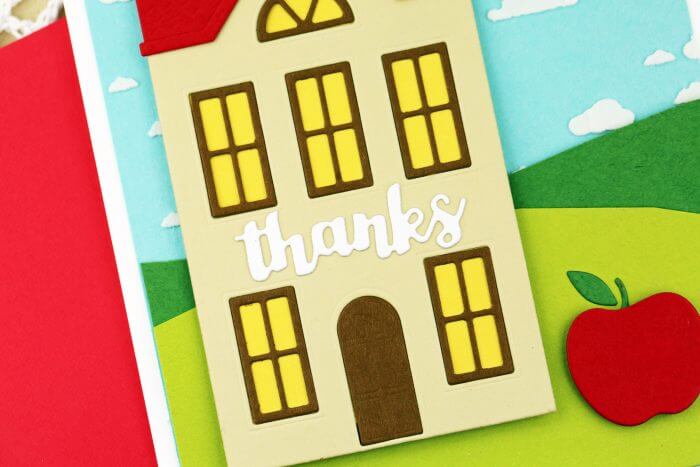
I added an apple for teacher from An Apple A Day, and a simple “thanks” word die called Calligraphy Pop Thanks. The word die comes as shown with a second outline die so you can add more detail if you like.
Wishing you sunny skies! Have a great day!
Finished Size 4.25 x 5.5″Supplies Used


-
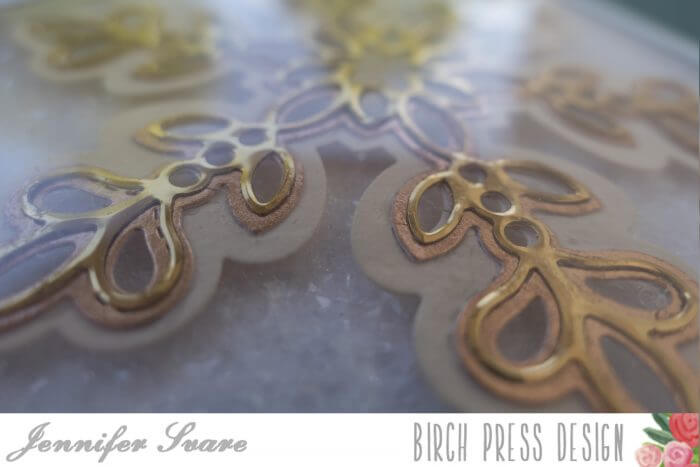
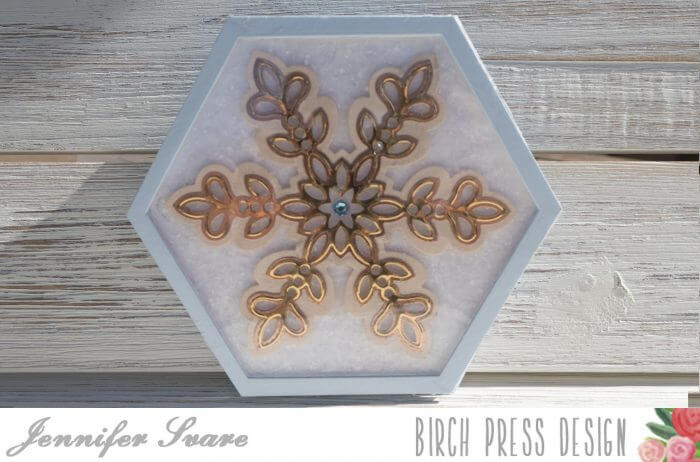
Layered Glitz Snowflake Card | Jennifer Svare
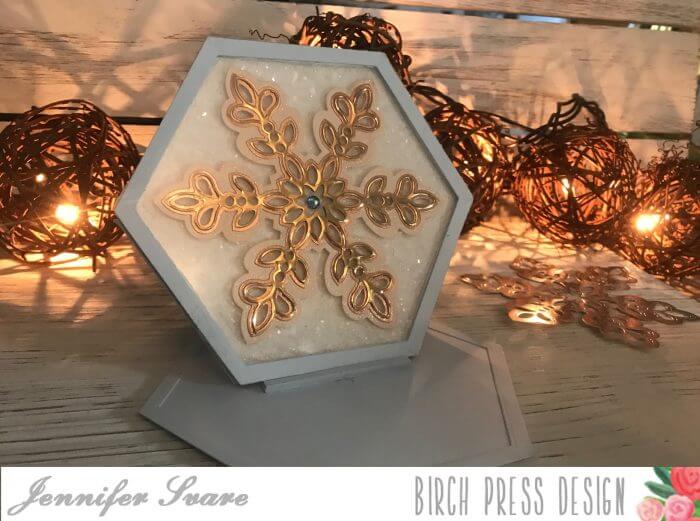
Hello! I am so excited to be part of the Birchpress Design Team! I have always loved the gorgeous designs of the innovative layering dies. This newly-released Glitz Snowflake Layering Die Set has to be my all-time favorite snowflake. I love how the layers work together, or even alone with the intricate details and delicate stitches. So many possibilities!
This easel card was easy and fun to make… a tutorial video is below. I used a very light pumpkin color for the base layer, followed by rose gold and then gold for the top. All was glued onto a bed of sparkly Diamond Dust with an icy mint blue base.
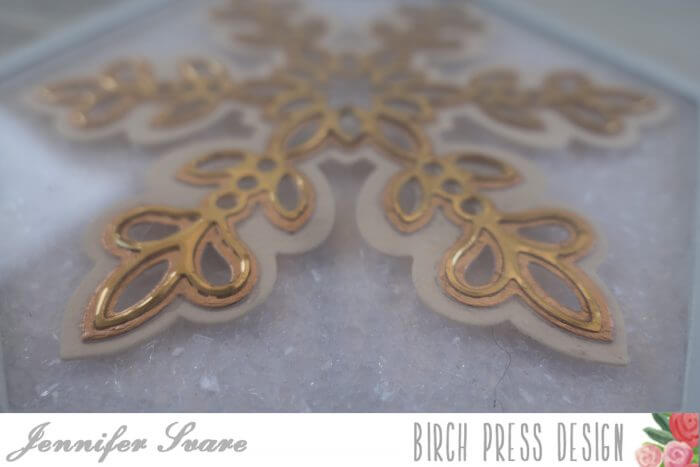
I didn’t put a sentiment on the inside, because I didn’t want to give it a label! It could be a gorgeous winter wedding card, birthday, anniversary, or any occasion. Since it is an easel card, it’s made to be displayed and enjoyed all winter.
So many things can be done with this layered die set. I made a quick video showing an idea for a 3 dimensional hanging snowflake as well. Sky is the limit on the decorating! It’s a fast, easy project for kids to make, or make ahead for the kids to decorate.
I hope you enjoy the videos below!