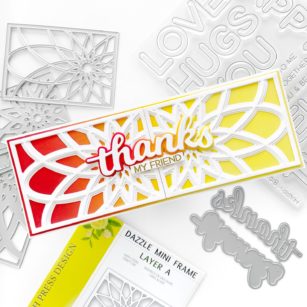
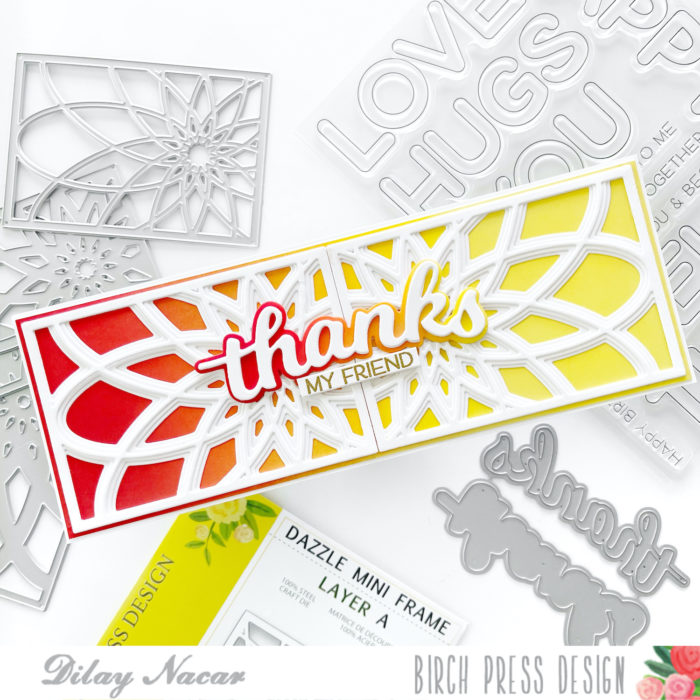
Welcome, friends! Dee here and today, I’m sharing a simple and vibrant slimline card featuring the new Dazzle Mini Frame Die! Let’s get started!
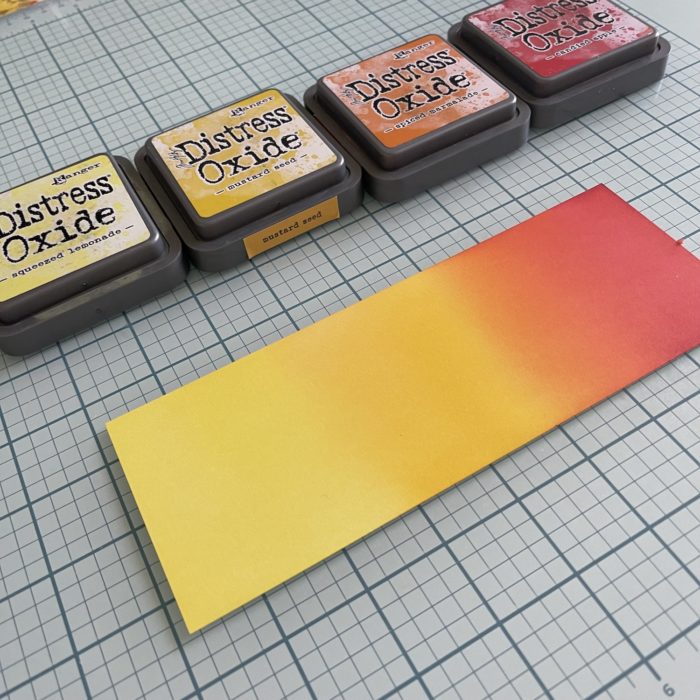
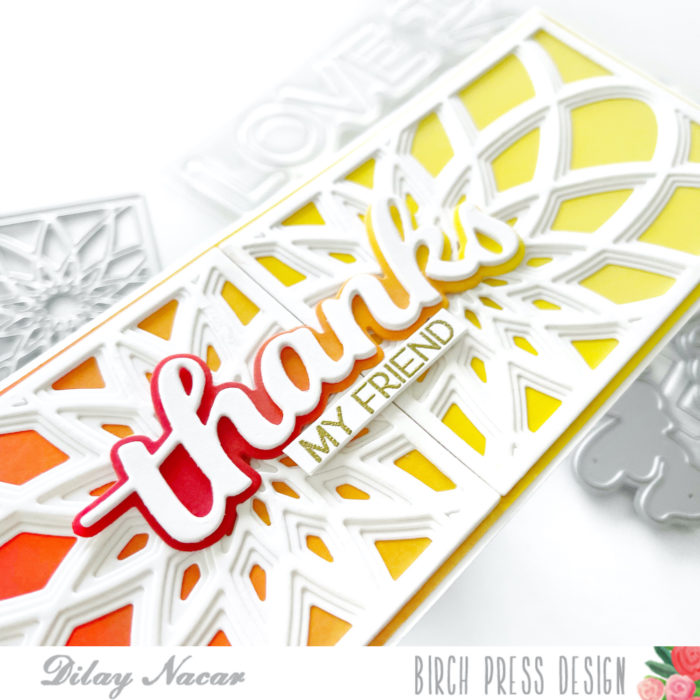
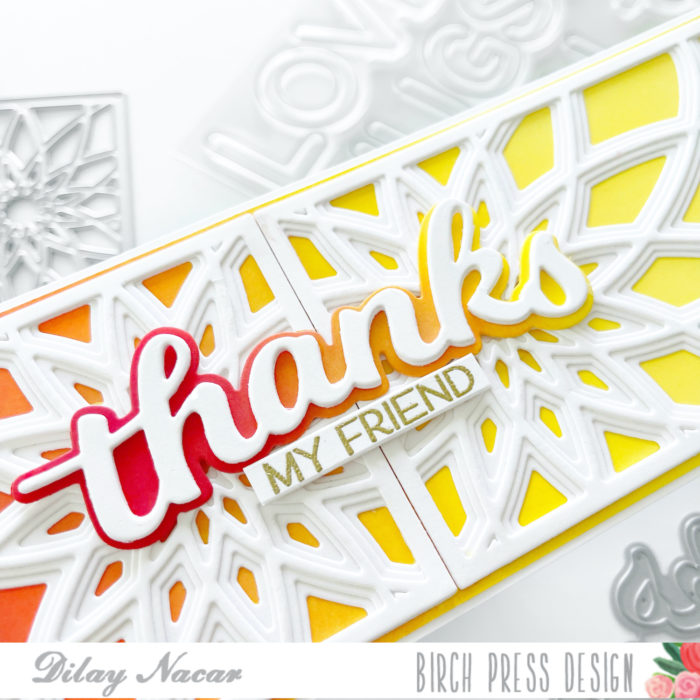
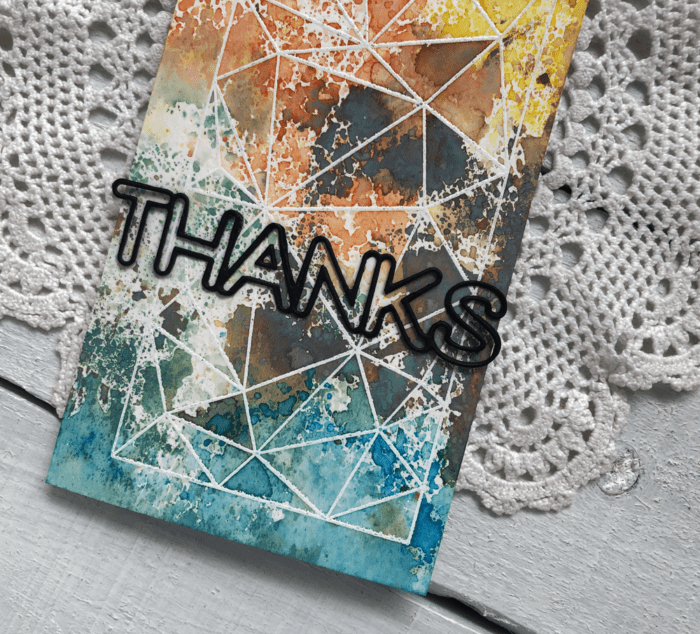
First, I created the base by cutting a piece of white cardstock down to 3” x 8.5” and ink-blending it with Distress Oxide inks. In this case, I used a combination: Candy Apple, Spiced Marmalade, Mustard Seed, and Squeezed Lemonade.
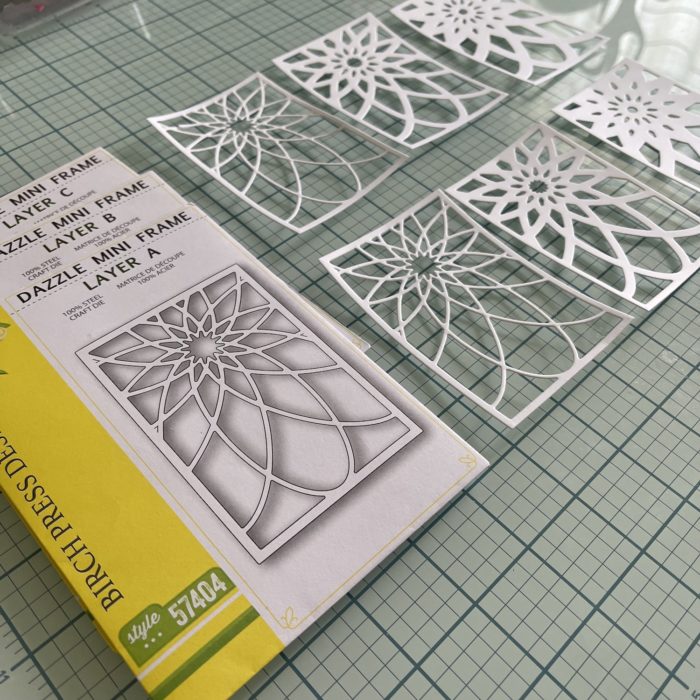
Next, I die cut layers A, B, and C of the Dazzle Mini Frame die layers two times in white cardstock, making two complete frames, then adhered them (mirrored) onto the base.
For the sentiment, I die cut the Thanks Honey Script die and shadow in white and ink blended the shadow with the same Distress Oxide ink colors as before. I adhered the word die to the shadow then adhered that, centered, between the two frames. For the sub sentiment, I heat embossed ‘my friend’ from the Happy Lingo stamp set and adhered it underneath the main sentiment with foam squares. To finish, I adhered the panel to a top-folding slimline card base!
I hope that you enjoyed my card showcasing this beautiful new frame die, and are inspired to create one of your own! Thank you so much for stopping by!
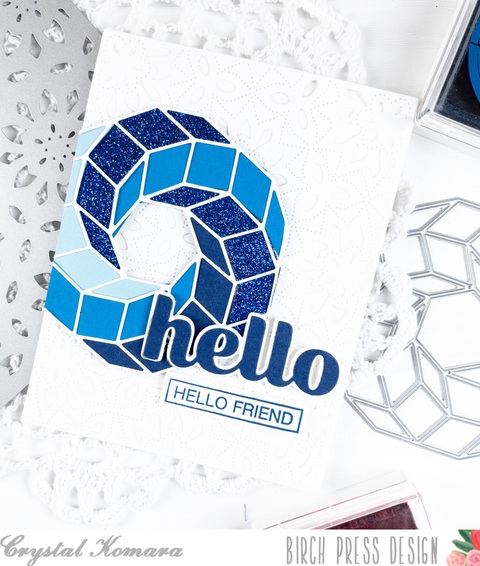
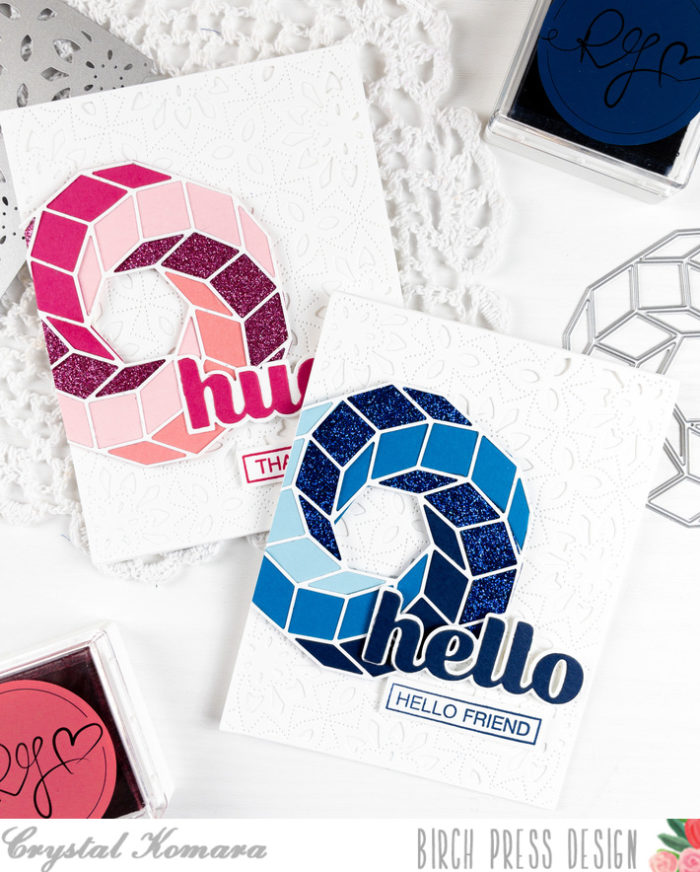
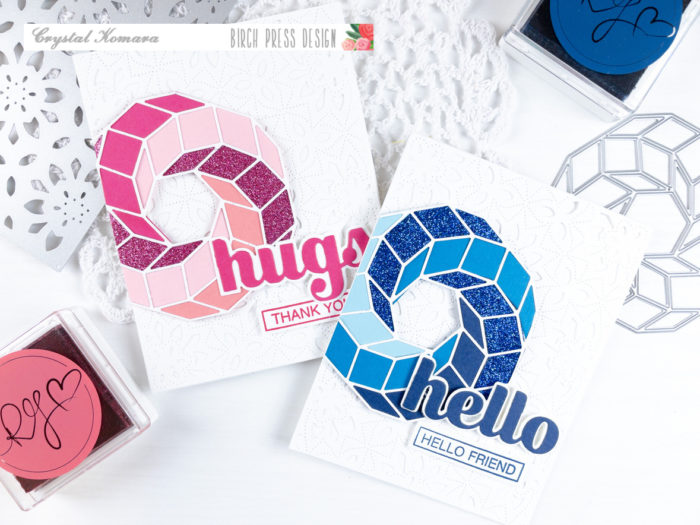
Hello friends and happy Monday! I hope you all had a wonderful weekend. This is Crystal Komara here with you today sharing two cards using the Torus Ring Die by Birch Press Design in monochromatic colors to create some cheerful greeting cards. I’ll admit that I didn’t love this geometric shaped die initially, but after creating these cards, I’m now giving it a second chance!
The base of this A2 sized card is made from 80 lb. Neenah Solar White Smooth cardstock. I die cut just Layer Plate A from the Viola Layering Plates out of white cardstock and adhered it directly to my card base using Lineco ph bookbinding glue, my go-to liquid adhesive.
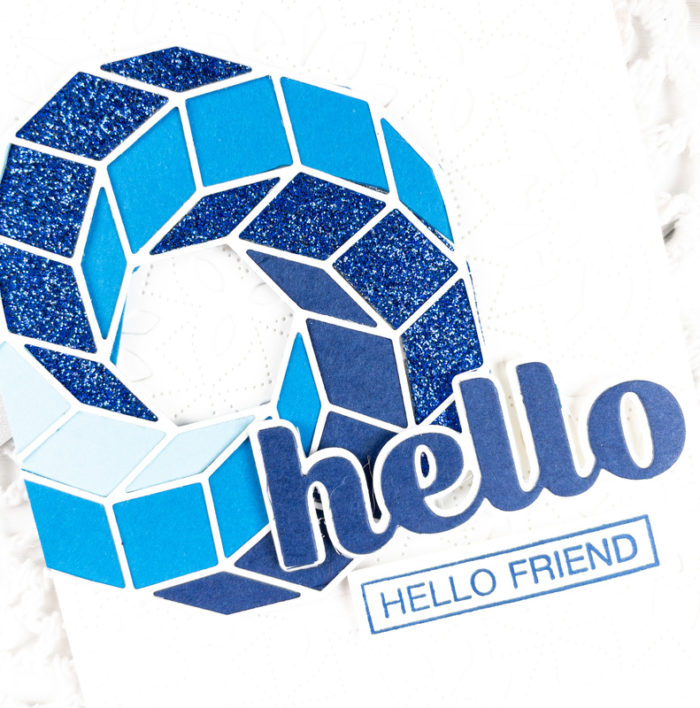
I die cue the Torus Ring outline from white cardstock. Using the second small die in the Torus Ring set, I die cut various pieces of blue paper that I adhered behind the white frame. I adhered the entire Torus Ring to the card with 3M foam adhesive for added dimension. For the sentiment I used the Big Hello Sugar Script die. This is a two-piece layering word die that creates a shadowlike effect. I die cut the large base layer from white cardstock and the top layer from blue cardstock. I adhered both layers together with liquid glue and then adhered the entire sentiment to the card using 3M foam adhesive.
I added the word “hello friend” from the Ticker Tape stamp set. I stamped the sentiment in blue ink and fussy cut the block outline. I adhered this sentiment below the word “hello” with 3M foam adhesive.
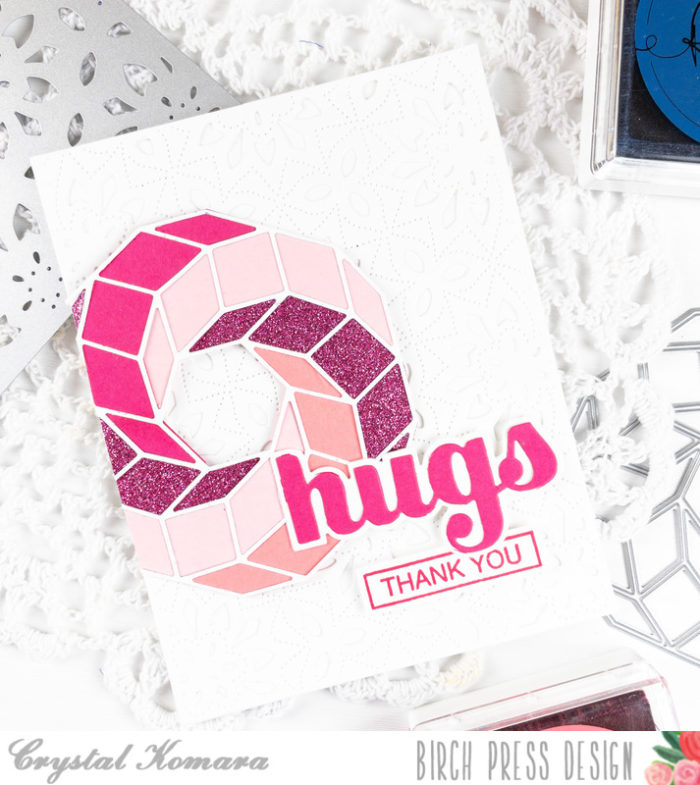
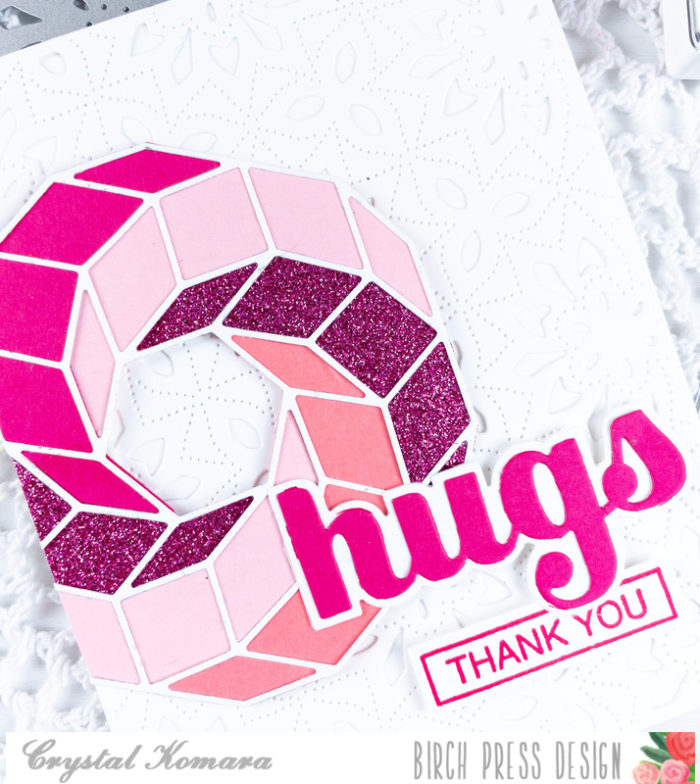
I die cut the Torus Ring outline from white cardstock. Using the second small die in the Torus Ring set, I die cut various pieces of pink paper that I adhered behind the white frame. I adhered the entire Torus Ring to the card with 3M foam adhesive for added dimension. For the sentiment I used the Big Hugs Sugar Script die. I die cut the large base layer from white cardstock and the top layer from pink cardstock. I adhered both layers together with liquid glue and then adhered the entire sentiment to the card using 3M foam adhesive.
I added the word “thank you” from the Ticker Tape stamp set. I stamped the sentiment in pink ink and fussy cut the block outline. I adhered this sentiment below the word “hello” with 3M foam adhesive.
I hope you have enjoyed today’s cards and hopefully I have inspired you to step outside of your comfort zone, because that’s when amazing things can happen! Thank you for visiting and have a wonderfully creative day!
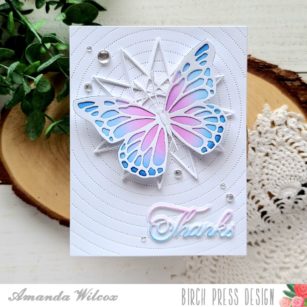
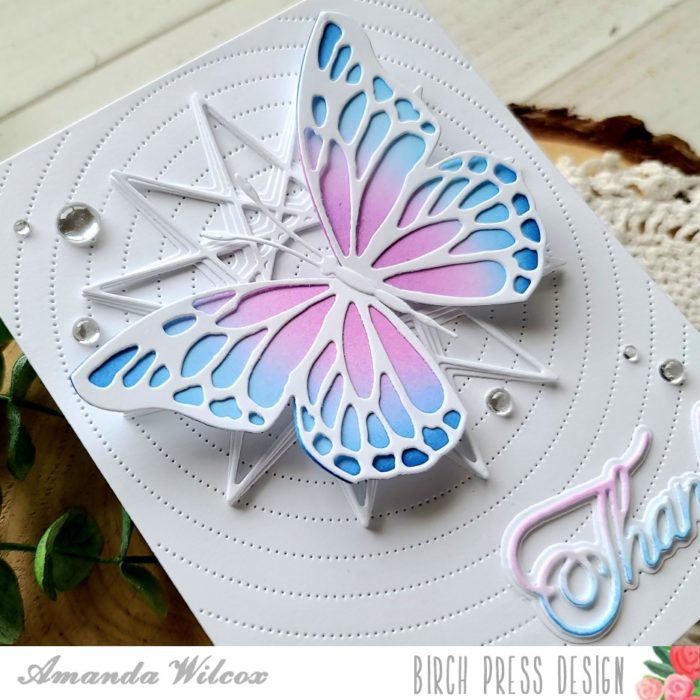
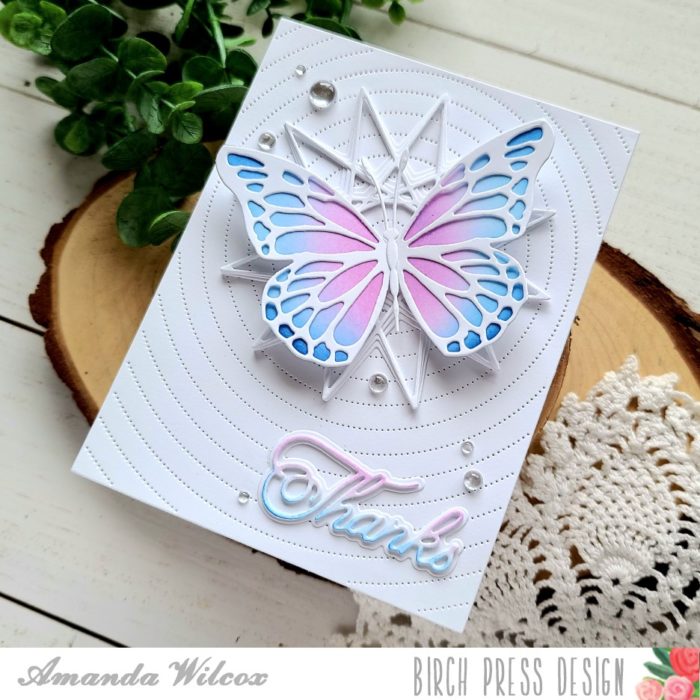
Hello everyone. It’s Amanda from Twiddler’s Nook joining you today with card featuring a few of the newest products in the shop!
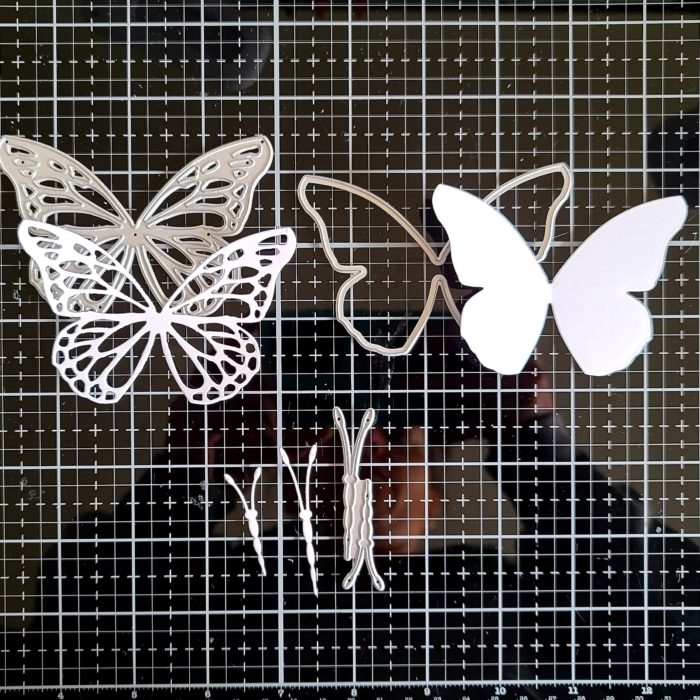
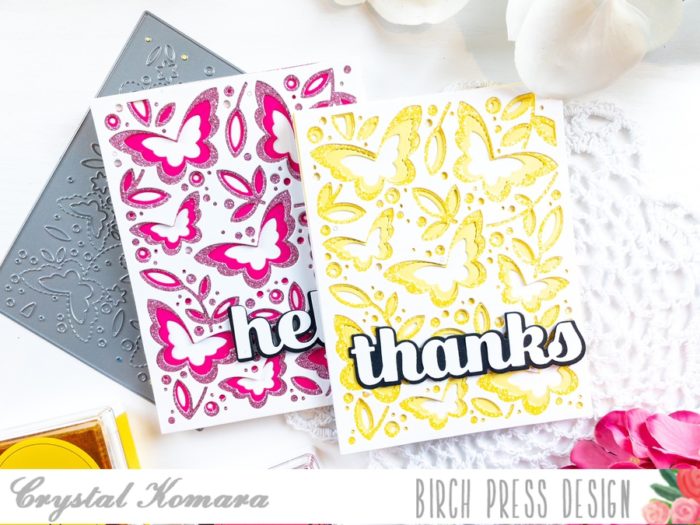
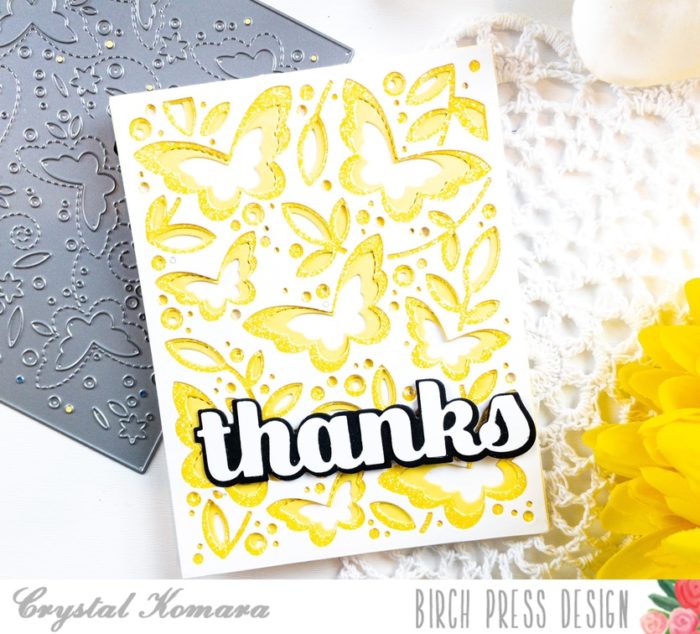
This new butterfly basics die set is absolutely amazing! There are so many possibilities, I feel like I could be making butterflies for ages without duplicating anything! Let’s get started on today’s card.
From white cardstock I die cut the starburst layers and radial pinpoint plate first.
Next, I pulled out the butterfly basics and die cut the pieces shown from white cardstock as well. There are two body sizes in the same die for the butterflies so I just put the one I didn’t use back in the envelope for next time.
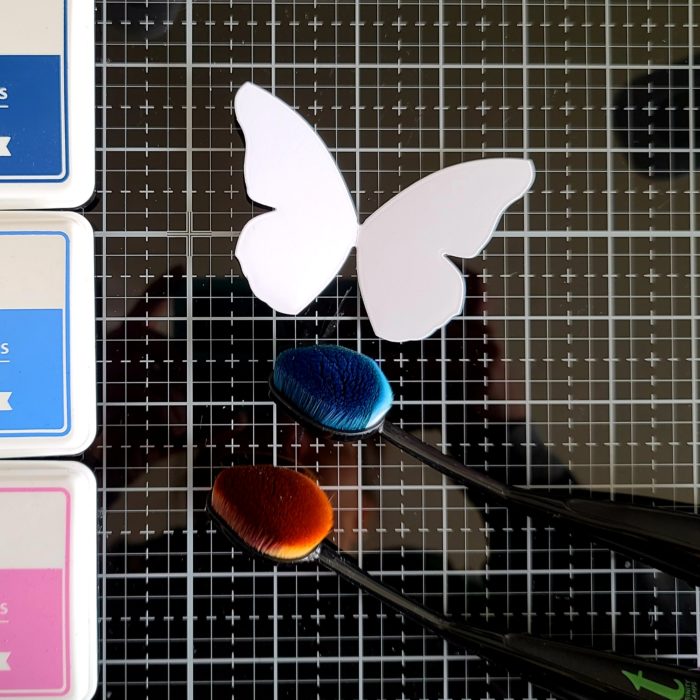
Next I grabbed my blending brushes and some dye inks and inked up the solid butterfly die cut.
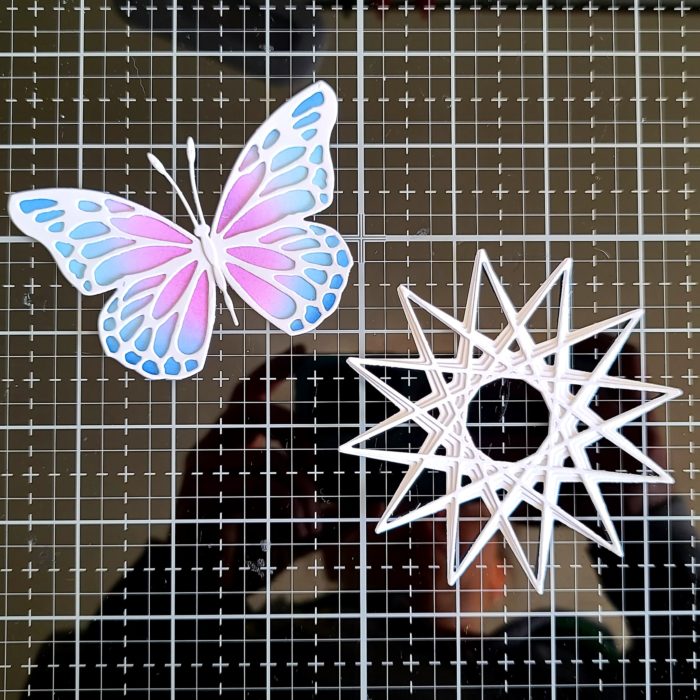
I used liquid glue and adhered the starburst layers together along with assembling the butterfly.
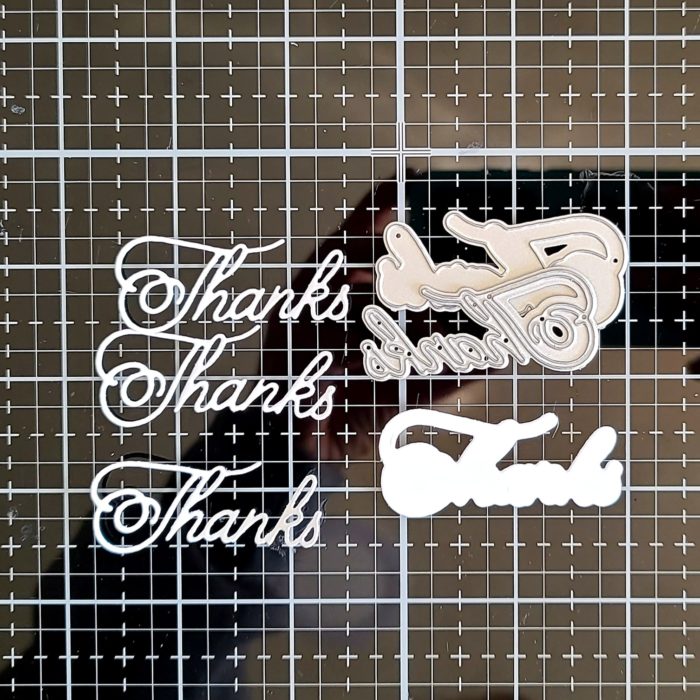
I chose the handwritten thanks die for my sentiment on this card. I cut the shadow once and the word 3 times. I used ink left in my blending brushes and inked up the top layer of the word die so it stands out just a little. Then I used liquid glue to adhere the layers all together.
For assembly, I used liquid glue to adhere the radial background to a white card base, then the starburst to that. I put one foam square in the middle of the butterfly body and stuck it down a little off center of the starburst.
Last, I added the thanks sentiment to the bottom right and finished things off with a scattering of fairy drops in all three sizes.
Be sure to head to the shop and take a look at the new products! There are lots and they are all incredible!
I appreciate you sharing your time with me. Have a fabulous day!
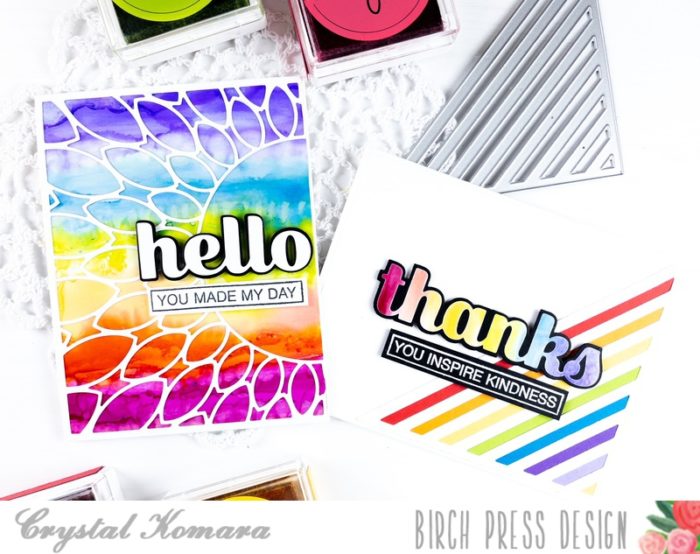
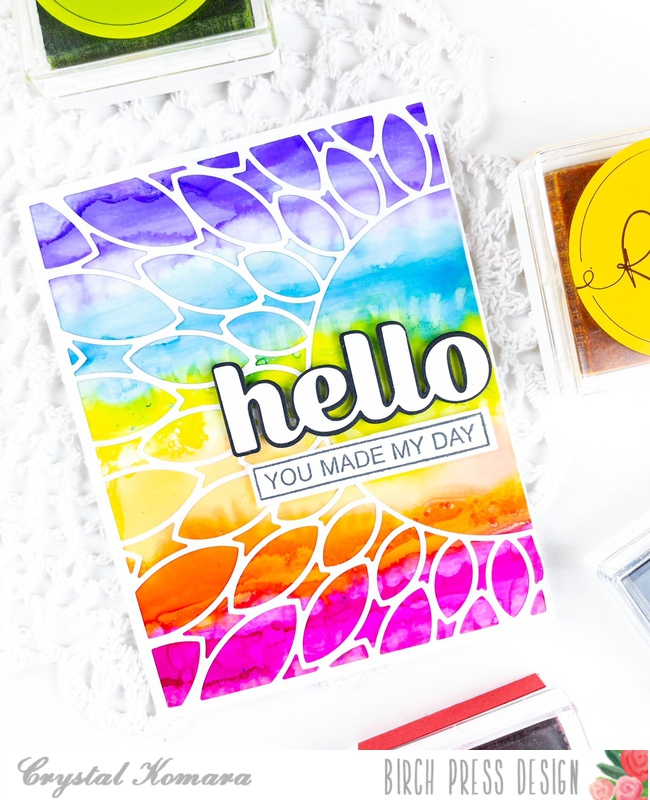
Hello friends and happy Monday! I hope you all enjoyed a pleasant weekend and hopefully found a little time to do something crafty. This is Crystal Komara here with you today sharing two rainbow themed cards using a variety of products from Birch Press Design. I just love creating with rainbow colors because the end result is always happiness.
For this first card, I used Layer A of the Lumina Layering Plates. I already had a pre-made rainbow colored alcohol ink background in my stash, so this card came together quite quickly. Gotta love that! I simply adhered the rainbow alcohol ink background to my card base – I use 80 lb. Neenah Solar White Smooth cardstock. Then I die cut Layer A of the Lumina Layering Plates from white cardstock. I adhered the intricate die over the alcohol ink background.
I die cut the word Hello using the Big Hello dies. I die cut the shadow background from black cardstock and the top thinner layer from white cardstock. I adhered both layers together with a Tombow Dot Runner and then I adhered both layers to the card using 3M foam adhesive for added dimension. Using the Ticker Tape stamp set, I stamped the sentiment in Memento Tuxedo Black ink and fussy cut the sentiment strip out. I adhered the sentiment below the “hello” dies using 3M foam adhesive.
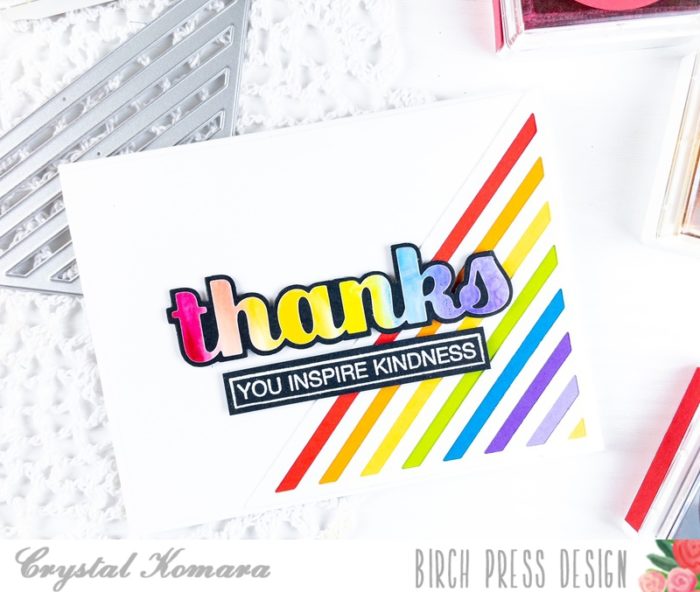
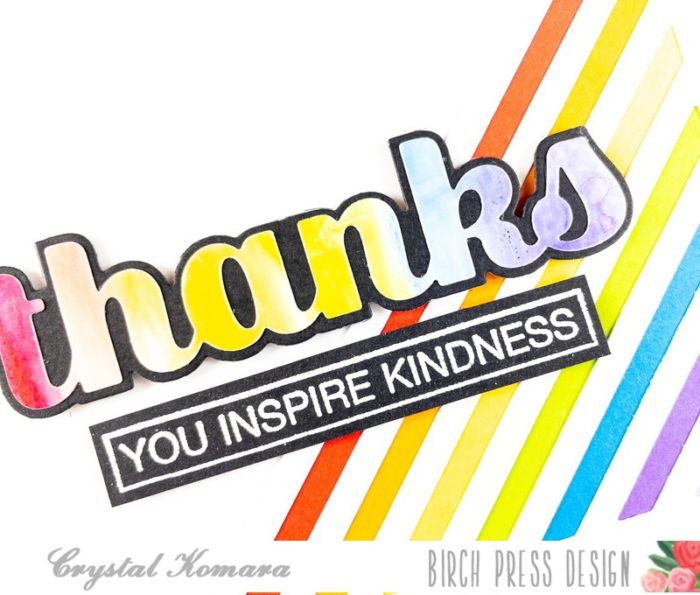
For this next card, I used the Linear Triangle die and lots of colored cardstock strips in various bright colors to keep in line with my rainbow theme.
My card base is 80 lb. Neenah Solar White Smooth cardstock. I also die cut the first 5 1/4″ x 4″ mat from white cardstock. I die cut the Linear Triangle from white cardstock and adhered thin strips of colored paper behind the lines. I placed the completed triangle in the lower righthand corner of my card. I die cut the large “thanks” die from black cardstock and from a piece of pre-made alcohol ink cardstock. I layered the two together with a Tombow Dot Runner and placed the large sentiment in the center of my card using 3M foam adhesive for added dimension. Using the Ticker Tape stamp set, I stamped the sentiment “you inspired kindness” in Versamark ink on black cardstock and heat embossed it with white embossing powder. I fussy cut this sentiment and adhered it below the large “thanks” using 3M foam adhesive.
I hope you have enjoyed today’s cards and they will bring some cheerfulness to the start of the week. Thanks for visiting and have a wonderfully creative day!
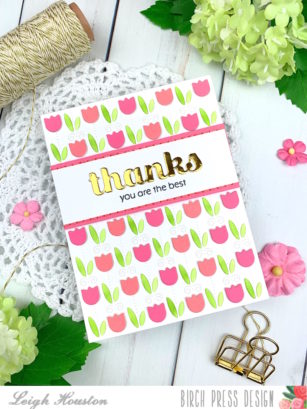
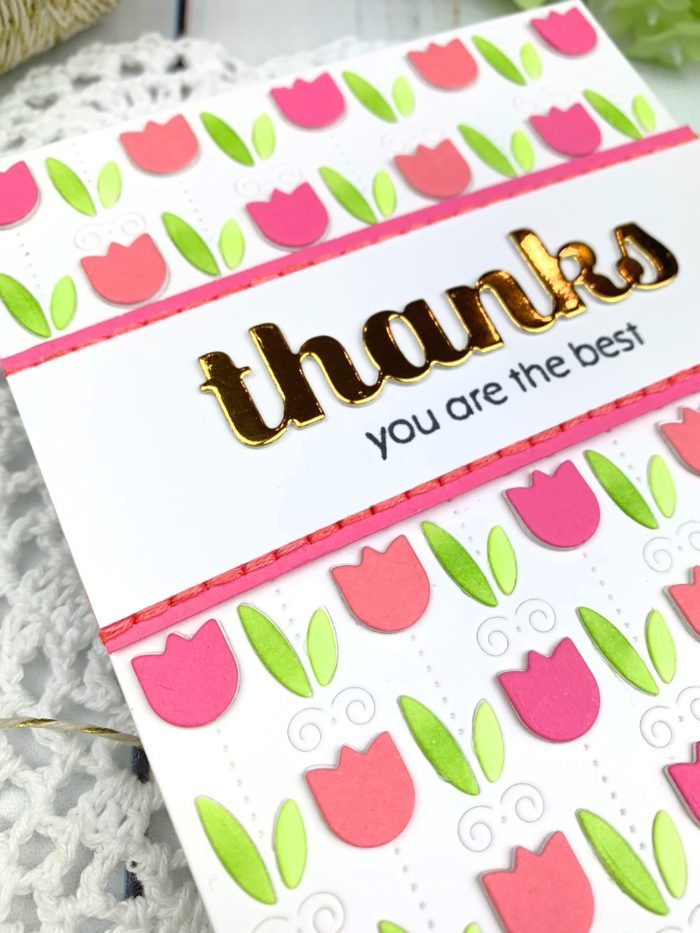
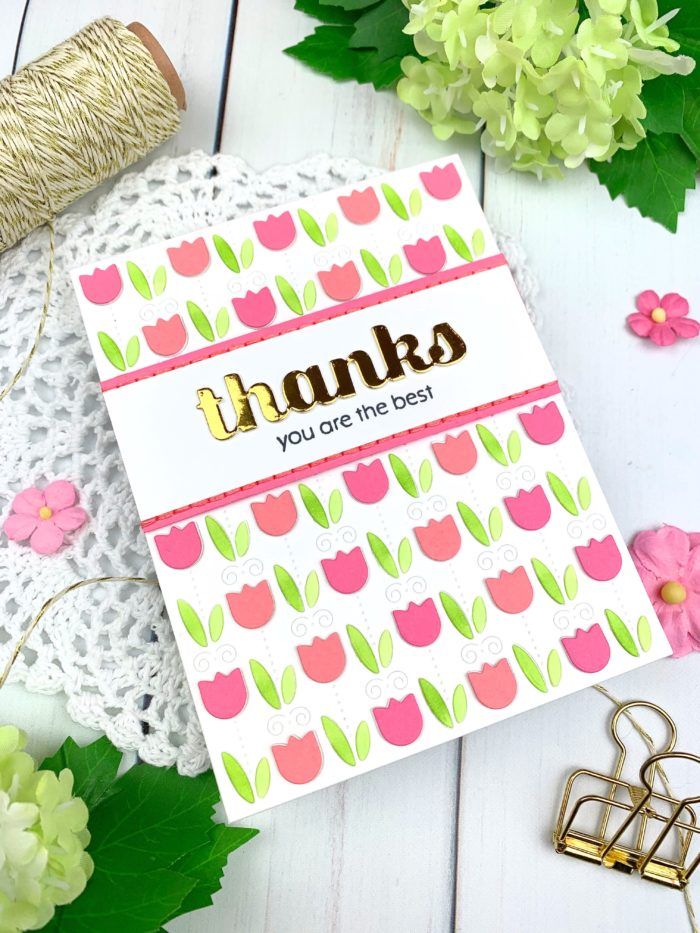
Hi, friends! I’m so happy you joined us here today. I created this dimensional die cut card using Birch Press Designs’s Field of Blooms layering dies, and I’m excited to walk you through the process!
I started this card using Layer A of the Field of Blooms layering dies, cutting it out 3 times from 110# cardstock. I popped out all of the little flowers and leaves, and adhered one of the panels to a white card base (I saved the two extra panels for future projects). I then used liquid adhesive to stack 3 layers of tulips and 2 layers of leaves on top of each other, leaving two rows blank for the sentiment. This sounds time-consuming, but it was quite quick and really easy. To finish the tulips, I die cut some coral and hot pink colored tulips from colored cardstock and adhered them on top. I then used Copic markers to color the leaves and adhered them on as well. I wish that photography captured the fun dimension of this card!
To create my sentiment strip, I cut a coordinating strips of pink cardstock and white cardstock and added a row of handstitching for some texture. I then stamped my “you are the best” sentiment from the You Are Awesome stamp set and die cut my sugar script “thanks” from gold mirror cardstock. And with that, this card was finished!
I hope you enjoyed this project! Links to the products I used are below. Thank you for stopping by today and I’ll see you again soon with more cardmaking projects!
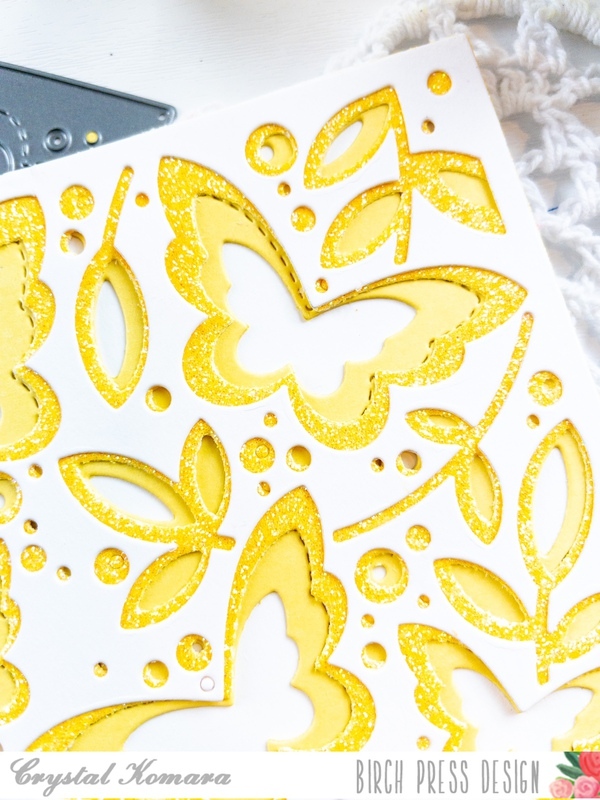
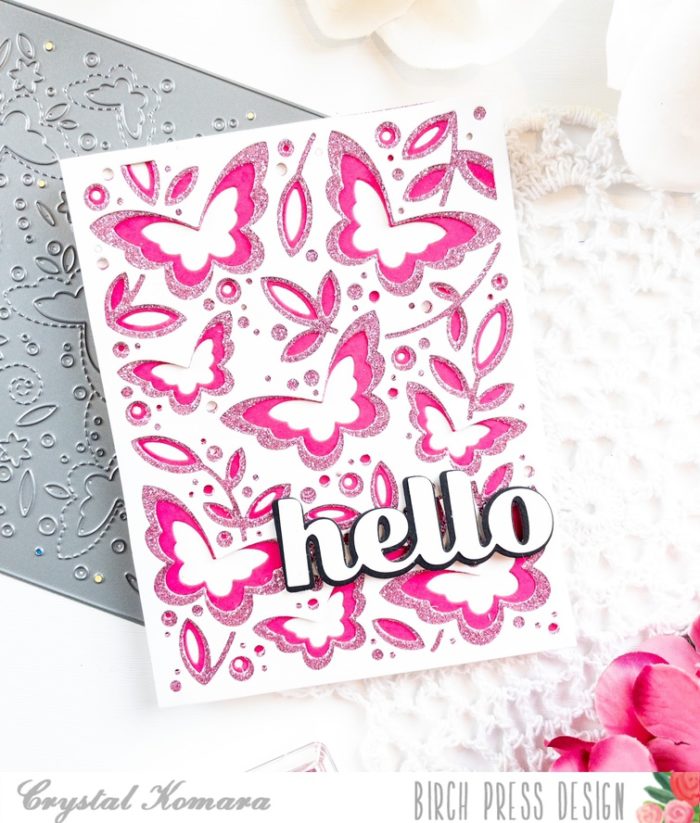
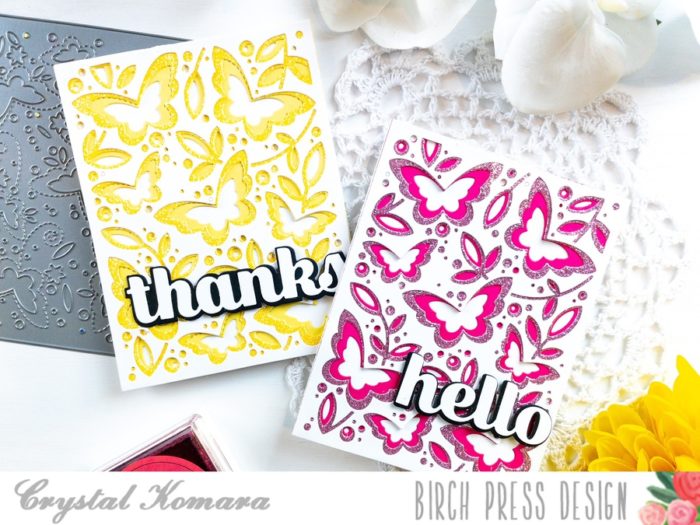
Hello readers and happy Monday! If you celebrate the Easter holiday, I hope you had a blessed weekend. This is Crystal here with you today sharing two cards in bright spring-like colors made using the Butterfly Garden Layering Plates.
I am so in love with these beautiful layering dies and while while one layer is enough to make an impact, all three layers together is really stunning, especially when you add in a middle layer of glitter cardstock.
Here is a step-by-step instructional video so you can see how both of these cards were made:
I hope you have enjoyed these cards! Thank you for visiting and have a wonderfully creative day.
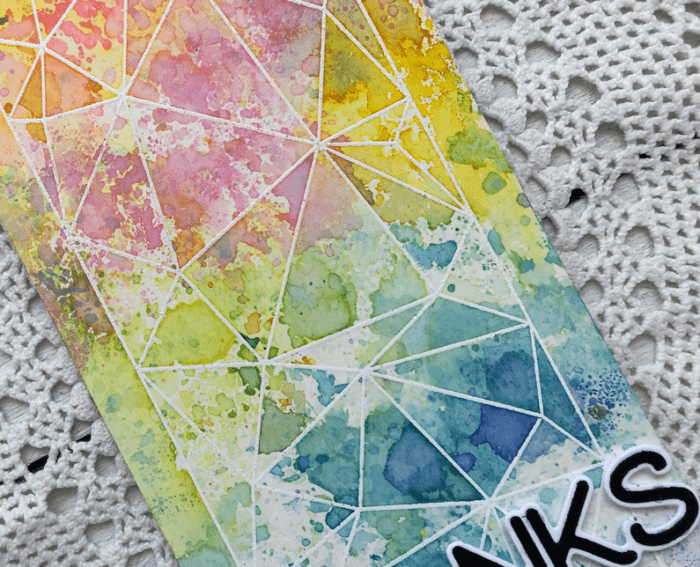
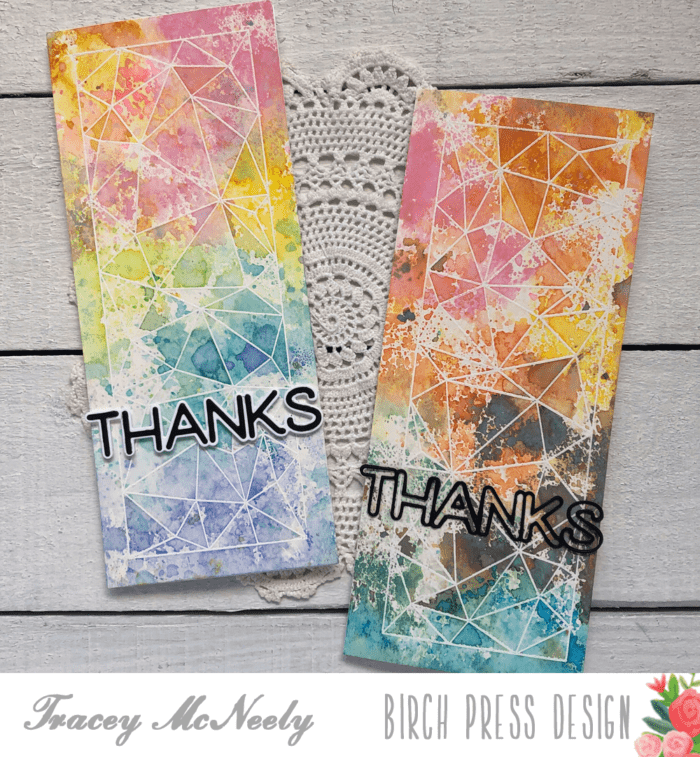
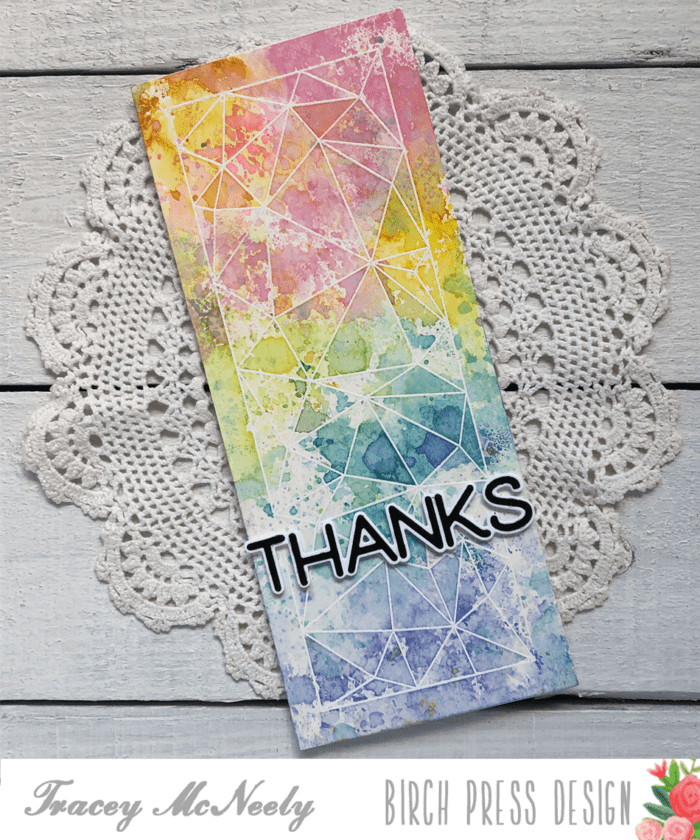
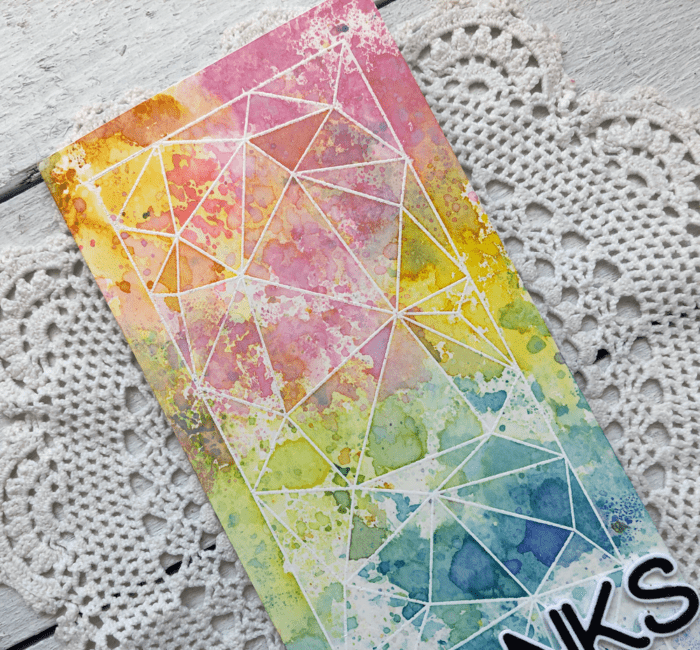
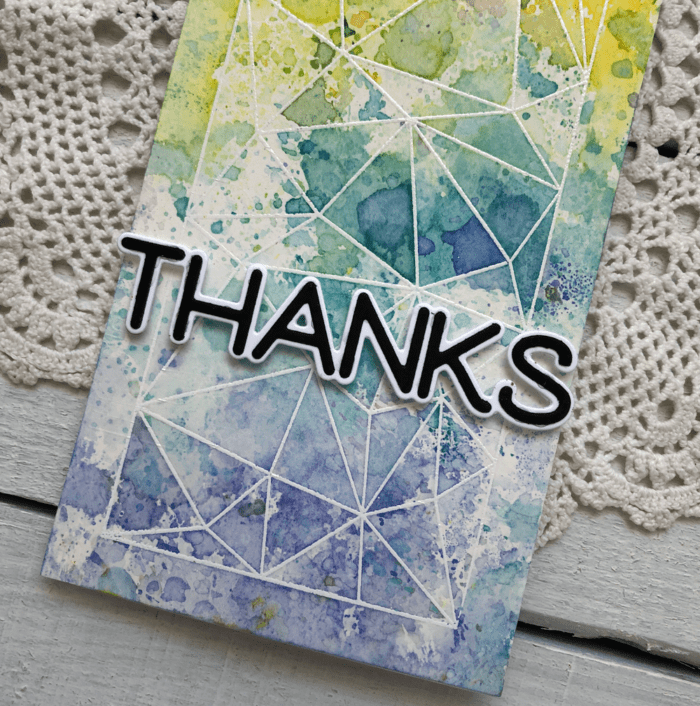
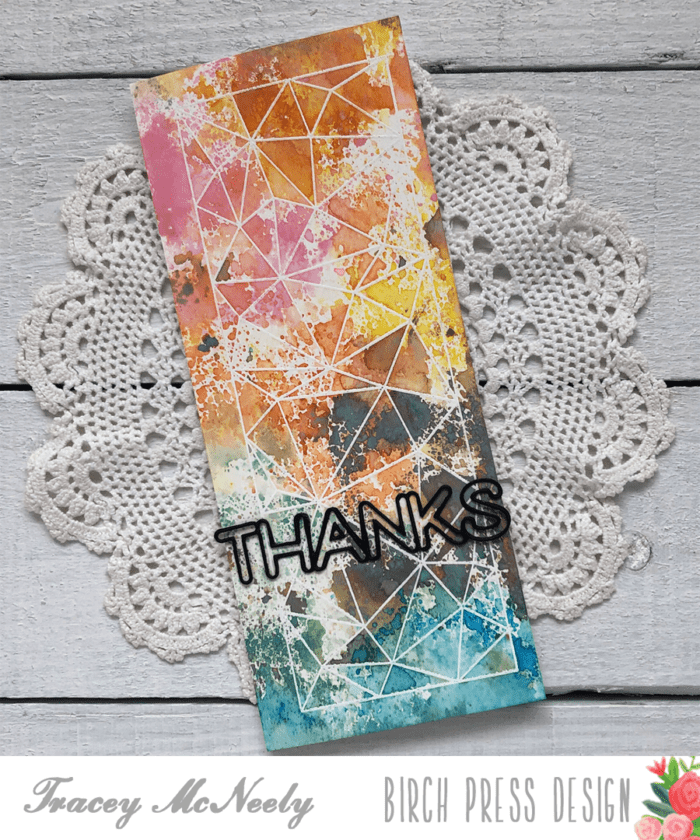
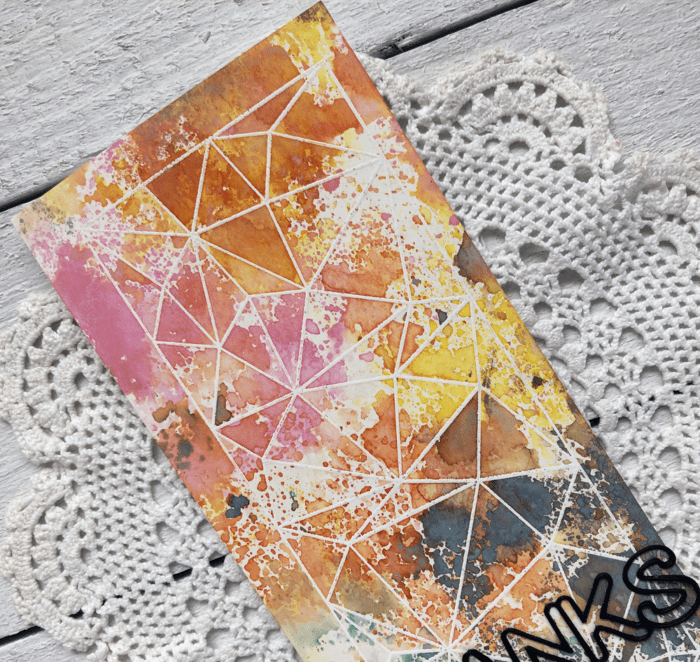
The faceted rectangle stamp in the Crystal Lingo clear stamp set is the perfect size for 8 1/2″ x 3 1/2″ slimline cards.
For both of the my cards today I started off by white heat embossing the faceted rectangle from Crystal Lingo on to two panels of watercolour cardstock cut to 8 1/2″ x 3 1/2″.
TIP: When embossing on watercolour cardstock I always make sure I prep the paper well with my embossing buddy and I always double stamp my embossing ink.
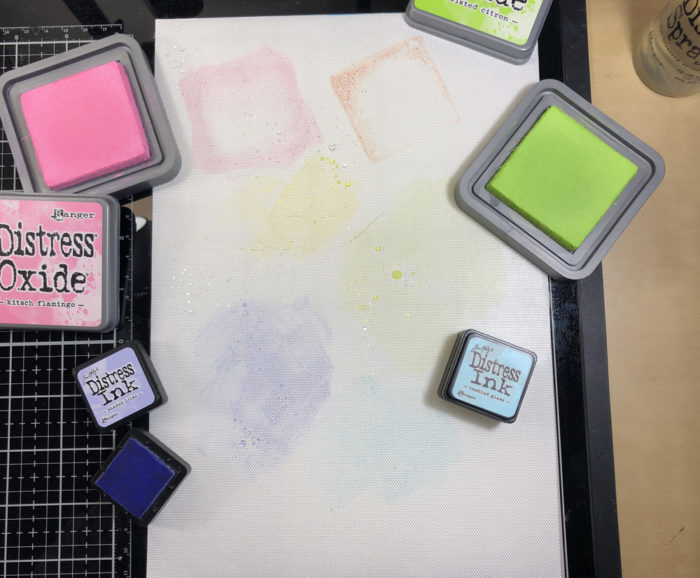
I laid down a combination of Distress Ink and Distress Oxide inks on to my craft mat in a staggered rainbow. I used Kitsch Flamingo, Carved Pumpkin, and Twisted Citron Distress Oxide inks and Mustard Seed, Tumbled Glass and Shaded Lilac Distress ink.
I spritzed some water onto the mat and then put my panel facedown into the ink and picked it up right away. I did not smoosh the ink, just straight on and off. I dried the panel thoroughly and then went back to the mat and tapped the panel around putting on a second layer. I spritzed a bit of water on my panel where the Distress Inks were to disperse them a bit more.
Once again I dried the panel thoroughly and went back to the mat one more time but before tapping down I spritzed the craft mat a bit more to reactivate the ink and did one final layer by tapping the panel on the craft mat. I stamped and die cut the Big Lingo Type Thanks die in white and black and attached it to the card with foam adhesive!
The second panel was actually the first panel but a little bit of Frayed Burlap was all it took to muddy up my rainbow.
Rather than toss it away I kind of liked the masculine vibe that the brown gave to the card. So I did the same as I did for the other card.
I dried it and added more ink until I had three layers! I die cut the Big Lingo Type Thanks using only the detailed die three times for the sentiment. I adhered the three layers together to give the die cut some stability. Trust me this takes some patience–lol! I adhered the die cut directly to the card front.
It’s so much fun to take an image like this, emboss it and then have some fun with your inks. This technique can be done with most inks and of course a little bit of water.
Thanks so much for joining me today and we’ll see you next time!
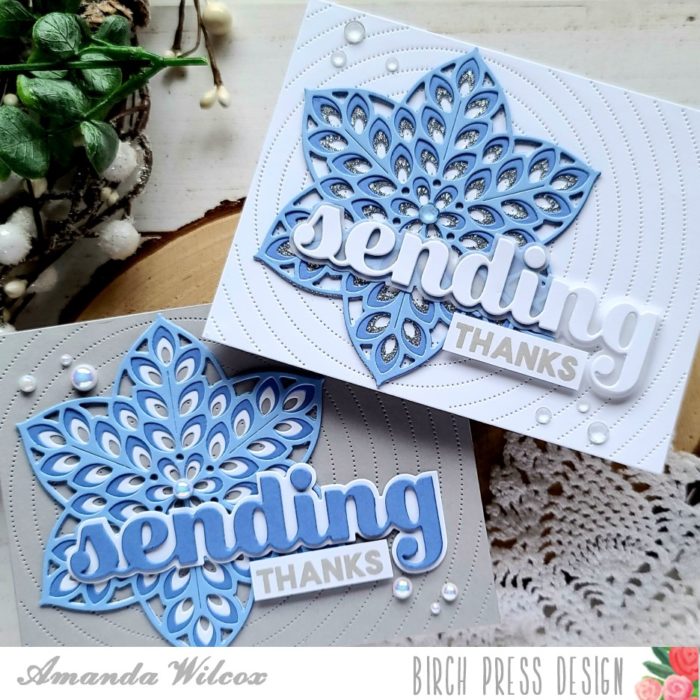
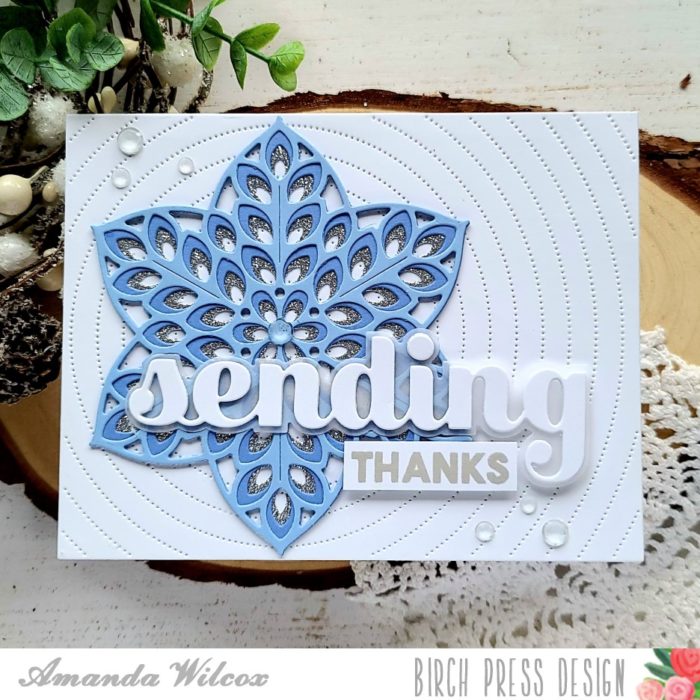
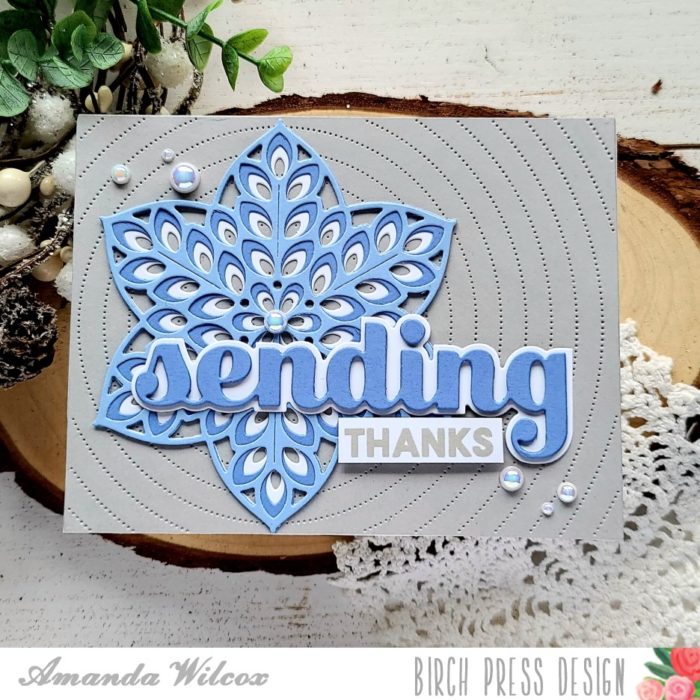
Hello everyone. This is Amanda from Twiddler’s Nook today getting a jump on winter thank you cards that I’ll be sending out after Christmas.
For these cards, I die cut the layers for the Floral Star from two different blue cardstocks and then the bottom layer from white and silver glitter cardstock. I was playing around with different looks and wanted to see which I liked better.
I used liquid glue to adhere the layers and put clear blocks on top to help them dry flat.
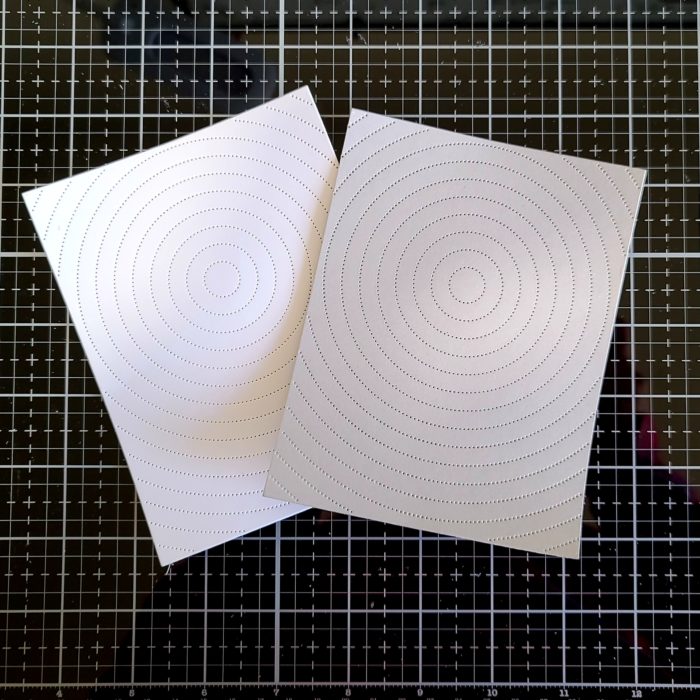
Next, I die cut the Radial Pinpoint Plate from a light gray and white cardstocks and adhered them to white card bases.
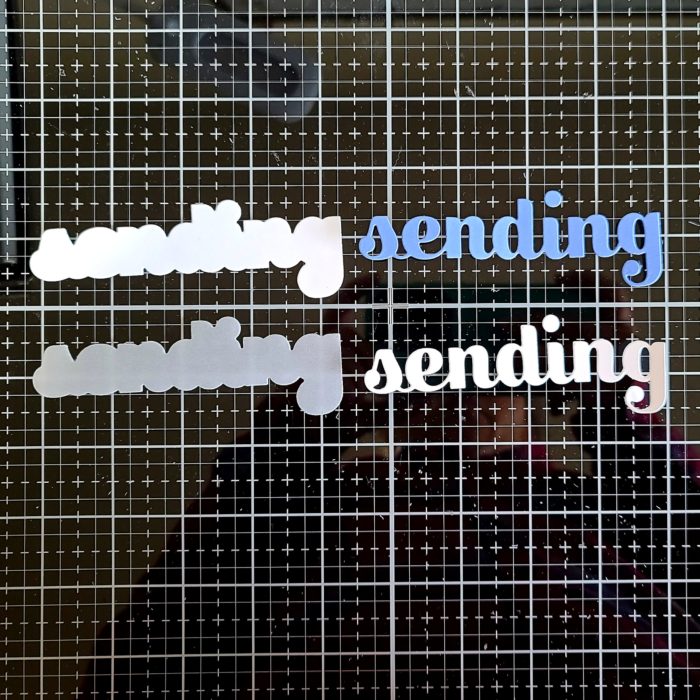
I knew I wanted these to be thank you cards so I pulled out the Big Sending Sugar Script word dies out and cut the shadow from vellum and white, and the word from white and the darker blue cardstock.
I really like the look of the stacked word dies for that dimension and visual interest so I cut each word 3 times and glued them together. Once those were dry, I moved on to assembling my cards.
I used liquid glue to adhere the floral star, then a combo of liquid glue and foam squares for the sentiments.
For finishing touches, I added some white pearls to the gray card and clear gems to the other.
I appreciate you sharing your time with me. Have a fabulous day.
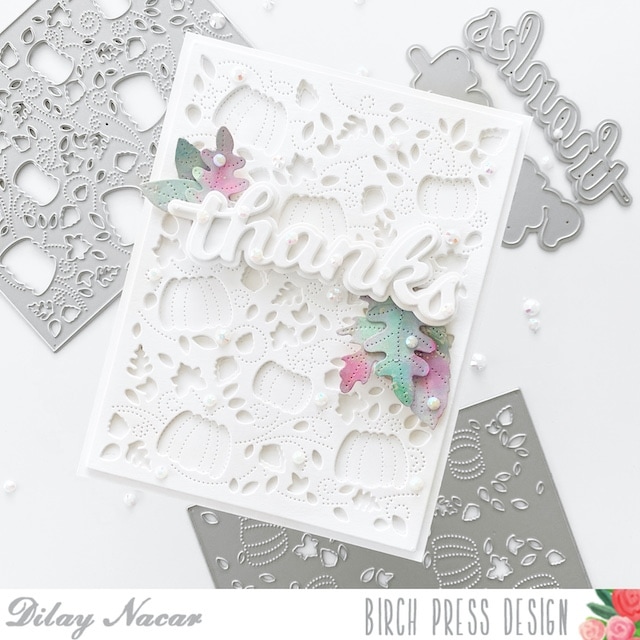
Welcome, everyone! Dilay here, and I’m back today to share another fall-themed card with a clean and simple design that is perfect for the season! Let’s get started!
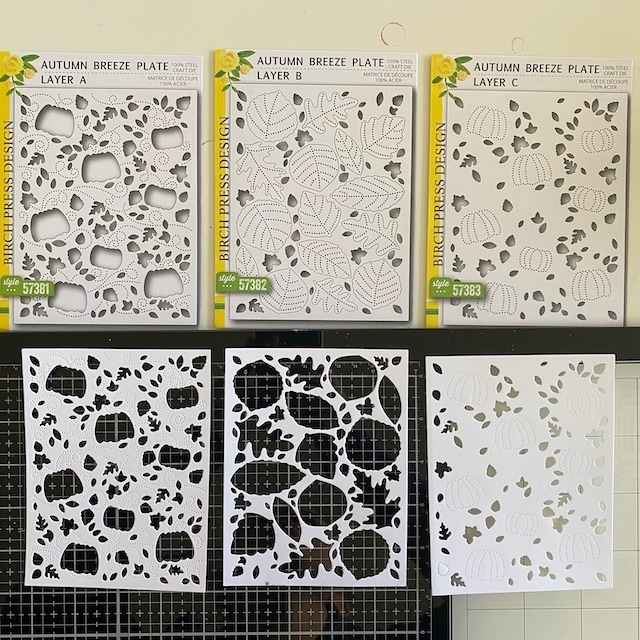
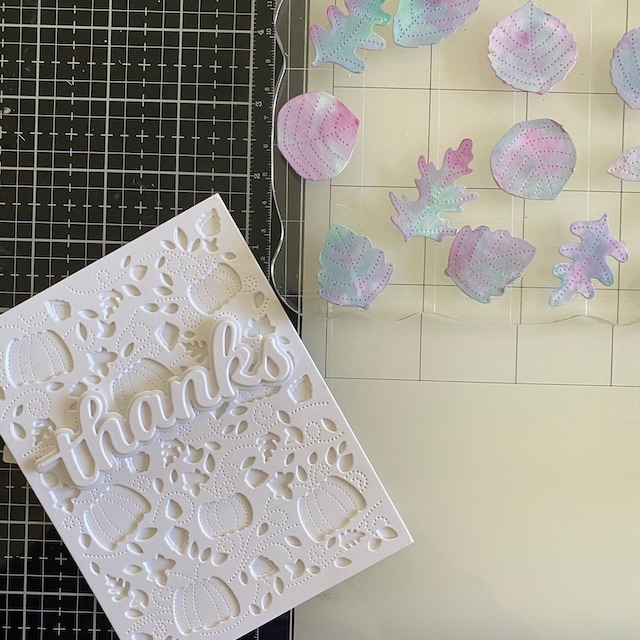
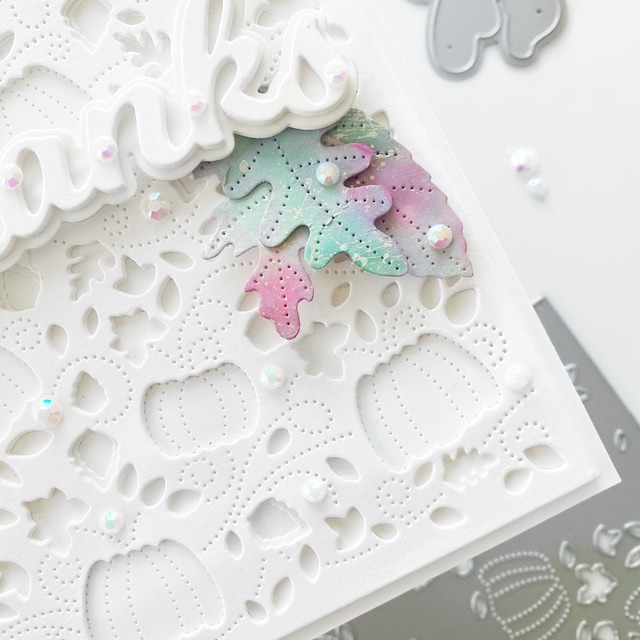
I began by cutting a solid piece of white cardstock down to an A2 (4.25” x 5.5”) size for the base of my card. Next, I die cut layers A, B and C from the ‘Autumn Breeze’ plate set, again in white cardstock, and adhered layer A and C onto the base.
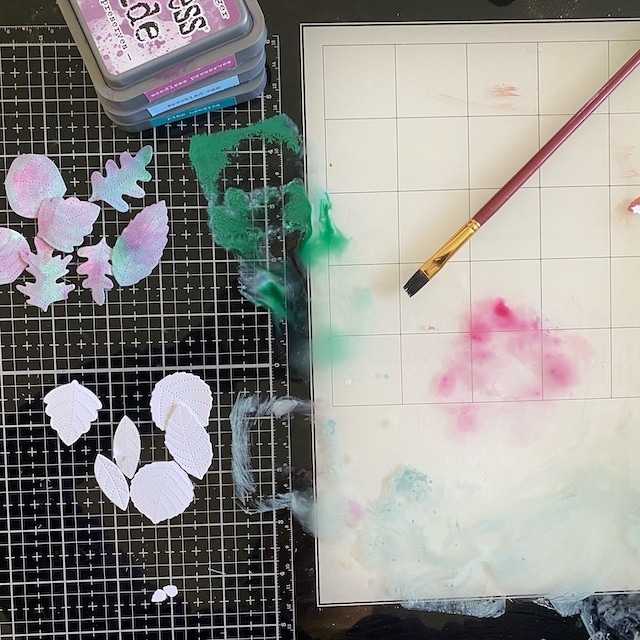
Then, I brush-colored the leaf cutouts from panel B using Distress Oxide inks diluted with a little water – this technique produces a distressed look and feel once dry, mimicking real leaves (I chose to use non-traditional fall colors, but any colors would look great for this step!) I then used a brush to splatter silver paint onto the leaves for an added touch. I set those aside to dry while I worked on the next step.
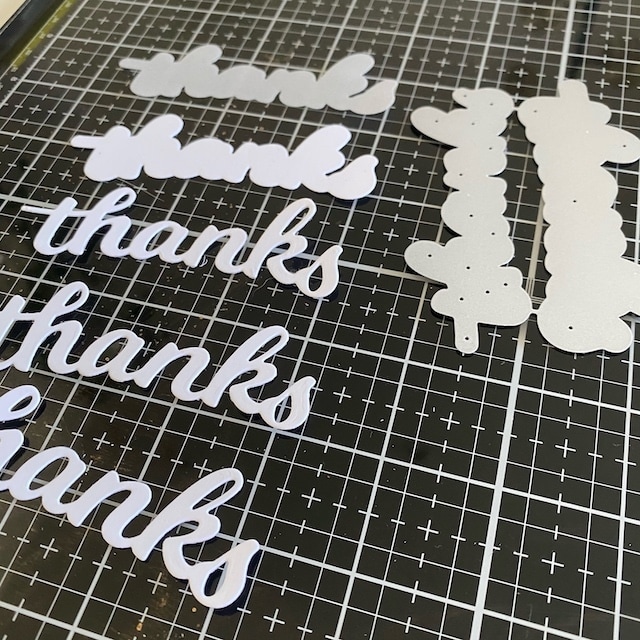
For the sentiment, I chose something that would blend in nicely with the background and allow the leaves to ‘pop’. I die cut ‘Honey Script Thanks’ word die three times in white cardstock and the shadow once in white cardstock and once in vellum, and stacked them together using liquid glue. I then adhered the completed sentiment onto the center of the base.
Once the leaves were dry, I tucked a few under both ends of the sentiment (you’ll have some leaves leftover for a another card). To finish, I added white iridescent rhinestones throughout the design to give it some sparkle!
I hope you enjoyed today’s design and found some inspiration! Wishing everyone a wonderful holiday week!
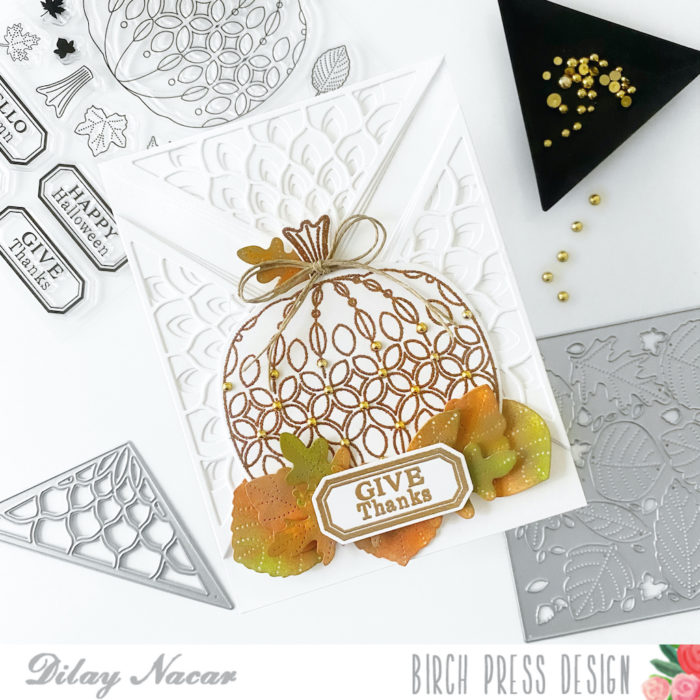
Hi, crafty friends! Dilay Nacar here from JustCallMeDee.com and I am so excited to be sharing my first card as a member of the Birch Press Design Team! It’s truly an honor to be sharing my creations and today, I’ll be going over a fall themed ‘Give Thanks’ card that I created using some of my favorite dies and stamps!
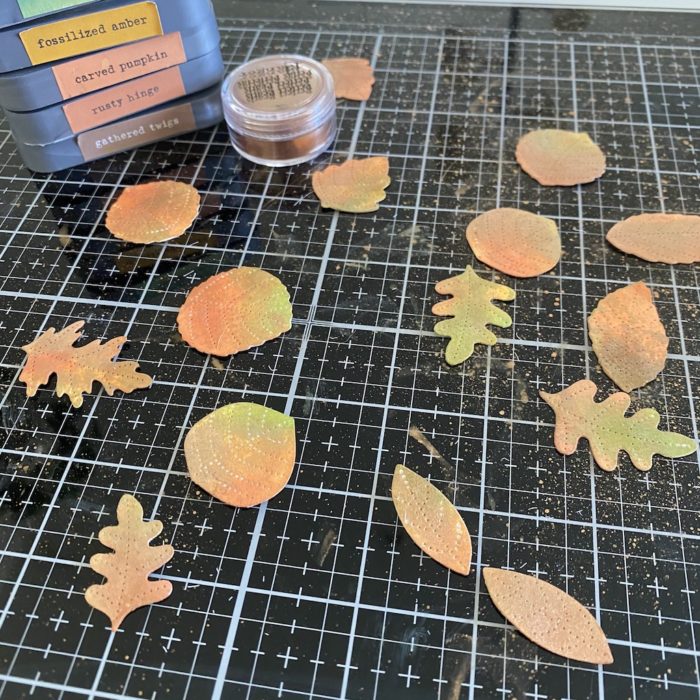
To begin, I made the leaves using Layer B from ‘Autumn Breeze Plate Layer Set’ die and Bristol Smooth cardstock, then colored them various fall colors using the ‘smooshing’ technique with Distress Oxide inks. I set these aside to dry while I worked on the background.
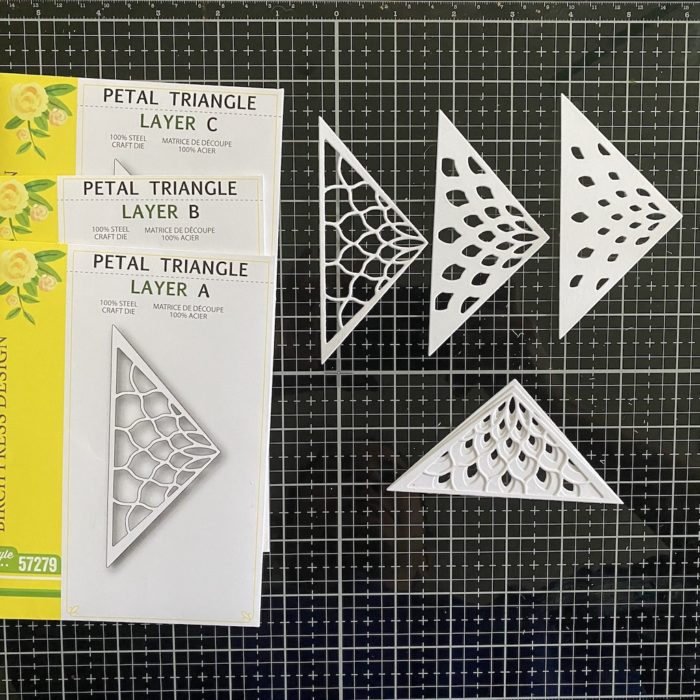
For this layer, I wanted a clean white background with layered detail, so I used the ‘Petal Triangle Layer Set’. I die cut each layer (A, B, and C) in white heavyweight cardstock then adhered them together using liquid adhesive. I prepared 3 sets of these triangles – one for each of the sides and one for the top of the card – then used liquid adhesive to adhere them onto an A2 sized, white 100 lb cardstock base.
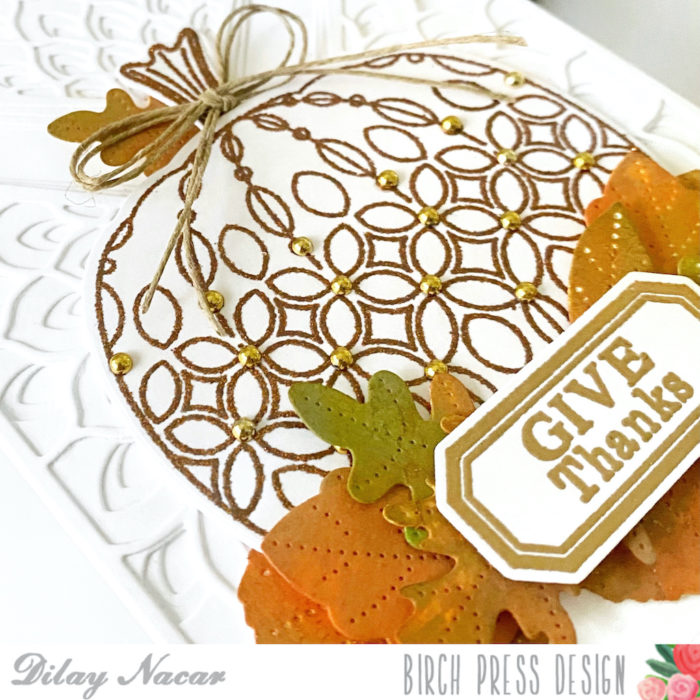
Next, I used the ‘Pumpkin Lacework’ stamp and die to make the main image. I heat embossed the pumpkin stamp and stem stamp using a copper embossing powder. I cut out the image using the coordinating die and adhered it onto the background.
Once leaves were dry, I placed them along the bottom of the pumpkin image (and one on the stem) then made a bow using a piece of twine and adhered it onto the stem.
For the sentiment, I used the same ‘Pumpkin Lacework’ stamp and die set and heat embossed it using a fine gold embossing powder. I used foam tape to adhere it along the bottom of the pumpkin.
Finally, to complete my card, I used off-brand gold flat back bobbles and placed them throughout the pumpkin pattern.
I hope you enjoyed my card today and found some inspiration for your next creation!