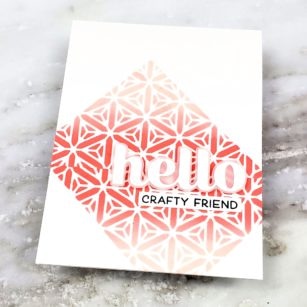
Hello there! It’s Seeka here, and I thank you so much for spending a bit of your day with us. For my card today, I used a die cut as a stencil to create a clean and simple (and easy!) card.
I started by using the Prism Triangle Collage die to cut a piece of scrap 80# cardstock. This pretty die doesn’t cut out a triangle, rather it leaves a beautiful triangle-shaped lattice pattern in your paper. This became my stencil.
I used low-tack paper tape to hold an A2-sized piece of bristol smooth paper on my glass work surface and then placed and taped my stencil over top. Using foam blending tools, I blended Abandoned Coral and Tattered Rose Distress Oxide inks over the stencil, blending the two to create an ombre effect. Because my stencil was made out of paper and not as durable as a plastic stencil, I took care not to drag my blending tool too much. Instead, I used a strong tamping motion.

When I finished, I removed the stencil and rotated it 180 degrees. I aligned the base with the triangle I’d just finished stencilling, and shifted it a bit to the left. I used the same colors to ink blend and then removed the stencil.
For the sentiment, I used the Big Hello Sugar Script die to cut a piece of white cardstock. I cut the shadow layer out of vellum and then adhered the two together. Then, I stamped “crafty friend” (from the Just Because stamp set) in black pigment ink onto white cardstock.
To assemble the card, I adhered the die cut sentiment with foam tape and then adhered the sentiment strip flush to the card front. Then I adhered the card front to an A2-sized card base.
Thank you so much for visiting!


Supplies


