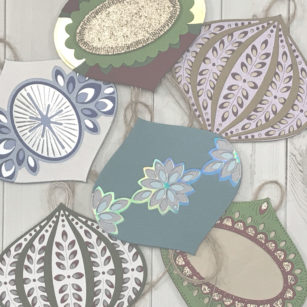
For today let’s make some Ornaments! The layering dies we will be using today are Bella, Twinkle, Marisol, Flicker and the Basic Set… When you combine all these together your possibilities for your creations are endless!
What was even better I was able to dig into my stash and use up some scrap pieces of cardstock and started die cutting all my pieces!
I made sure I die cut two of every layer I wanted to use for each ornament. This way we are able to make our ornaments double sided and place our hanger inside the two layers!
When we look at our stash, we also have the opportunity to choose colors that we normally would not consider, sometimes we get stuck on the traditional colors for the holidays! Choose any color to brighten up your Christmas Tree!
As always, I hope you enjoyed today’s project… and if you want to see more details just click on the video below and see how these projects come together step by step!
Make sure you stay tuned for more wonderful projects coming soon! Have a great day and always remember… Be Creative!
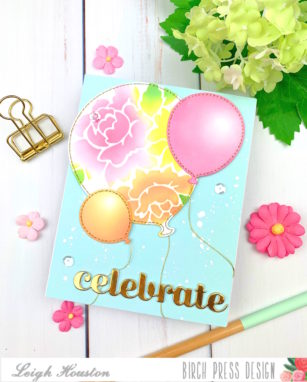
Hello, friends! I am so happy you stopped by today. I’m here sharing how I made this stenciled and stitched balloon card using Birch Press Design’s Party Balloon dies.
These Party Balloon dies are truly a must-have for creating birthday or celebratory cards. I love their stitched details! To start my card, I die cut my largest balloon and added stenciled details using Poppystamps’s Romantic Blooms stencil and Distress Oxide Inks. I then die cut two smaller balloons and added color with the same shades of Distress Oxide inks, being sure to keep a highlight area for some realism.
To add some more interest to the balloons, I stitched through the stitch holes using gold metallic thread and a simple backstitch. I then adhered some of the same thread to the back of the balloons to create their strings.
To finish the card, I splattered a sky-colored background panel with some white paint. I then cut my “celebrate” sentiment from gold mirror cardstock. I popped up my largest balloon with foam tape and adhered my balloons to the cards, wrapping their strings somewhat loosely around the back of the panel to add to the floating effect. A few sparkly sequins and this card was finished!
I hope you like this simple but pretty celebration card! Links to the products I used are below. Thanks again for stopping by and I’ll see you again soon with another card project!
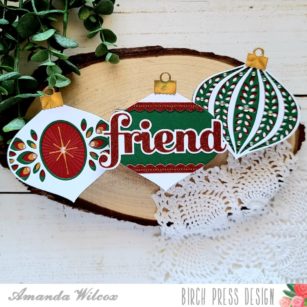
Welcome everyone! This is Amanda from Twiddler’s Nook today to share a trio of Christmas tags I made with the new ornament sets.
Let’s start with making the tag bases. I took a regular sheet of cardstock and folded it down the middle length-wise.
Then I place my base ornament die hanging off the folded edge about 1/4 inch and ran it through my die cutter. I got 3 tag bases out of 1 sheet of cardstock.
Then I moved on to creating the ornament fronts. I die cut the layers from different colors of cardstock and adhered them with liquid glue. Here are the layers to the Marisol ornament.
Then I moved on to the components from the original ornament basics set and created one from just those.
And lastly, I decided to create a twinkle ornament today too. These are so fun I really could have kept going.
As I mentioned earlier, I used liquid glue and adhered all of these layers together to create the fronts to my tags. Then I added the tag bases to the back of them. I die cut the ornament topper from the basics set and attached those to the tops. Let’s look at the finished product of each ornament.
This is the one using just the ornament basics dies. Once it was finished I thought the middle was empty so I added the word “friend” across the middle. I love how this turned out!
Here is the marisol ornament all finished with some baubles added for extra texture and interest. I think this one is just gorgeous! Definitely my favorite.
And the twinkle ornament with some gems added to it to finish everything off as well. Isn’t it just so pretty? I can’t wait to try this one in silver and blue.
I hope you enjoyed these ornament tags today and find some inspiration to create something wonderful.
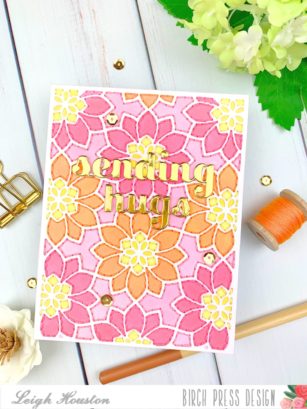
Hello, friends! I’m so thrilled you’ve joined me today for this cheery, summery card. I added some texture and dimension to the gorgeous Birch Press Designs Viola die set and I’m excited to share the process with you!
I started my card by die cutting Layer A from the Viola Layering Die Set twice: once from inexpensive cardstock, and once from Neenah Classic Crest Solar White #110 cardstock. I used my inexpensive die cut panel as a stencil, using alcohol markers to color in the negative spaces. When I was finished, I discarded the stencil and adhered the clean 110# layer on top of my colored card base using a strong liquid adhesive.
After the adhesive had dried, it was time for the stitching. I used a paper piercer to poke holes inside the die cut lines. I then used coordinating embroidery floss (I used 4 strands) and a simple backstitch to stitch inside these spaces. This went surprisingly quickly… a couple of episodes of bad TV and I was finished!
To finish my card, I die cut my sentiments from the Sending and Hugs Sugar Script dies from gold mirror cardstock. A few sparkly gold sequins and this card was finished!
I hope you enjoyed this project! Links to the products I used are below. Thanks again for stopping by today, and I’ll see you again soon with another card project!
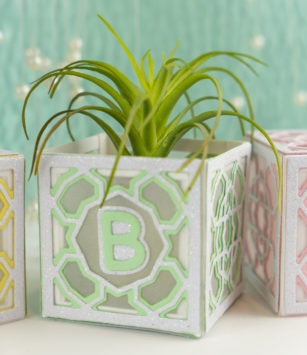
Hello! Today I’ve made two types of votives to share. They are both made the same way, but one is open on the top, and the others are made to cover a flameless candle. I’ve used the beautiful Grandiose Mini Tile layer set for the walls of the votives, and when the center is cut away, the Mod Alphabet dies perfectly fit inside the center! Although this is a custom box, making it was super easy by using the hinge from the Small Square Base set. Sky is the limit with what messages could be conveyed; from holiday greetings to names, it’s a wonderful table decoration or gift!
These are 2″ x 2″, and are perfect size for a small plant or small flameless candle. Very simple to make, I’ve made an example for a baby shower, or decoration for a baby’s room. The below photo shows what it looks like when used as a votive.
Check out the video for tips and how this project was created!
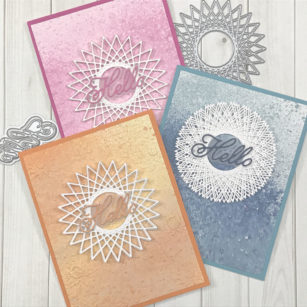
For today’s project I wanted to create some backgrounds for the String Art Circle Die! I used a combination of oxide sprays and embossing folders and played around to see what would happen to the pattern.
I used my mix media paper and my spray box to apply the color. For each color I chose two shades to obtain a variegated effect.
Once they were dry, I grabbed some embossing folders to add texture to the back ground for our focal point.
While they were drying, I grabbed my die and cut it out of white card stock multiple times for the different techniques I was going to complete.
I put the die together in three different ways. The first I simply layered three to each other. This creates a wonderful chip board that will hold up nicely through the mail.
The second I only used my liquid adhesive in the center ring of each of the circles. This allowed the tips of the string art to lift and give more texture to the image.
For the final card when applying each layer to each other I shifted the die over one section on itself. This gave a great effect of the die and really showed the string art!
As always, I hope you enjoyed today’s project… and if you want to see more details just click on the video below and see how these projects come together step by step!
Make sure you stay tuned for more wonderful projects coming soon! Have a great day and always remember… Be Creative!
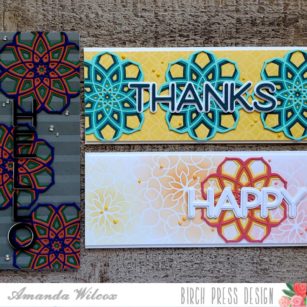
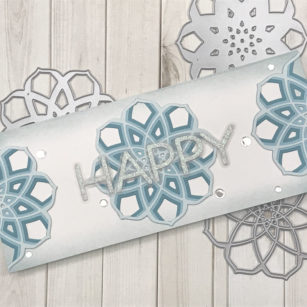
Hello everyone. It’s Amanda from Twiddler’s Nook joining you today for a trio of cards. I started with one in mind and just couldn’t stop creating! These were so fun to create!
We’re going to start with the process I used to create the Thanks card first and then I’ll touch on some differences with the other 2. Let’s dive in!
To create all of these cards, I chose my 3 colors and cut 3 of each of the Cora layers and assembled them with liquid glue.
For this first one, I used the Ring Tile stencil with a yellow dye in and blending brush. I just did half, then shifted the stencil and did the other half. It was super easy!
Then I glued the Cora layers to the stenciled panel, trimmed the excess off and adhered the panel to a white card base measuring 3.5×8.5. I die cut the letters from the Jumbo Lingo Thanks from white and the darkest teal and adhered them all together. Finishing off by adding them to the top of my card and adding some Nuvo Crystal Drops in dandelion yellow scattered about.
Here’s a look at the finished product. I absolutely love these colors together! And that sentiment is so bold and wonderful! I love it! Let’s keep going with the HAPPY card next.
I created my Cora layers the same way with different colors and moved on to stenciling a panel with the Midnight Mandala stencil this time. I started on one end with my blending brush and some melon dye ink, then moved the stencil and used peach ink and finally moved it one more time and ended with yellow so it all coordinated with my cardstock colors.
This time the sentiment is white on white with 3 layers of the letters on top for dimension.
Now for this design, although I created 3 of the Cora layers up front, I only used one because I love the stencil showing through. I adhered everything and popped the panel on a white card base. For finishing touches this time, I used Nuvo Crystal Drops in dandelion yellow, sugared almond and bubblegum blush.
Now, let’s check out that bold masculine version.
Again, I created the Cora layers with those awesome bold colors and set them aside to stencil my background.
For the sentiment this time, I decided not to use the shadow and try moving the letter vertical though. It looks so cool this way!
I adhered my stenciled panel to a card base and then adhered the Cora layers and trimmed the excess. For placement on the sentiment I used a T-ruler to keep it all straight. Notice how the “O” is funny because of the curve…I adhered all the other letters, removed the stencil and eyeballed centering the “O” under it all. It looks much more balanced.
Then I finished this one off with some cool bubble embellishments and it’s done.
I know this was a really long post and I appreciate you sticking with me. I hope you found some inspiration to create something wonderful. Have a fabulous day!
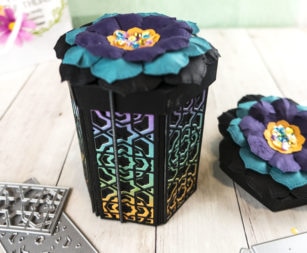
Hello! Part of the brand new release at Birch Press Design is this fabulous Hexagon Box Base. Such a festive box with lots of room inside, and the dies are unique because they allow for total customization of height.
Rather than design each side (which could be done in so many different ways with stamps or dies!) I used the Mini Grandiose Bevel Plate Layer Set – it fits perfectly! There are other designs also available, such as the Mini Honeycombs or the Mini Dazzle sets that also work.
I used the Hexagon Lid which is an add-on to the base set, along with the Vivid Bloom Stitched Layer Set to create a 3D flower to sit on top of the lid (The Vivid Bloom set also fits perfectly!)
I cut into the petals of the Vivid Blooms to separate them a little, wet the paper, and ran a stylus inside the petals for a fun, eclectic look. For the center, I poured on some glue, and let matching colors of sequins fall into place. The glue dried clear leaving a fun pile of sparkle! What a fun project!
I’ve created a video to show how I created this box and lid and that can be seen here, but these boxes can be made so many different ways! Enjoy the video, and have a great day!
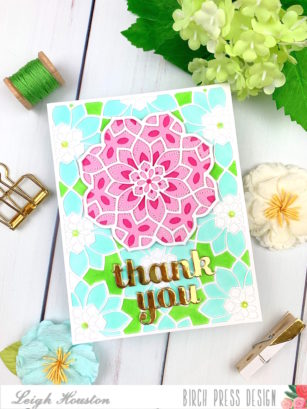
Hello, friends! I’m so happy you stopped by today! I’m here sharing a new stitched card made with Birch Press Designs’s new Kinsley and Viola dies. These two dies work so beautifully together and combined to make the perfect summery thank you card.
I started my card by die cutting my center medallion from Kinsley Layers A (in white) and C (in a medium pink). After adhering these two layers together, I decided to add some stitching along the stitch lines from layer C. I accomplished this by poking through the holes to enlarge them ever-so-slightly, then using a simple backstitch with two strands of white DMC floss. This was really fast and easy and added some pretty texture to the medallion. I then cut a backing piece from Birch Press’s Vivid Bloom Stitched Layer Set (this set cuts the perfect backing for the Kinsley Layering dies).
To create my background panel, I die cut the Viola Layer Plate A from thin cardstock, and used this piece as a stencil to color a background panel using alcohol markers in lime green and pool shades. I then cut a new Viola Layer A and attached this clean piece over the colored panel using strong liquid adhesive.
All that was left to do was assemble the card! I adhered my center medallion to the panel, then die cut my thank you sentiment from the Sugar Script “thanks” (I cut off the “s”) and you dies. Some little gems in the centers of the florals finished the card.
I hope you enjoyed this project! I had such fun creating it. Thanks again for stopping by today, and I’ll see you again soon with another fun Birch Press Design card!
For today’s project I wanted to create a SLIMLINE card featuring the Cora Layering Die set and the wonderful Big and Bold Sentiment Die sets!
I started, as always getting my die cuts ready and set them aside so I could create my card base and design panel. The panel is cut 3 ½ inches x 8 ½ inches while the card base is cut at 7 inches x 8 ½ inches and scored along the 7-inch side at 3 ½ inches.
I layered my dies and also my sentiments and used my liquid adhesive to make sure they were secure. Before I placed my focal die cuts, I used some ink and a blending brush to add a hint of color around the edge of the design area.
I center my first die cut and then added one to each side and trimmed the edges with my long shears.
Added my first sentiment ‘HAPPY’ to the front of my card and then I added the second sentiment ‘BIRTHDAY’ to the inside!
As always, I hope you enjoyed today’s project… and if you want to see more details just click on the video below and see how these projects come together step by step!
Make sure you stay tuned for more wonderful projects coming soon! Have a great day and always remember… Be Creative!