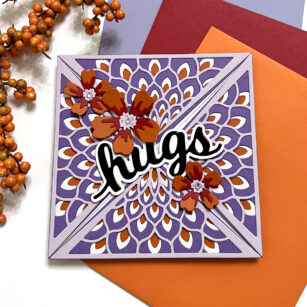
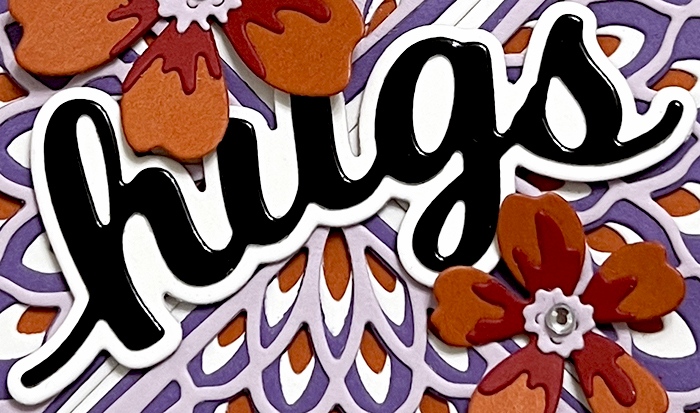
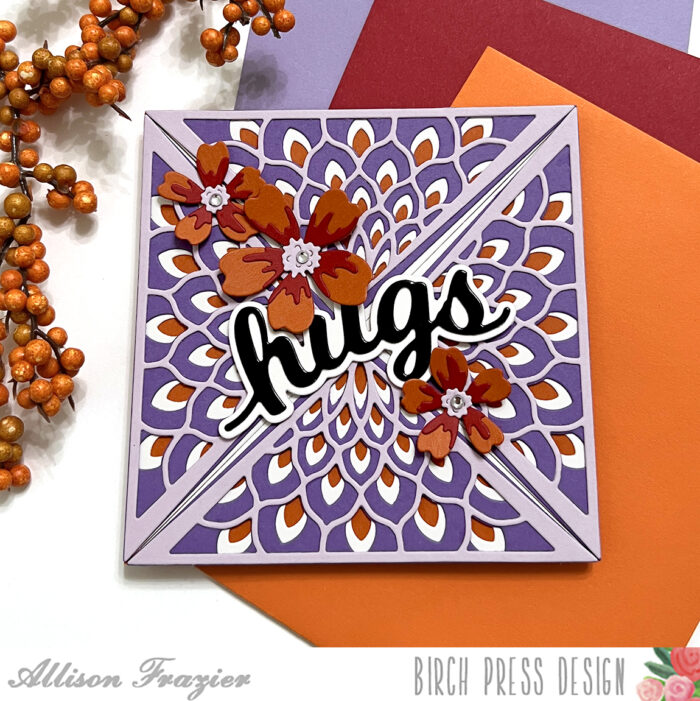
Hello, Birch Press friends! Today, I am sharing this colorful card featuring the Petal Triangle Layer Set. This color palette is something I have been wanting to try for awhile, but I was a bit apprehensive. I decided that a layering die set would be the perfect way to try it out. And, I’m really happy with the results!
The first step was to cut all of the triangles. There are 3 layers and four total triangles, so that is a total of 12 triangles to cut out. I used white card stock for Layer C, purple card stock for Layer B, and lavender card stock for Layer A. I then glued the three layers of each triangle together with liquid glue. I mounted the finished triangles onto a 4.25″ square card base that I had made from a dark orange card stock.
Next, I created three flowers using the Phlox Blooms and Leaves Contour Layers Set. I used the same orange color to create the base of the flower. I cut the detail pieces out of a deep red card stock. The small center pieces were cut from the lavender card stock. I adhered all of those together and set them aside for final assembly.
I used the Hugs Honey Script Die for my sentiment. I used two layers of white card stock for my shadow layer. I cut the main layer from black glossy card stock. I adhered the sentiment to the center of my card panel. Finally, I arranged the flowers around the sentiment and added a clear fairy jewel to the center of each flower.
Thank you so much for joining us today. I hope this card inspires you and brings a smile to your face!
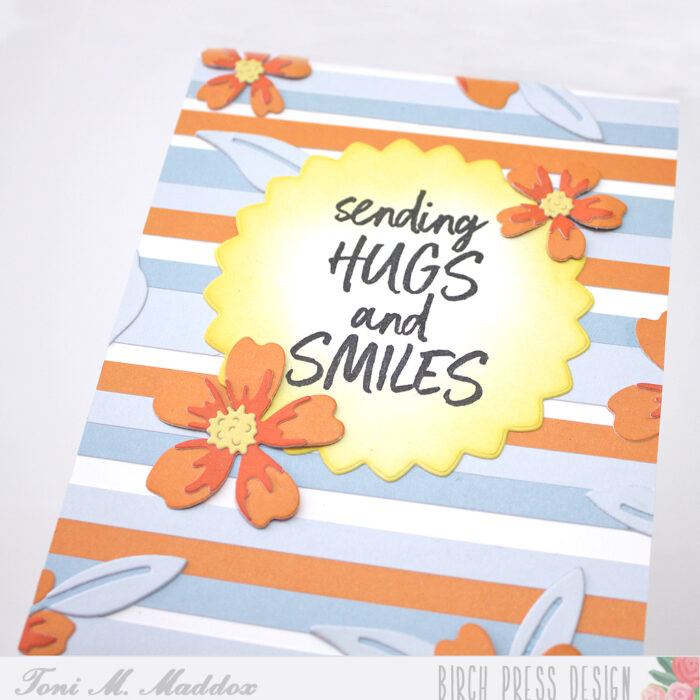
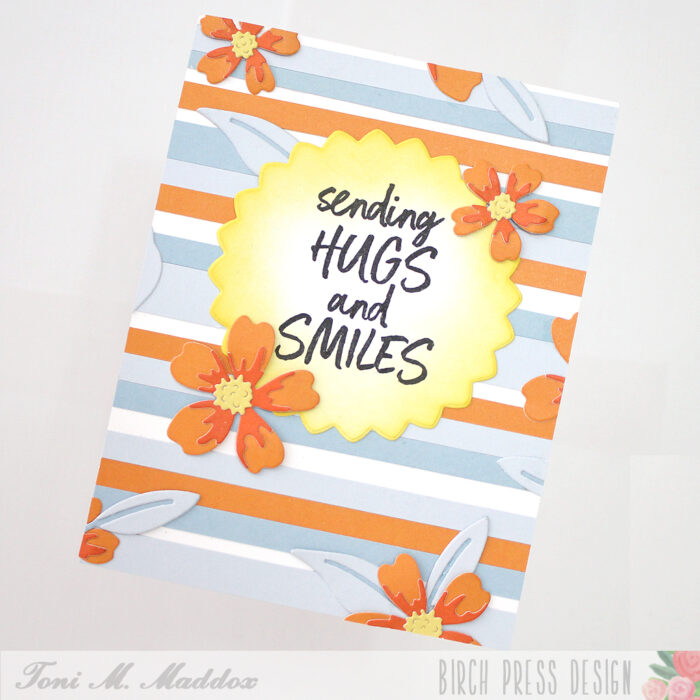
Hello, Birch Press fans! Toni here with you today sharing a card that just makes me happy–I love the colors and the blossoms. So pretty!
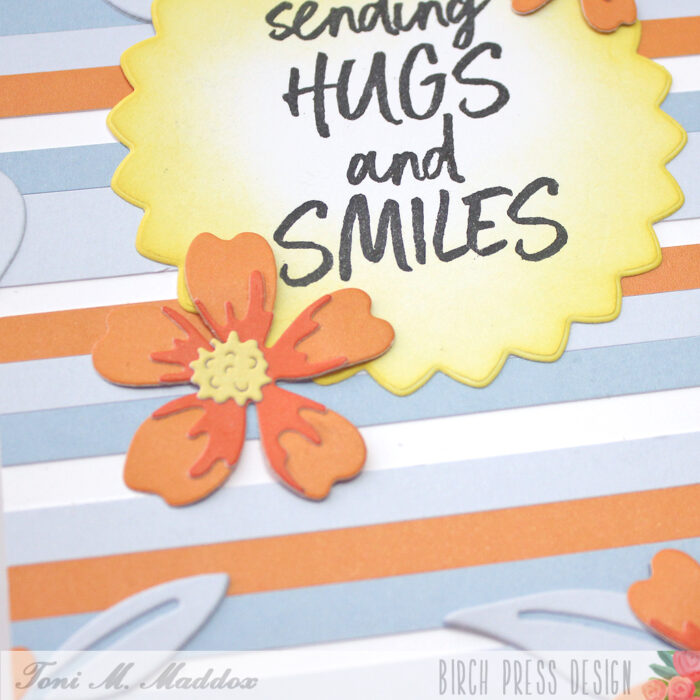
I cut out randomly size strips of Memory Box Sunny Orange and Stormy Blue 6×6 cardstock which I adhered to the card base, leaving empty areas so the white base acted as another color strip.
I used the die that comes with the Gilded Petalpoint Hot Foil Plate to cut out a “sun” which I sponged with Distress Oxide Mustard Seed. I stamped one of the Brush Sentiments on top of that in Versafine Clair Nocturne.
I cut out the Phlox Blooms and Leaves Contour Layers using the same cardstock, then adhered them randomly over the card front, nestling them in and around the sun. Easy, peasy!
I hope you enjoyed today’s card and have a great rest of your week!
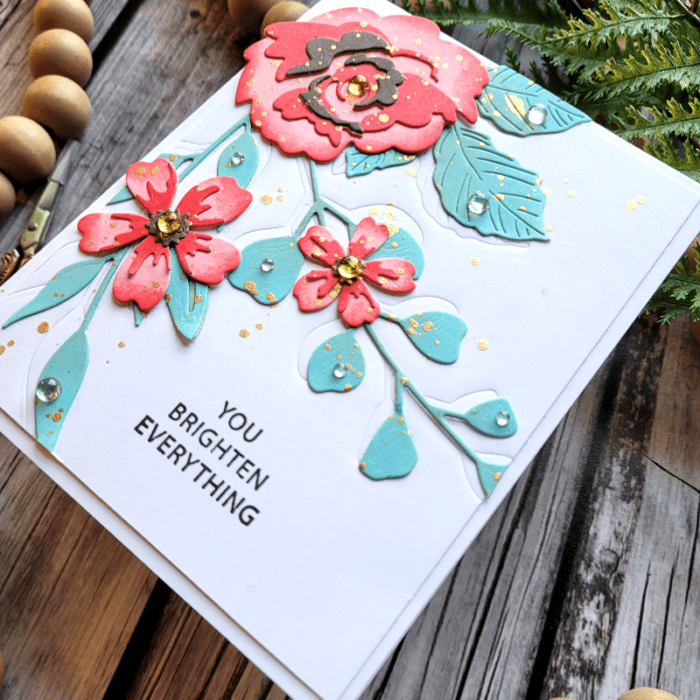
Hi friends! Today I want to share a Clean and Simple Spring Floral card!
A good Clean and Simple card utilizes white space creatively. And it’s hard to add detail and interest without over-doing it!!! I tend to create cards that are filled from top to bottom with details, but I fall in love with designers like Dee Nacar and her expert use of white space, so I’m giving it a try today, and I hope you like it!
Today I’ll be using Morning Rose & Triple Buds die, Eucalyptus Stem & Berries die, Phlox Blooms & Leaves die, Sylvan Berries & Leaves die, and Rainbow Days stamp. All of these items will be linked at the bottom of my post!
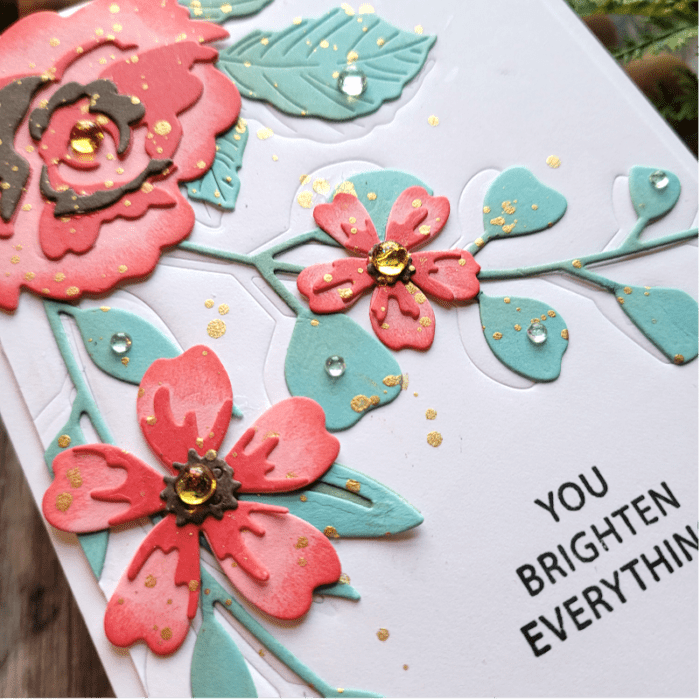
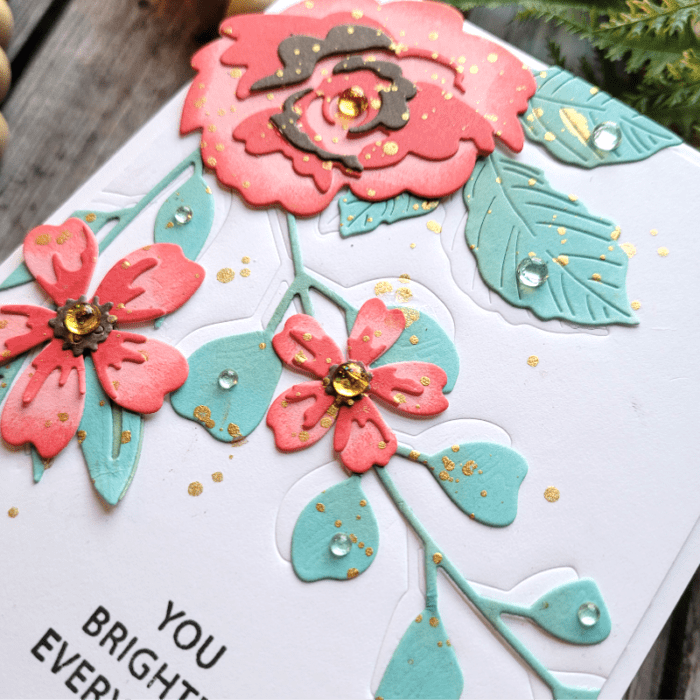
First step was to decide on the layout for my card panel. Once that was decided upon, I die cut my floral pieces and ink blended each piece with shades of coral and mint green. While it’s easier to ink blend a card panel first and then die cut second, I like to do the opposite because I can add more depth this way. I create an ombre effect with color that brings my flowers to life. And that’s one of the details you’ll need in a Clean and Simple card! Take a look at the photo above to see what I mean about adding depth.
Next, I added more detail to my white background card panel by using the same die cuts from earlier as an embossing tool. To do this, I placed the die cuts where I wanted them on the card panel, taped them into place so they wouldn’t move, and then ran them through my die cut machine with an embossing pad that comes with my machine (each machine is different, so look for an embossing pad that goes with your die cut machine). The embossing pad allows the image to be embedded into the card panel without cutting all the way through. This is another fun and creative way to use your die cuts! Look at the photo above and below to see the embossed images peeking out from behind the flowers and leaves!
Another option to add detail to a white card panel is embossing with embossing folders. You’re adding detail without losing the white space. It’s a great technique!
The final step was to place the flowers and leaves where I wanted them, along with the sentiment. I wanted to keep the sentiment simple, so I went with a stamped one rather than die cut one. The leaves are placed off-center from the embossed image so that a tiny bit of the embossed image peeks out from behind them. Then I added gold metallic splatters and sequins to add shine! You can see the splatters and sequins in the photo below. Some of the sequins are clear to look like rain drops on the leaves. The splatters and sequins are another subtle way to add detail without busying up the card panel! I was careful only to splatter around the flowers and leaves, leaving a good part of the white card panel alone.
I’m pleased with how this Clean and Simple card turned out! To summarize, here are a few pointers to keep in mind when creating Clean and Simple designs:
Emboss the white card panel with embossing folders or dies
Use splatters sparingly to add interest without overwhelming the card panel
Add detail to the focal point by ink blending to create depth and life to your florals
Keep the sentiment simple and small
Add sequins or a Nuvo Shimmer pen to add shine and shimmer to your focal point
Keep one half to one quarter of the card panel white and untouched
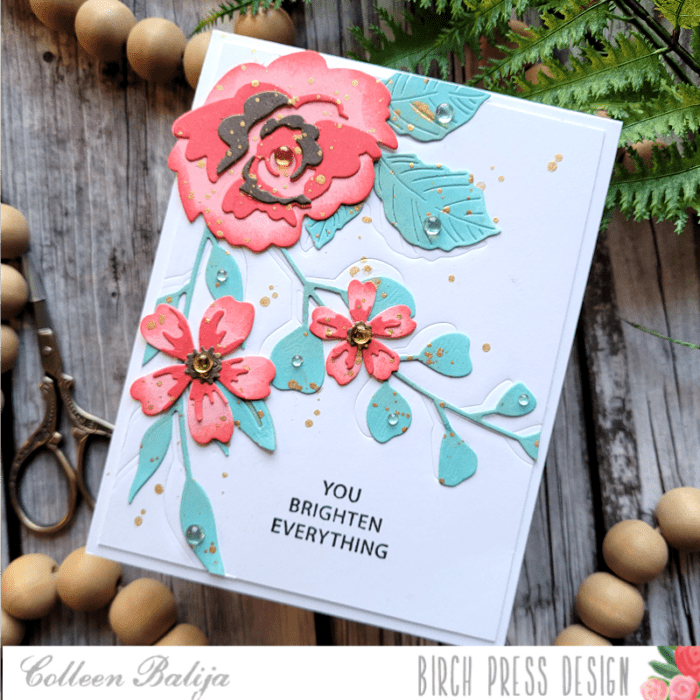
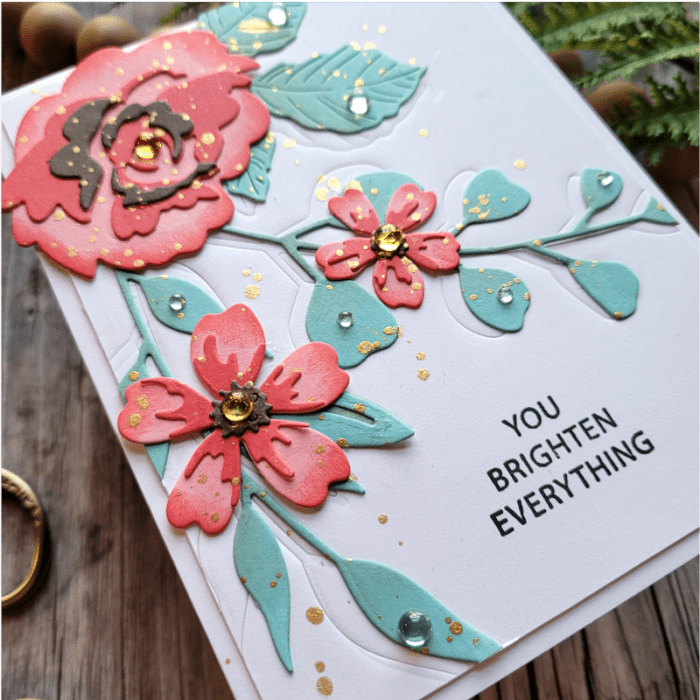
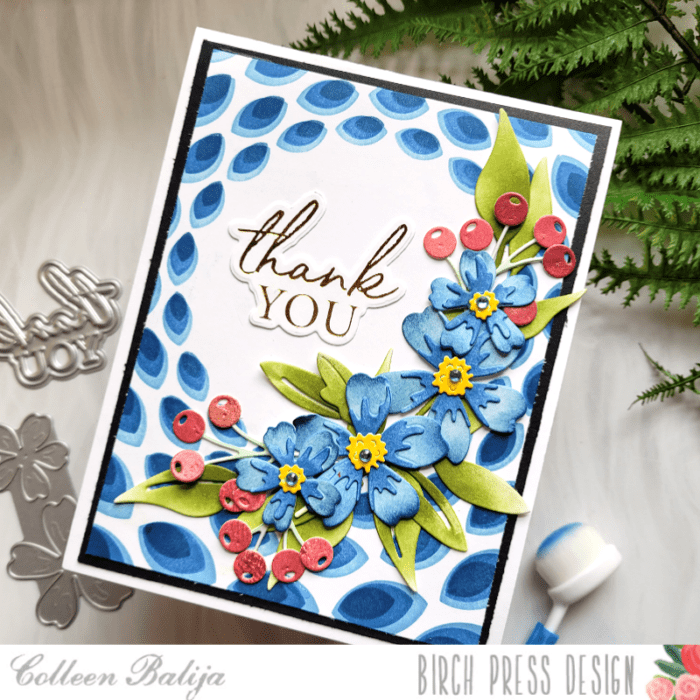
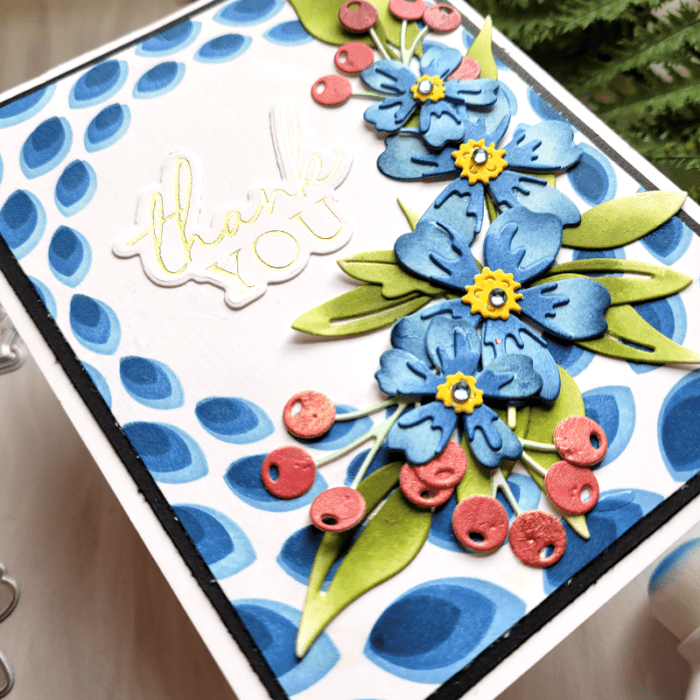
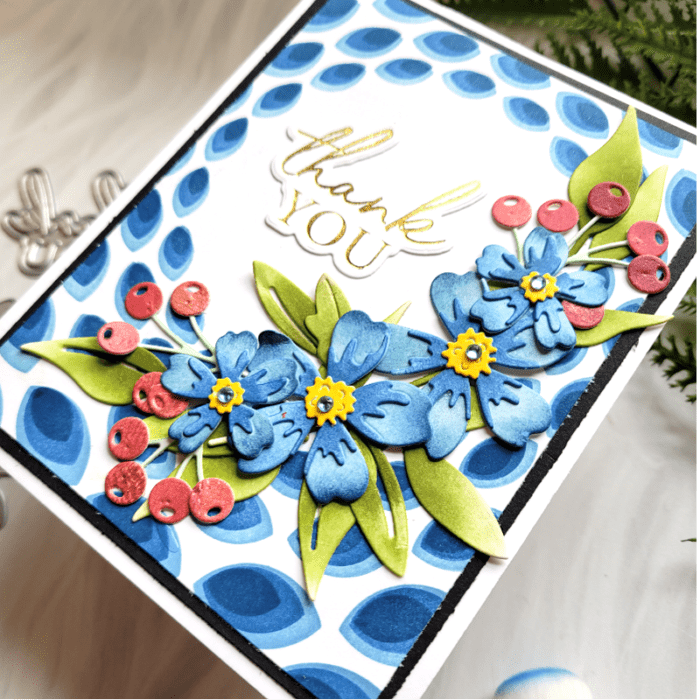
Hi friends! Today I want to share a card that reminds me of my Mom’s Blue Willow dishes! I loved those dishes, and I’ve been seeing this color frequently and just fell in love with it all over again! Let me show you how I achieved the look!
Since I already had my color palette chosen, I picked my design elements for the card. I’m using Sylvan Berries & Leaves, Mixed Berry Contour, Phlox Blooms & Leaves, Thank You hot foil plate, and Gilded Petal Point stencil (which also comes with the hot foil plate). All the links to the products here will be at the end of my post for you!
First step was to create my background to look like Blue Willow dishes (if you don’t know what these are, go look them up and you’ll love them!) Using the Gilded Petal Point 3-layer stencil and inks in light, medium, and dark blue, I ink blended my background onto white cardstock. Then I trimmed the card panel and placed it over a slightly larger black card panel. Both layers went onto a 5.5×4.25 white card base. Already I’m in love with these colors and designs!
Next up, the flowers!
I die cut the Phlox onto white cardstock and ink blended them using the same inks as I did on the background. You can see in the photo above how I played with the variation of light to dark with my ink blending. Don’t be shy about adding contrast of color to them! It adds so much detail and depth to your flowers!
I wanted just a pop of a different color to add some variety, so I die cut the berries using a colored card panel that I had on hand in shades of red. For the leaves, I ink blended in shades of green in a similar way that I did with the Phlox. Then I adhered all the layers together. Birch Press Design layered flowers are really easy to put together!
Now I was ready to place everything onto the card base! Before adhering everything down, I staged the foliage where I wanted them around the hot foil Thank You sentiment. Then I slowly glued everything into place using liquid glue. Liquid glue gives you a little more time to get the exact placement before it dries, so I always use it with my flowers. I finished with a few sequins from Memory Box over the flowers and the Thank You sentiment.
Blue is such a fun and bold color to use on cards, and the color can be used from Sympathy to Happy Birthday greetings! Thanks for stopping by!
Supplies
57503 Sylvan Berries and Leaves Contour Layers
57527 Mixed Berry Contour Layers
57507 Phlox Blooms and Leaves Contour Layers
42037 Gilded Petalpoint Stencil Set
BPF511 Thank You Noted Script Hot Foil Plate and Die Set
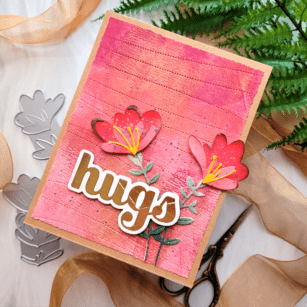
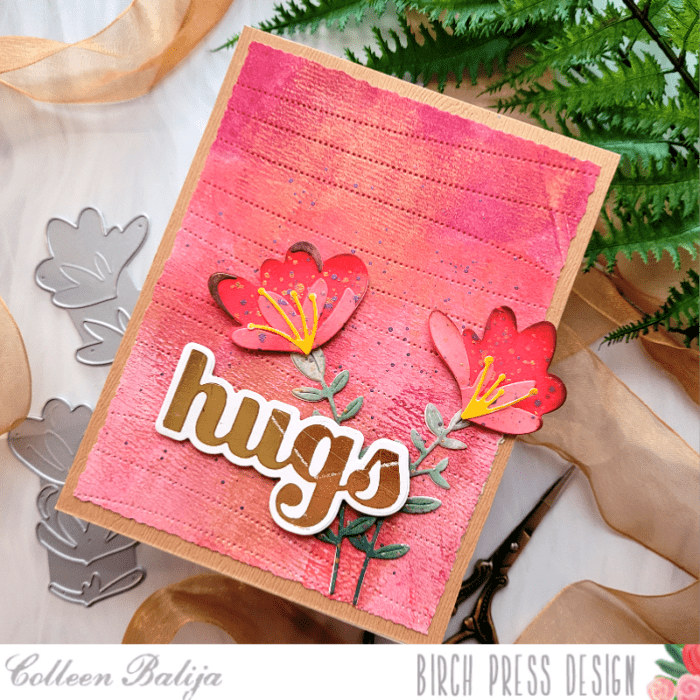
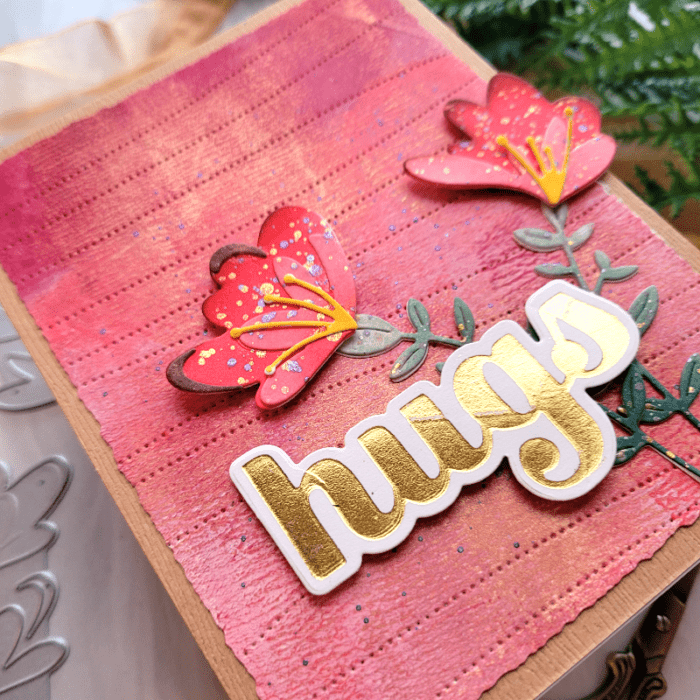
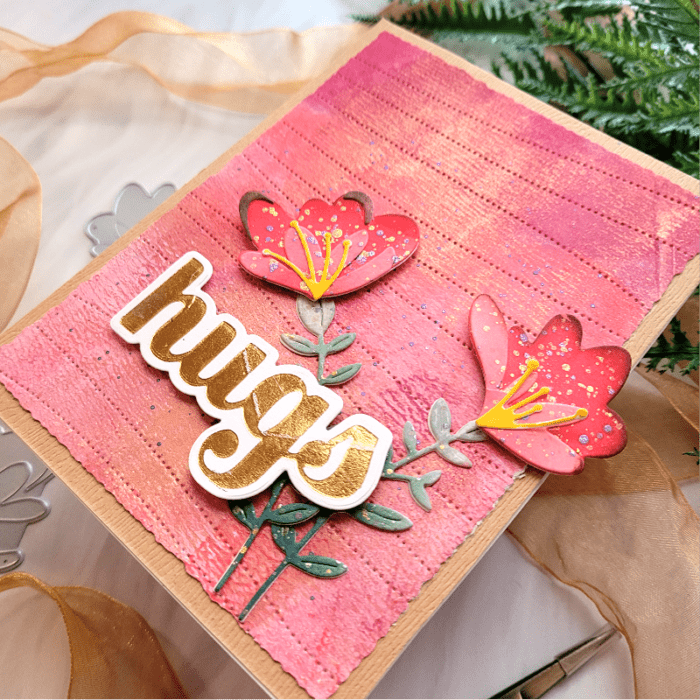
Hi friends! With spring in full swing, I want to share a colorful and simple floral card to celebrate the bounty of beautiful color that’s about to descend upon us! I can’t wait!
I will be using Jovial Blooms & Leaves, Pinpoint Contour Plate, and the Hugs Sugar Script die. Oh yes, and LOTS of bold color! All the supply links will be provided to you below at the end of my post.
First step for me is always to choose the colors for my card. Choosing the colors helps my creative process! I had a gelli plate card panel set aside that was in shades of coral, pink, and gold, so I decided to use that color palette and build my card from there. I took the colored card panel and die cut it with the Pinpoint Contour Plate to add texture and interest to the background. Then I trimmed it down using my deckled paper trimmer and placed it over kraft cardstock. Background finished! Now it was time to focus on the flowers and sentiment!
I decided to go with a monochromatic look, meaning that the flowers would be the same color as my background. I die cut Jovial Blooms & Leaves onto white cardstock, and then ink blended each layer in shades of coral and the leaves in shades of green. I created an ombre effect by going from lighter to darker with my ink blending tool. I added brown ink to the tips of the flowers to help them stand out from the background color. Then I adhered the layers together and finished with gold and purple splatter using metallic paint, a paintbrush, and water. The splatter adds another level of detail and interest to the flowers. I added splatters to the background as well for a cohesive look. You can see the detailed ink blending and splatters in the photo below! These little extra details can take your flowers from average to outstanding!
Once the flowers were dry, I placed them over the background card panel where I wanted them, and then adhered everything down. I finished with a Hugs Sugar Script die that was hot foiled with gold. The sentiment and flowers were popped up using foam tape. And the gold from the sentiment brought balance to the gold in the background and in the flowers! Can you see what I mean in the photo below?
You could use any color palette to create a similar monochromatic look to your card. Just remember to add those little details to your flowers to help them stand out from the background! Thanks for stopping by!
Supplies
57502 Jovial Blooms and Leaves Contour Layers
57511 Pinpoint Contour Plate
BPF513 Hugs Sugar Script Hot Foil Plate and Die Set
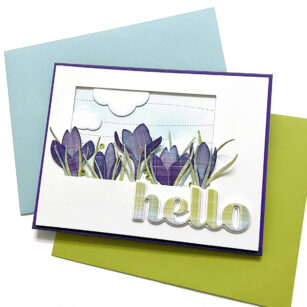
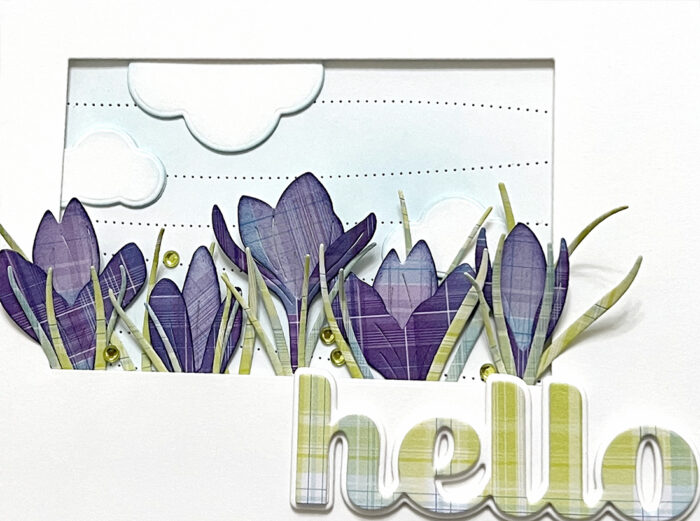
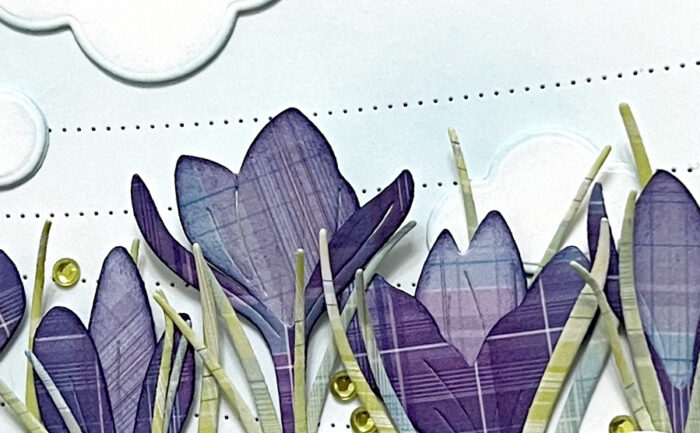
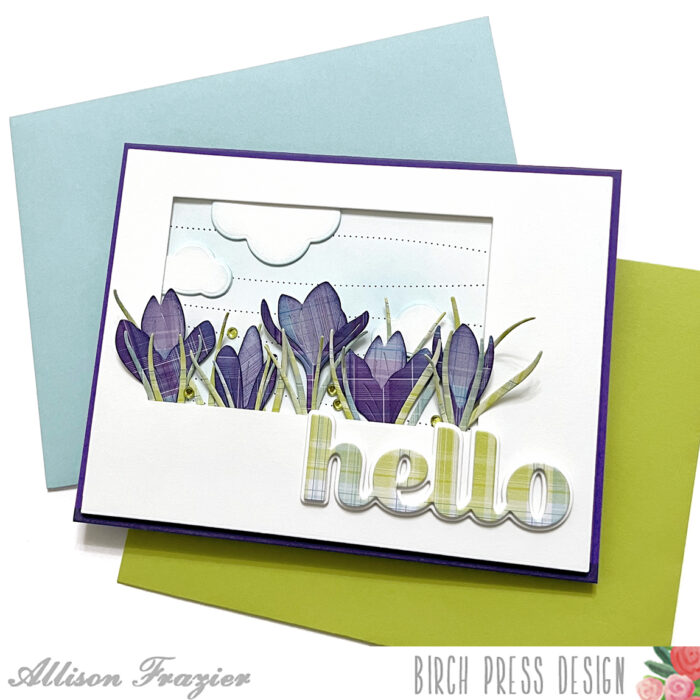
Hello, Birch Press friends! Today, I am sharing a card featuring the new Sprouting Crocus Contour Layers set. But, I did something unconventional. I used patterned paper for all of my die cuts! It’s a really fun way to add texture and color variation.
I started by cutting my flowers. I used the Madras Plaid Blue and Violet paper pad from Memory Box, which I believe is now retired. I chose a darker plaid pattern for the layers that go in front and a lighter pattern for the layers in back. I blended all the edges of each layer with a dark purple ink. I adhered all of the layers of my flowers together with glue.
I then took a similar pad of paper, the Madras Plaid Coral and Green pad, and I cut the stems from two different green plaid patterns. I only adhered one stem to each of my flowers, but I kept some extra ones to fill in later.
After completing my flowers, it was time to set the scene. First, I took a panel of white card stock and cut it with the Pinpoint Contour Plate. I blended some light blue ink onto the panel. I then used a rectangle die to cut an opening into a second panel of white card stock, slightly offsetting it into the upper left corner. I added foam tape to the back of this panel and attached it to the ink blended panel. Before attaching them together, I made sure that I had cut them both down to be slightly smaller than an A2 card base.
I cut a few clouds from white card stock using dies from the Rainbow Days Lingo Notes set. I inked up the edges of the clouds with light blue ink, and then I added them to the sky background. I tucked two of them under the edges of the framed opening. I then took my five flowers and tucked those into the bottom edges of the frame. I had left enough room between the edge of the framed opening and my foam tape so that I could achieve this look for the clouds and flowers. I used the extra stems/leaves that I had cut and filled in some of the gaps. I adhered this card panel to a dark purple A2 card base.
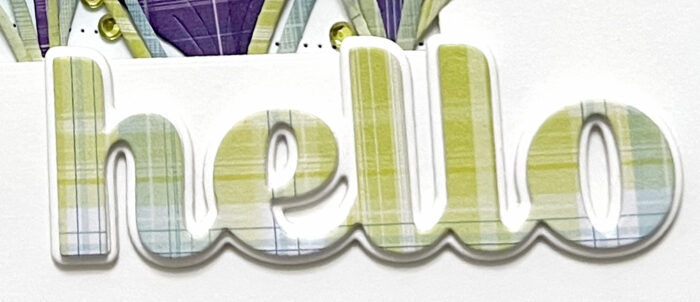
I used some more of the green plaid paper to cut the main layer of the Big Hello Sugar Script Die. I adhered this to two layers that I had cut from plain white card stock. I then adhered that stack to the shadow layer, which I also made from three layers of white card stock. I adhered that to the card, and then I finished everything off with a few green fairy jewels.
Thank you so much for joining us today. I hope this card inspires you and brings a smile to your face!
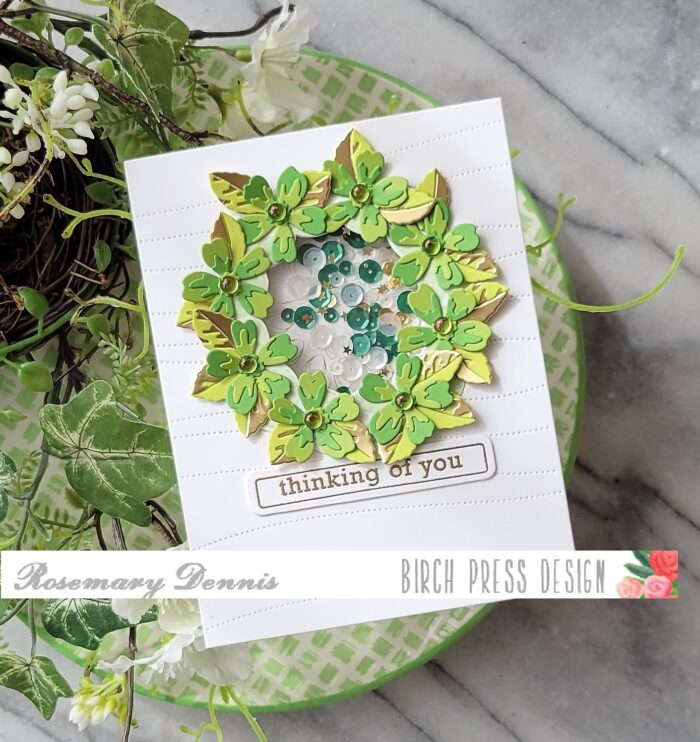
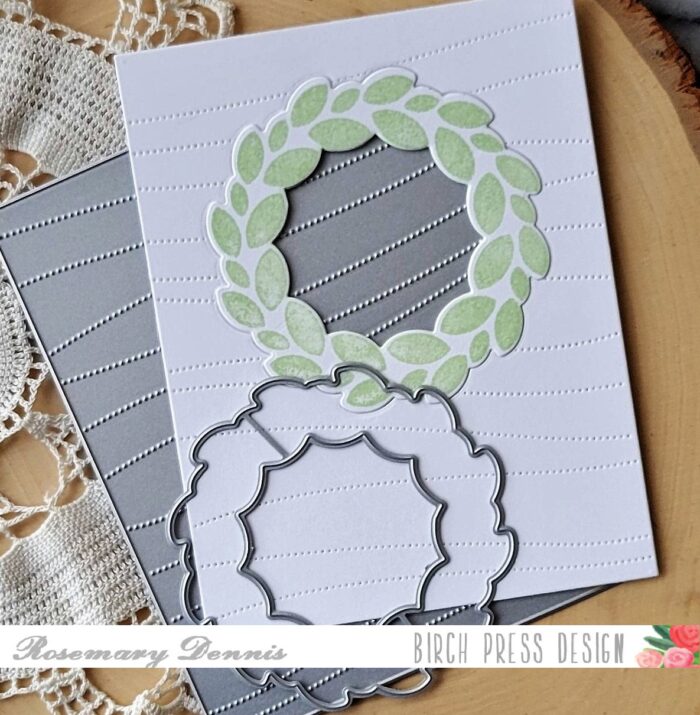
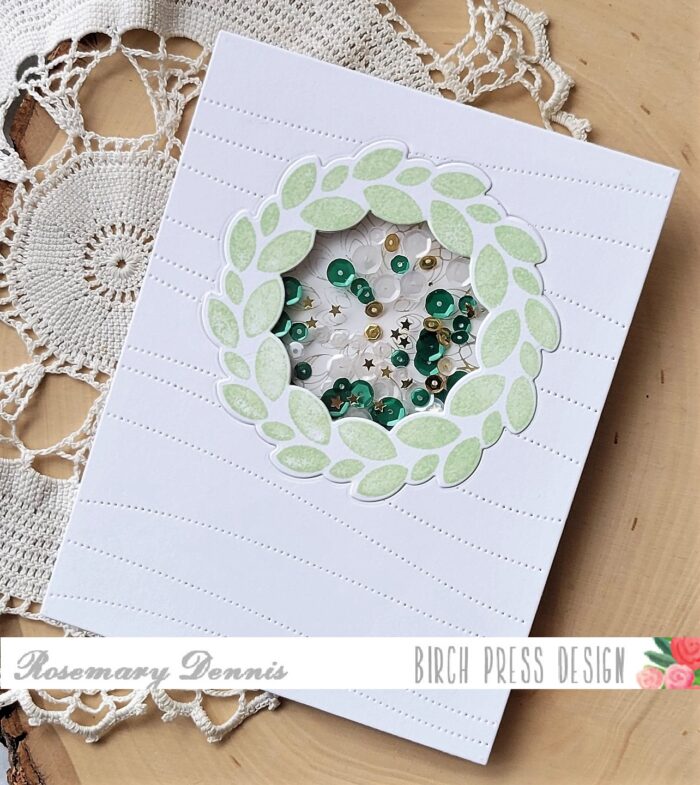
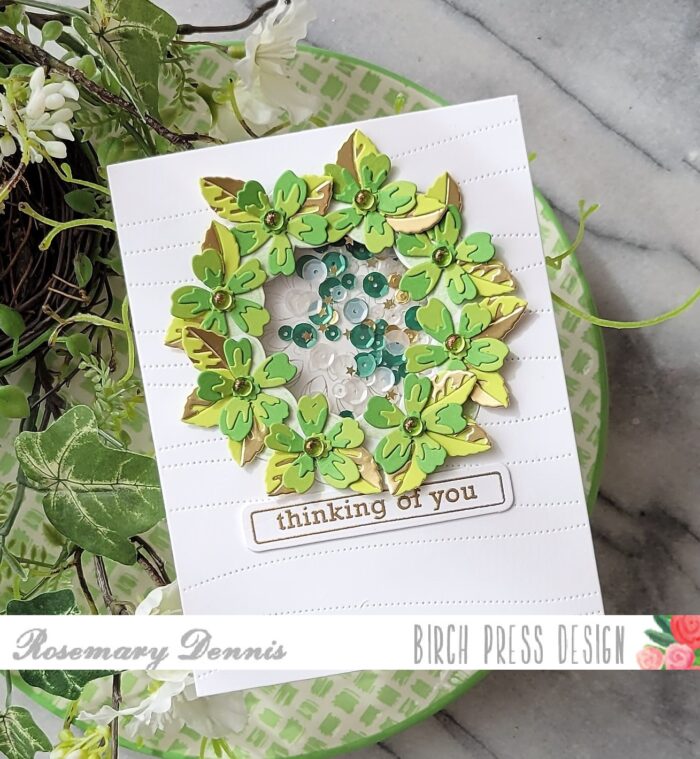
Hello everyone! St. Patrick’s day is tomorrow and with that in mind I decided to create a wreath using the new Phlox Blooms and Leaves Contour Layers dies in multiple shades of green with some gold thrown in for good measure! As I began to create my card I decided that I also wanted to provide some interest in the background so I die cut my cardstock with the Pinpoint Contour plate die. I also knew that I wanted to have a shaker element in card so to create that I used the Classic Sentimental Wreath stamp and die set for that element.
I die cut the panel with the Pinpoint Contour die and then positioned the wreath die from the Classic Sentimental Wreath stamp and die set in the top center of the panel and die cut the wreath. I then added low tack tape to the back of the panel to keep the wreath in place. As you can see, I then stamped the solid wreath image in a light green ink, die cut it and then layered it on top to form the base for my wreath. I then started building the shaker element.
I had previously foiled the center medallion from the Gilded Petalpoint hot foil plate in gold so I decided to use that as my backer behind the opening. I added a piece of acetate to the back of the panel and then added foam strips to the back to create the well for the sequin mix. I added the mix and because I’m a little particular about how my sequins look I did actually flip the majority of the sequins over so they are facing in the “right” direction, lol! You can just see the foiled medallion peeking out through the sequins. Then I die cut the smaller phlox flower die from two shades of green cardstock and layered everything alternating the colors. I did originally die cut the leaves from the set in another shade of green and mirror gold cardstock, but the ended up opting to us a smaller leaf from the Dainty Rose and Leaves Contour Layers dies.
Once all the flowers and leaves were layered and dry I set about creating the wreath. I alternated the flowers for interest and then tucked the leaves in where they best fit. I finished off the wreath with pretty green/gold crystals from the Christmas Fairy Crystals pack. Here in the close up you can see more of the foiled medallion in the background.
I finished off the card with the sentiment from the Contempo Greetings stamp and die set. I really like this stamp and die set. There are so many great sentiments and dies to cut them out! I stamped the sentiment in watermark ink, applied gold embossing powder, heat set and then die cut. I thought about trying to place the sentiment on the wreath, but ultimately ended up tucking up underneath the wreath.
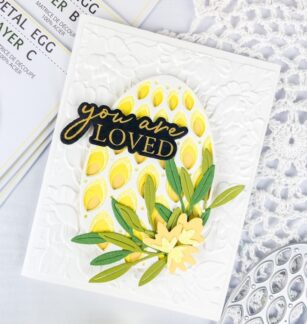
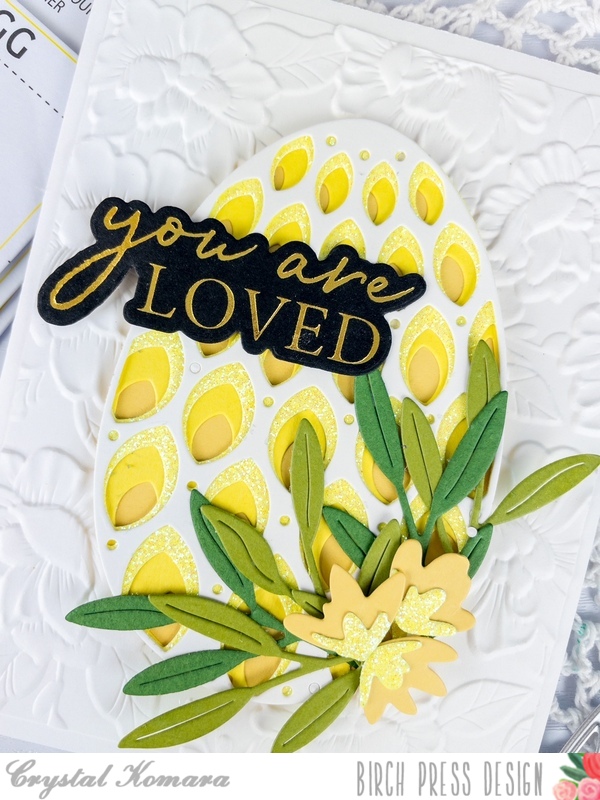
Hello readers and happy Tuesday! This is Design Team member Crystal Komara here with you today sharing a beautiful Easter card for the upcoming holiday using the Petal Egg Layer Set and a few other products from Birch Press Design.
Card details:
The base of this A2 sized card is made from Neenah Solar White Smooth cardstock. For the first 5 1/4″ x 4″ layer, I ran a piece of the same Neenah white cardstock through the Blooming 3D embossing folder by Memory Box Co (a sister company of Birch Press Design).
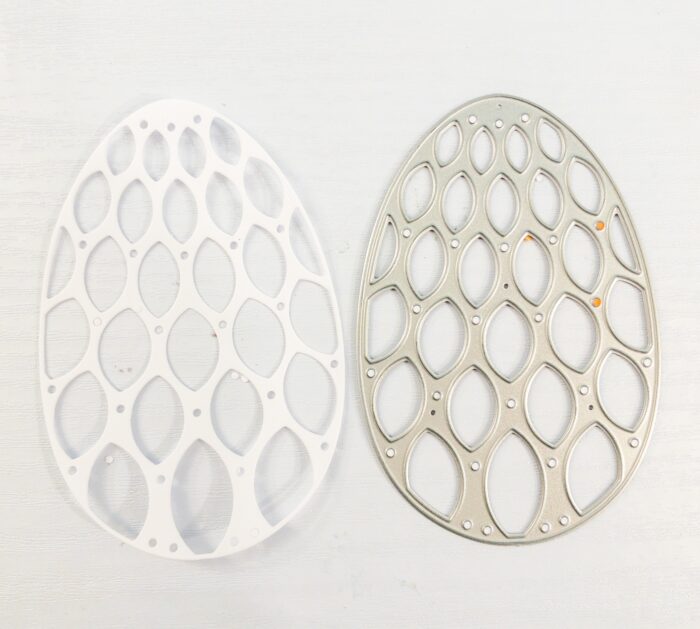
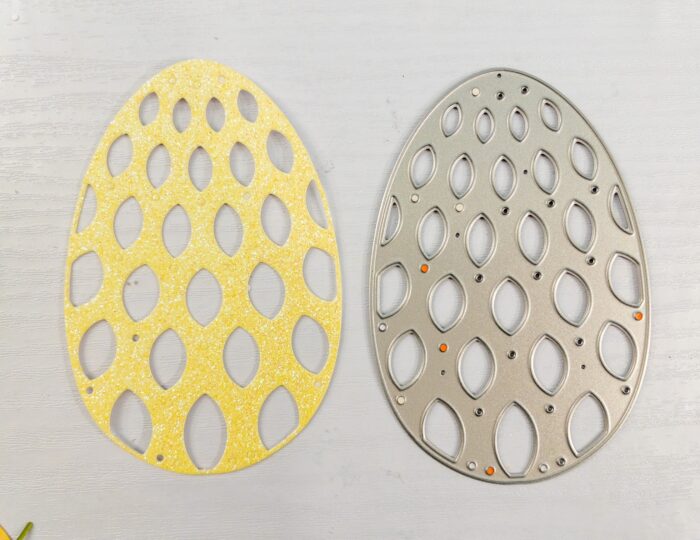
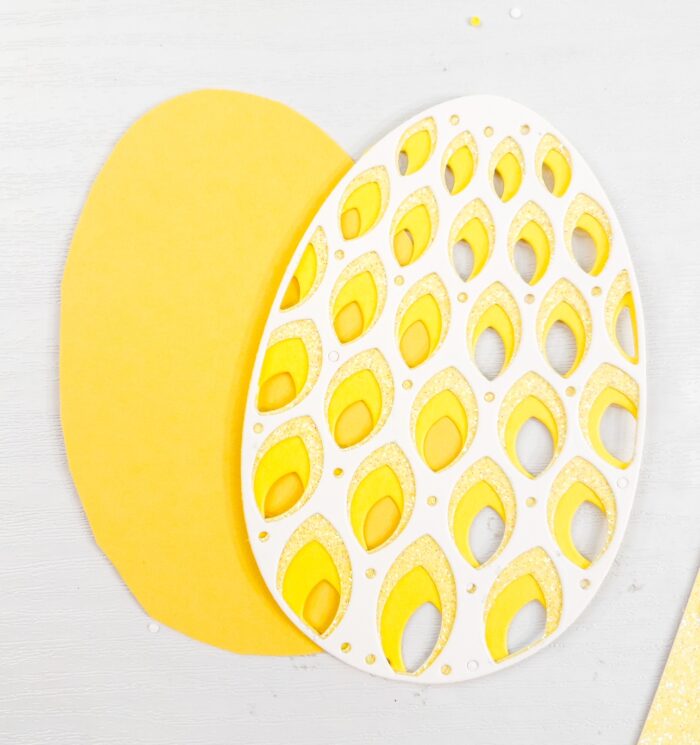
Layer A – the top layer was die cut from white cardstock.
Layer B – the middle layer was die cut from yellow glitter cardstock.
Layer C – the bottom layer was die cut from a darker yellow cardstock.
I fussy cut the base or bottom layer of the egg in yellow cardstock, so that it would help the egg standout against the white background.
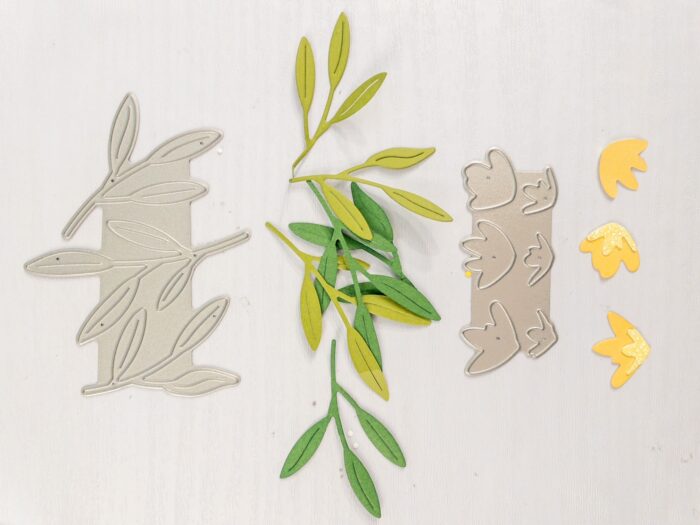
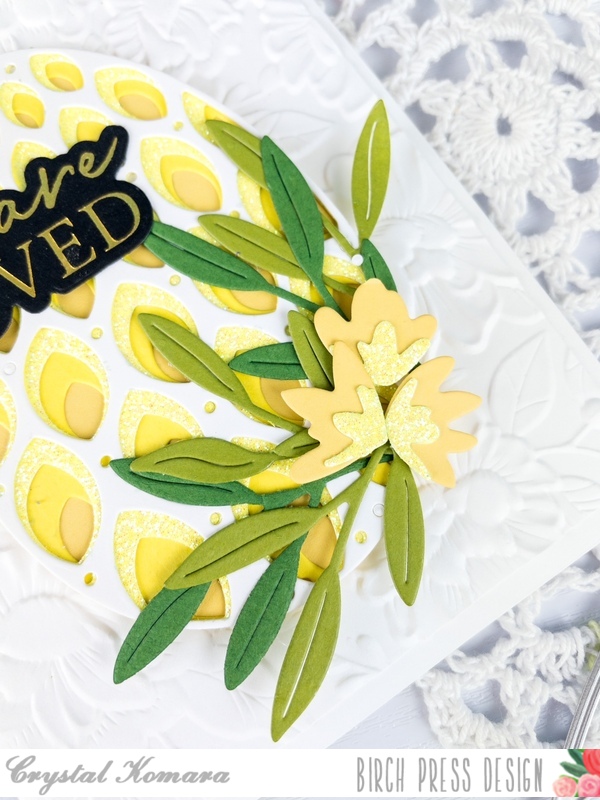
I adhered all four layers of the egg together using a fine-tip liquid glue. Once this was dried, I placed the egg in the center of the card. Then I used the Tiny Tuft Flowers and Leaves Contour dies. I cut the leaves from two different colored green cardstock and the flowers from both yellow cardstock and yellow glitter cardstock.
I adhered the leaves and flowers to the lower right side of the egg using a fine-tip liquid glue.
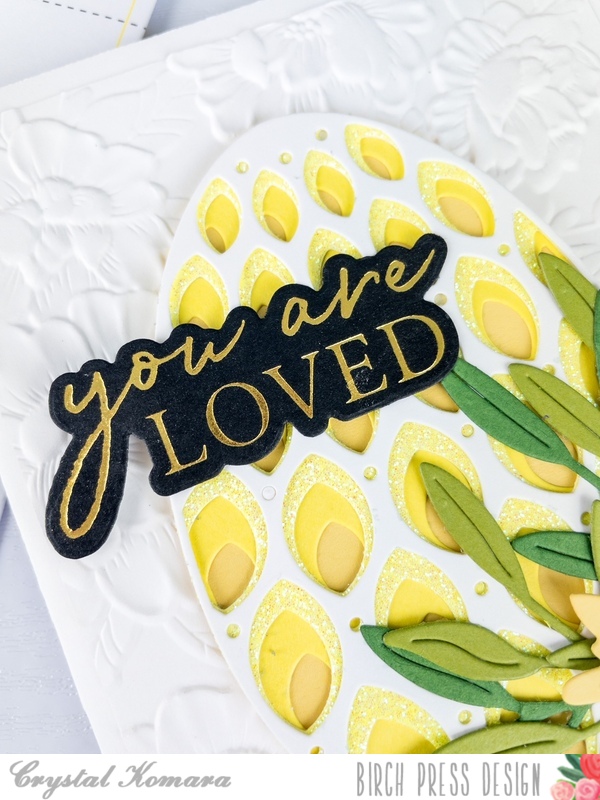
Using the You Are Loved Noted Script heat foil plate and die, I heat foiled the sentiment in gold foil on black cardstock. I used the coordinating die to die cut the sentiment out and adhered it over the egg using 3M foam adhesive for added dimension.
I hope you have enjoyed today’s card! Thank you for visiting and have a wonderfully creative day!
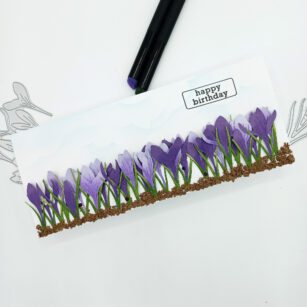
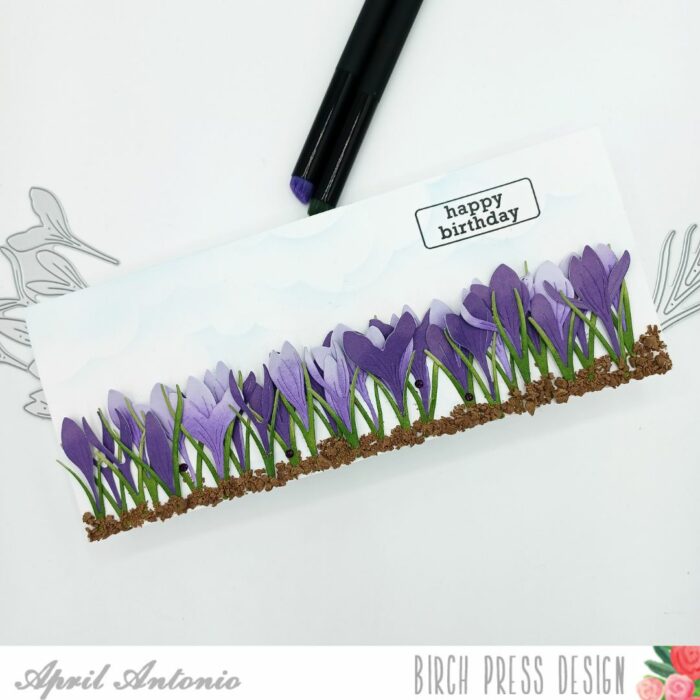
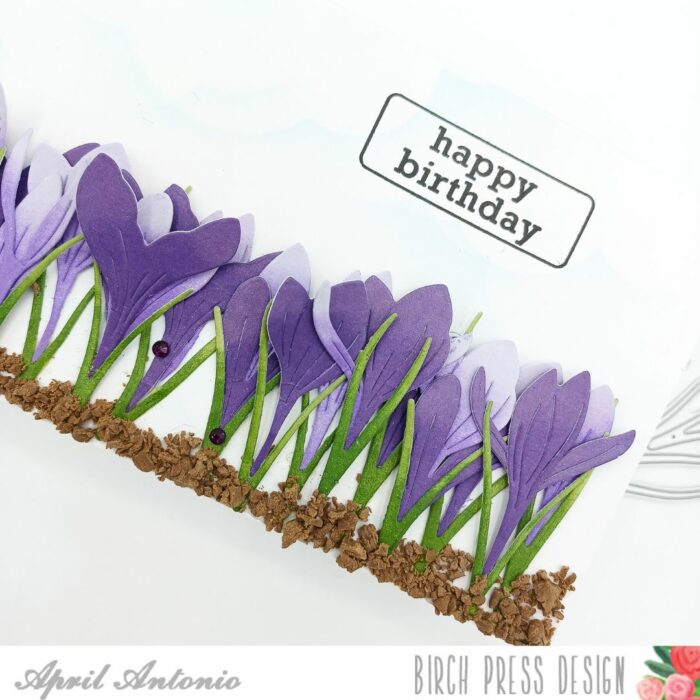
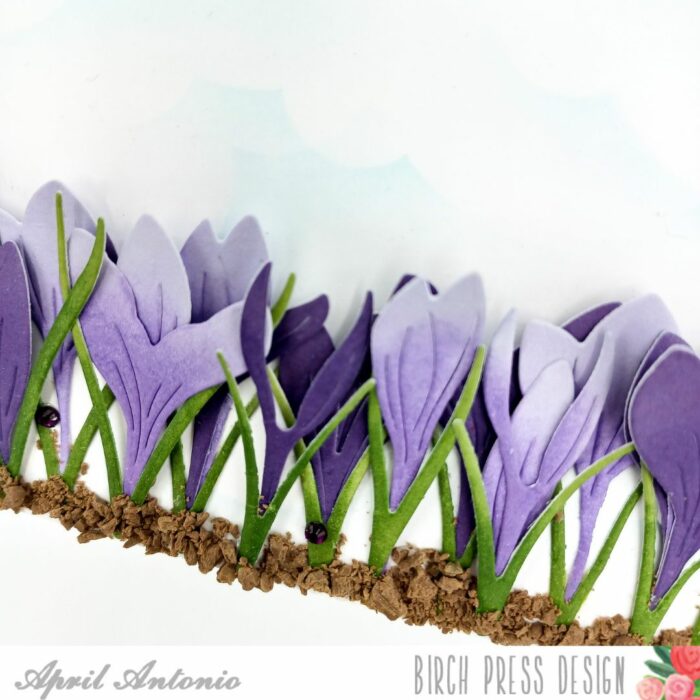
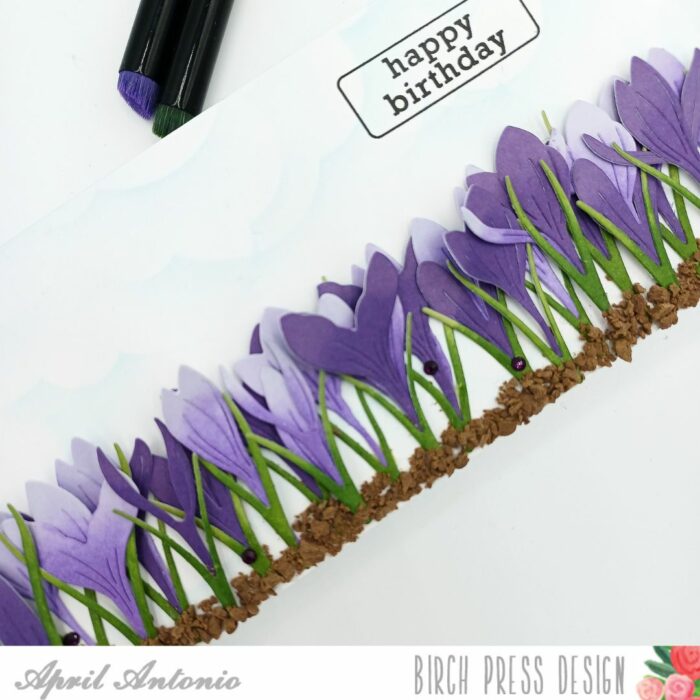
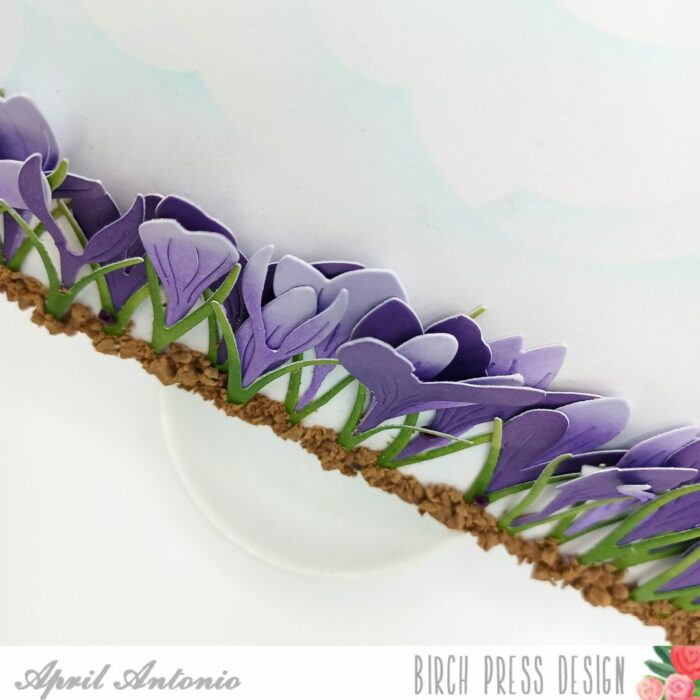
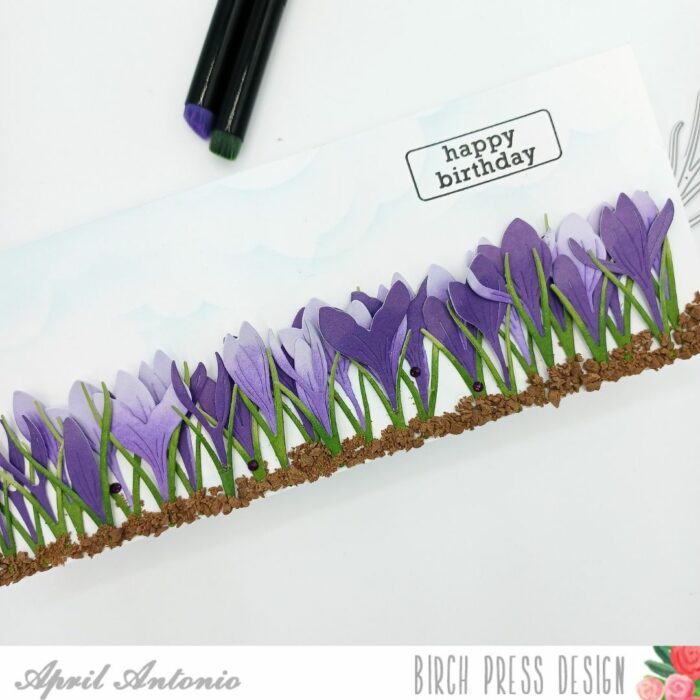
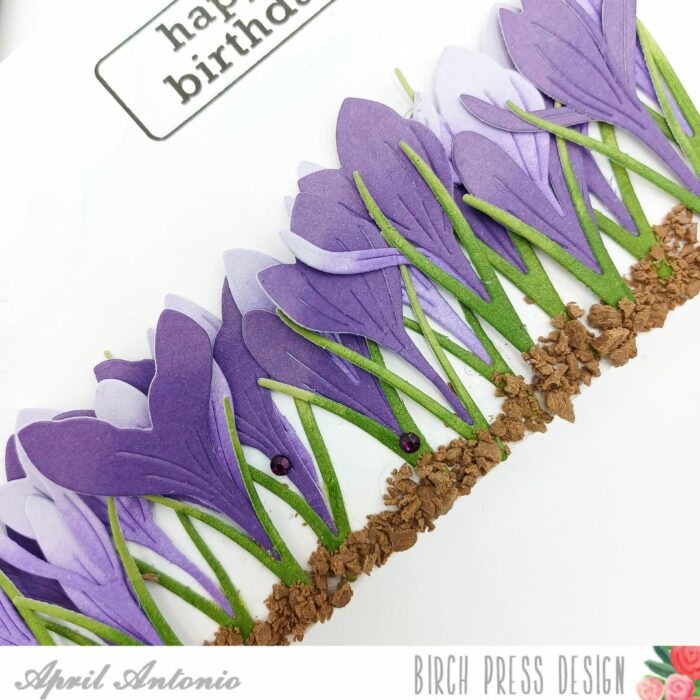
Happy Monday! I am happy to be back on the Birch Press blog today sharing a new project using the newly released Sprouting Crocus layering die set.
I began this card wanting to show a beautiful row of of the crocuses, and so started by die cutting the flowers and stems multiple times from white cardstock.
I used mini blender brushes and pigment ink in a couple of shades of purple and green to ink blend each piece. I started with the darker color towards the bottom, and then blended in the lighter color towards the top of the flower. I then assembled the flowers by gluing together the different sprouts, buds and stems.
To be able to show the longest line of flowers I chose a slimline card design, using a white colored base. I used a cloud stencil to lightly add some clouds to the background.
Assembly I assembled this card by adding one row of crocuses across the card. I then went back and added another row, filling in the blank spots to try and add some depth. I then went back a third time and filled in a few remaining spots to add even more depth.
Pro Tip: When gluing flowers, to give them more dimension, only glue part of the flower from the bottom moving up, and leave some of the top off the page. Once dry, go back and carefully curl out the flower petals so they ‘jump off the page’ and look more lifelike.
To create the look of ‘dirt’ I used some fake polymer clay ‘chocolate’ chunks I had on hand. They made perfect ‘dirt’ to cover the bottom of my flowers. I used liquid glue to add a layer, let it dry, then added some additional layers.
Lastly, I stamped the happy Birthday using the Contempo Greetings clear stamp set and added a few purple jewels from the Bright Jewels pack.
Hello Birch Press Friends, it is Natasha here and I am excited to be back on the blog today! Today’s card features 2 of the new die sets in the latest release from Birch Press Designs. I am using the beautiful Sprouting Crocus Contour Layers die set and the Thank you Noted Script hot foil plate and die set. So let’s get started!
I started today’s card by creating 2 backgrounds using sprays. One panel was made using shades of purple and the other panel was created using green spray inks. Once the panels were complete and dry, I die cut the Sprouting Crocus Contour Layers die set using both panels. The flowers in purple and the stems in green.
Next I added a bit more ink to each layer of the blooms and the leaves. On the flowers I used purple and pink ink. On the leaves I used green and brown. I applied the inks using a sponge dauber. Next I adhered the Crocus flower layers together using liquid glue. I then set these aside.
Next I chose a background from my stash. I ran the background through my die cutting machine with the Memory Box Ringadings 3D embossing folder. After one pass I removed the panel and added Distress Oxide in the shade Aged Mahogany to the raised areas of the folder. I added the ink directly to the embossing folder by gently swiping it onto the folder. I then lightly spritzed the folder with water and placed the card stock into the folder and ran it through my die cutting machine a 2nd time. I really like the texture this provides to the background.
I then trimmed the panel using my paper trimmer. I roughed up the edges and added ink using a sponge dauber and distress ink. I added splatters to the panel using gold and white metallic water color. To complete my card, I adhered the panel to an A2 card base with a piece of pattern paper to frame the embossed panel. I then adhered the crocus flowers using foam tape and liquid glue to my dry embossed panel. I completed the card with the beautiful Thank you Noted Script sentiment. I love this hot foil sentiment! I adhered the sentiment using foam tape.
Thank you so much for stopping by today! I will be back soon!